Streaming IoT sensor data from MQTT to Kafka
MQTT is an open standard and one I use a lot in my homelab. Day to day I work with Apache Kafka® and Confluent Cloud. So, when one of my customers asked:
How do we get sensor data into Confluent Cloud?
It gave me the perfect excuse to take a detailed look at how exactly I'd do this.
My MQTT-powered homelab
I've been running Eclipse Mosquitto MQTT broker in my homelab to manage devices for many years. I use Zigbee2MQTT with Home Assistant, and by publishing messages to an MQTT topic, I can turn lights and power sockets on/off, start the vacuum cleaner, etc. Basically, I use MQTT as a bus to shunt data directly between devices, with Home Assistant taking the role of stream processor.
While I've had a few problems with networking and VMs, the Eclipse Mosquitto MQTT broker itself has been rock solid. When something does break, I don't need to look at Prometheus because the smart lights stop working - literally!
Recently, I've started collecting more environmental data around the home with a DIY formaldehyde sensor I built from a Raspberry Pi - formpie.
The sensor sits in a small 3D printed enclosure I can pick up and move.
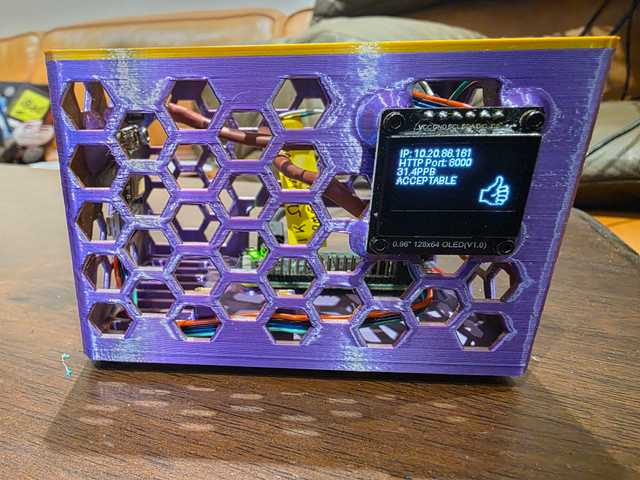
The formpie uses Python to publish JSON data to MQTT over WiFi which is then processed by Home Assistant to graph formaldehyde levels.
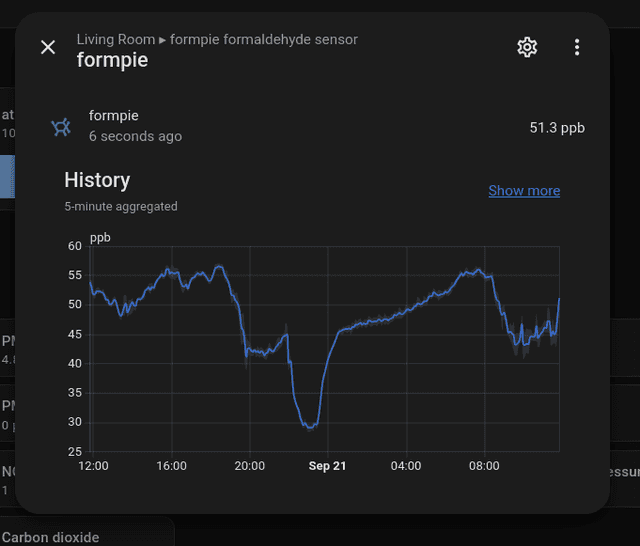
In the past, I've tried hooking up Home Assistant directly to Confluent Cloud (Apache Kafka) as a way to ETL data into another system. This worked, but there were a lot of moving parts and a dependency on Home Assistant.
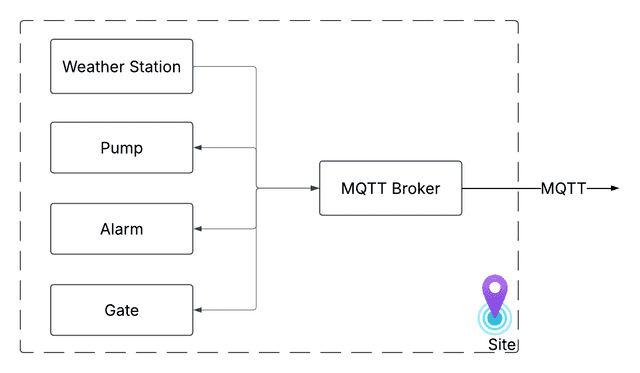
If I diagram my homelab and replace my lights and vacuum cleaner with pumps, gates and alarms (I already have the weather station), then my homelab architecture starts to look a lot less like a toy and more like an industrial deployment that you might find at a farm or a mine.
The research project
Going back to my customer's question, the research goal was simple: load data from real sensors into Apache Kafka on Confluent Cloud in a few different ways to see what works and what doesn't. Once data is loaded into Confluent Cloud, it can be transformed and pushed into other systems for reporting, as well as being used to perhaps drive other operational applications.
Note: In this blog post I demonstrate getting MQTT data to Confluent Cloud, but the same principles should apply to any other Kafka deployment too.
Getting the MQTT data from the local site
So, what were my options for getting the data from MQTT to Kafka?
Of course, my first instinct was to reach for a Connector. Specifically, the Confluent MQTT Source Connector could connect directly to my Eclipse Mosquitto broker, but this would mean opening up the LAN somehow with port forwarding, VPN, etc - I'm not doing this.
With a 'pull' route already discounted, I looked at 'push' options. I needed a way to get MQTT data from the homelab into the cloud somehow, as this would make it much easier for both connectors to reach the MQTT broker; and the MQTT broker to reach Confluent Cloud.
Moving the MQTT broker to the cloud removes one of its key benefits of running locally: devices need to be able to reliably coordinate between themselves, without depending on a cloud server somewhere or vagaries in network performance. At home, a blip in connectivity is annoying and the smart light doesn't switch on; in an industrial setting that same incident can manifest as missed livestock movements or flooded crops.
Fortunately, MQTT has an easy answer to this problem: MQTT Bridging
MQTT Bridging
MQTT Bridging lets us connect two MQTT brokers together and selectively replicate data between them. For my homelab sensor data, this means I can pick and choose the data I want to send to another MQTT broker running in the cloud.
Bridging is typically a push operation which means the networking problems are essentially solved. It also brings a range of other benefits:
- Traffic flow is outbound, so no port forwarding is needed on the home router
- VPN or similar can be set up to access a private cloud MQTT broker if needed
- We can choose the topics to include/exclude from bridging
- Topics can be renamed at either side of the bridge, e.g. to prefix topics in the cloud MQTT broker with the site name
- Once MQTT data is available in the cloud, private networking to Confluent Cloud becomes much simpler
MQTT Bridging is built-in to Eclipse Mosquitto. So I should be able to bridge to an MQTT broker in the cloud and then onwards to Confluent Cloud somehow.
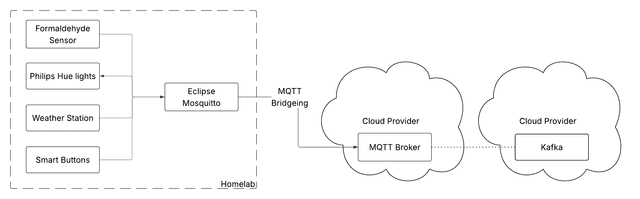
With additional engineering to figure out broker capacity, topology and partition, the tiered MQTT architecture created by bridging gives us an architecture that could scale across a country if we wanted it to, by connecting more sites to the cloud MQTT broker.
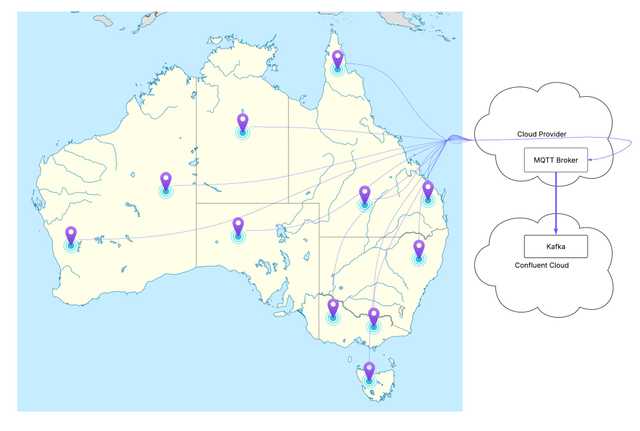 Map: Australia location map.svg by NordNordWest, licensed under CC BY-SA 3.0, modified, via Wikimedia Commons
The MQTT broker at each site means there's a local control channel that always works. Sites push their data to a central MQTT broker in the cloud and the next hop is Confluent Cloud.
I will set up MQTT bridging with Pro Mosquitto, later in this post.
MQTT technology lab
I can drop any MQTT compatible software I like into the architecture diagrams above. With this in mind, I came up with a shortlist of different MQTT technologies I wanted to try out:
- Pro Mosquitto
- Confluent MQTT Source Connector
- HiveMQ
- Zilla Kafka Gateway
- AWS IoT Core
- Kepware
I used Amazon Lightsail to give me a VM to run the self-hosted components. This gave me a full Linux environment with a text editor with no need to set up things like VPCs, subnets, and security groups.
For a Kafka broker, I used Confluent Cloud. The architectures I tested would also work with Confluent Platform or Apache Kafka.
End-to-End sensor data pipeline with Pro Mosquitto
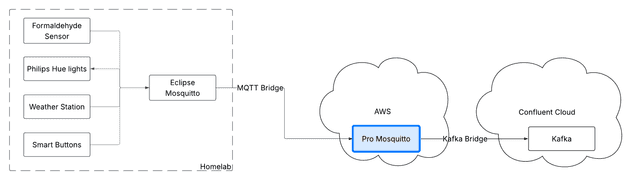
Pushing data directly into Kafka from an MQTT broker gives us a simple network design that's aware of MQTT semantics (QoS, retained messages, etc).
To do this with Mosquitto, we need the Pro version which includes the Kafka Bridge. Pro Mosquitto is closed source, commercial software with free trial available.
Cedalo, the makers of Pro Mosquitto, also offer a SaaS Cloud Platform Cedalo Cloud for those who prefer a fully managed MQTT solution. At the time of writing, it doesn't support self-service private networking and Kafka set up, but this is something to keep an eye on in the future.
Trying out Pro Mosquitto first was a no-brainer since I'm already running Eclipse Mosquitto in the homelab so let's jump in.
Download and set up
After registering for a free trial, you can access the Download Area and download an archive with a container environment configured for your free trial. This needs to be uploaded to your cloud VM and extracted. Follow the manual to configure and start the server. Once started, the container engine will then download the software itself, which is shipped as container images from registry.cedalo.com.
Once started, I had an MQTT broker running in AWS that could be accessed externally by configuring the Lightsail firewall rules. I did not set up TLS for my broker to keep the lab simple - the data is not confidential and setting up TLS in Pro Mosquitto is very similar to Eclipse Mosquitto, which I've already done in my homelab. Of course, in a production deployment, TLS is basically mandatory.
Pro Mosquitto configures users differently to Eclipse Mosquitto, with a mechanism called Dynamic Security which persists users into dynamic-security.json.
Interestingly, the out-of-the-box admin user cannot read or write topics at all. It's necessary to create a new user to actually use the server. The recommended way to do this is with the mosquitto_ctrl command rather than editing the JSON directly. I created myself a superuser called pubuser and bound ACLs to read/write any topic (#) with the following commands:
# The password for **your** admin user, from mosquitto/mosquitto_client_info.txt
ADMIN_PASS="REPLACE_ME"

# create a role called `publisher`
mosquitto_ctrl -u admin -P $ADMIN_PASS dynsec createRole publisher

# allow `publisher` to publish to any topic
mosquitto_ctrl -u admin -P $ADMIN_PASS dynsec addRoleACL publisher publishClientSend '#' allow

# create the `pubuser` user (will prompt for password)
mosquitto_ctrl -u admin -P $ADMIN_PASS dynsec createClient pubuser

# bind the publisher role to `pubuser`
mosquitto_ctrl -u admin -P $ADMIN_PASS dynsec addClientRole pubuser publisher

# allow subscribe any topic
mosquitto_ctrl -u admin -P $ADMIN_PASS dynsec addRoleACL publisher subscribePattern '#' allow

# allow read any topic
mosquitto_ctrl -u admin -P $ADMIN_PASS dynsec addRoleACL publisher publishClientReceive '#' allow
Check access
exec'ing into the Pro Mosquitto container, I can use mosquitto_pub and mosquitto_sub to prove that I can send and receive messages with the user I created.
In one terminal, I subscribed to testtopic:
mosquitto_sub -h localhost -p 1883 -u pubuser -P $PASSWORD -t testtopicThen in another, I published a test message:
mosquitto_pub -h localhost -p 1883 -u pubuser -P $PASSWORD -t testtopic -m "Hellorld"If everything is working, mosquitto_pub will return immediately and mosquitto_sub will print the message that was sent.
The lesson here is to use these tools to validate connectivity at each hop of the MQTT pipeline.
MQTT bridge
The homelab Eclipse Mosquitto broker can be configured to send data to another MQTT server with just a few lines of configuration:
connection mqtt-bridge-mosquitto-pro
address x.x.x.x:1883
cleansession true
topic formpie/# out 0 "" fedmqtt/homeoffice/
remote_username pubuser
remote_password REPLACE_ME
The main reference for setting up MQTT bridging is the online man page for mosquitto.conf
Most of the settings in this little fragment are self-explanatory:
- Name the bridge mqtt-bridge-mosquitto-pro
- Set the broker endpoint, username, password, and session settings
The topic line configures what data to bridge between brokers:
- My formaldehyde sensor publishes to a topic hierarchy under formpie, so I chose to bridge only this topic structure to the remote MQTT server with the expression: formpie/# - # is a wildcard matching the remaining topic levels
- Data is sent in the out direction
- QoS 0 - fire and forget
- No local prefixing since our traffic is one way
- Remote prefix fedmqtt/homeoffice/
This has some nice features:
- I am sending only the sensor data I'm interested in
- All other topic data never leaves my network
- I added a site prefix homeoffice to the remote topic
- If I had more than one site, setting a different remote prefix lets me identify where data is being sent from
You could also request 1:1 outward bridging of all topics, like this:
topic # out 0Which is useful for troubleshooting. mosquitto_sub proved bridging works and data is arriving:
[ec2-user@ip-172-26-12-42 ~]$ mosquitto_sub -h localhost -p 1883 -u pubuser -P $PASSWORD -t 'fedmqtt/homeoffice/formpie/state'
{"timestamp": "2026-09-15T06:58:38+00:00", "temperature": 26.6, "humidity": 48.2, "formaldehyde_ppb": 43.0}
{"timestamp": "2026-09-15T06:58:48+00:00", "temperature": 26.6, "humidity": 48.2, "formaldehyde_ppb": 42.8}
{"timestamp": "2026-09-15T06:58:59+00:00", "temperature": 26.6, "humidity": 48.2, "formaldehyde_ppb": 42.8}
Confluent Cloud
The final step of the pipeline is setting up the Kafka bridge in the Pro Mosquitto server:
-
Enable the Kafka Bridge by uncommenting the Kafka bridge line in config/mosquitto.conf:
plugin /usr/lib/cedalo_kafka_bridge.so -
Create data/kafka-bridge.json to configure the connection to Confluent Cloud and topic mapping. Here's an example:
[
    {
        "name": "mosquittoPro",
        "connection": {
            "brokers": ["pkc-xxxxx.ap-southeast-2.aws.confluent.cloud:9092"],
            "clientId": "mosquitto-broker",
            "allowAutoTopicCreation": true,
            "queueSize": 10,
            "sasl": {
                "mechanism": "plain",
                "username": "CONFLUENT_API_KEY",
                "password": "CONFLUENT_API_SECRET"
            },
            "retryPublishMinDelay": 250,
            "retryPublishMaxDelay": 250,
            "ssl": true
        },
        "topicMappings": [
            {
                "name": "mosquitto-pro-data",
                "kafkaTopic": "mosquitto-pro-data",
                "mqttTopics": ["fedmqtt/#"]
            }
        ]
    }
]
NOTE: "ssl": true is vital, otherwise the connection to Confluent Cloud won't work. Also, allowAutoTopicCreation doesn't do anything on Confluent Cloud but is required configuration for the bridge.
After restarting the Pro Mosquitto broker and creating my output topic mosquitto-pro-data, the data started arriving in Confluent Cloud.
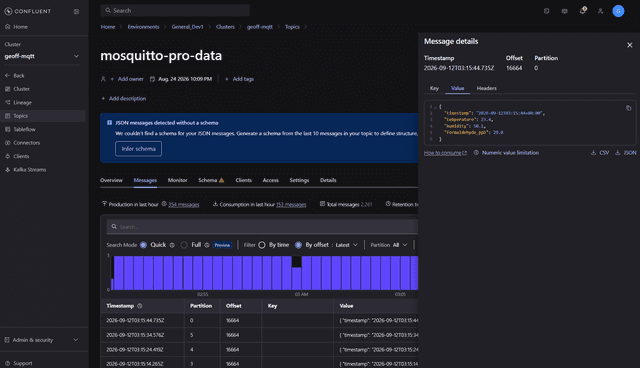
There are a couple of gotchas that would need addressing before rolling this out further:
-
No schemas - Common to all the platforms I looked at, the message value is just a string. This makes sense because MQTT has no built-in concept of schemas.
Schemas are important to have for building resilient systems, and Confluent Cloud offers the ability to create them based on sample messages. You can also use Flink to apply a fixed schema and validate messages coming through.
-
The MQTT source topic contained our site name but this is not available in Kafka - since I own the sensor software, I could easily insert it at the data level, either during sensor registration or as part of each payload (or again, with Flink).
Pro Mosquitto got the job of getting data into Confluent Cloud quickly and easily.
Confluent MQTT Source Connector
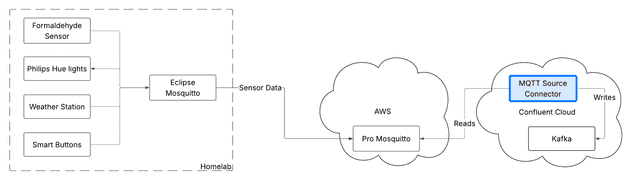
Another way to get MQTT data into Confluent Cloud is to pull it with the Confluent MQTT Source Connector.
As a reminder, I didn't want to open up my homelab to outside traffic (understandably), but setting up a secure path to my existing MQTT bridge from testing Pro Mosquitto was easy enough, and I was able to connect to it directly from Confluent Cloud.
My Connector JSON looks like this:
{
  "config": {
    "cloud.environment": "prod",
    "cloud.provider": "aws",
    "connector.class": "MqttSource",
    "kafka.api.key": "****************",
    "kafka.api.secret": "****************",
    "kafka.auth.mode": "KAFKA_API_KEY",
    "kafka.endpoint": "SASL_SSL://pkc-xxxxx.ap-southeast-2.aws.confluent.cloud:9092",
    "kafka.region": "ap-southeast-2",
    "kafka.topic": "mqttsourcetest",
    "mqtt.clean.session.enabled": "true",
    "mqtt.password": "****************",
    "mqtt.server.uri": "tcp://x.x.x.x:1883",
    "mqtt.topics": "fedmqtt/#",
    "mqtt.username": "****************",
    "name": "MqttSourceConnector_0",
    "tasks.max": "1"
  }
}
Interestingly, the MQTT Source connector extracts the full MQTT broker topic name and uses it as a message key:
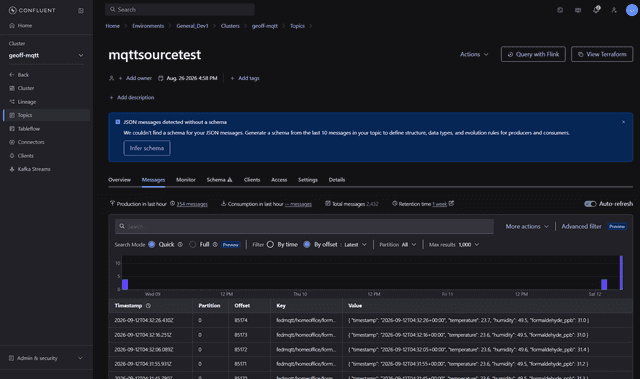
The connector documentation details some limitations to the connector relating to at least once delivery. Notably:
The topics are distributed across tasks. Confluent recommends you do not change the topic assignments–that is, do not alter the task count, or change the topic listing once the connector is up and running. This can potentially lead to data loss as the connector will be restarted with a different topic to task assignments, and hence, a different client ID.
This means a seemingly innocent connector adjustment has the chance to lose data, so plan your architecture, workloads and maintenance accordingly.
The Confluent MQTT source connector can be a good choice if you don't want to touch the MQTT broker and can tolerate gaps in your sensor data.
HiveMQ
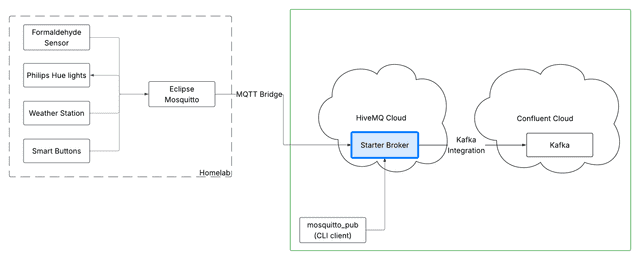
HiveMQ is another enterprise-grade MQTT broker that gets used all over the place. HiveMQ offers both on-prem (edge) and cloud/serverless solutions. I tested the cloud option.
The HiveMQ cloud product is quite polished and includes an AI agent, Bea, which was genuinely useful for answering specific HiveMQ questions.
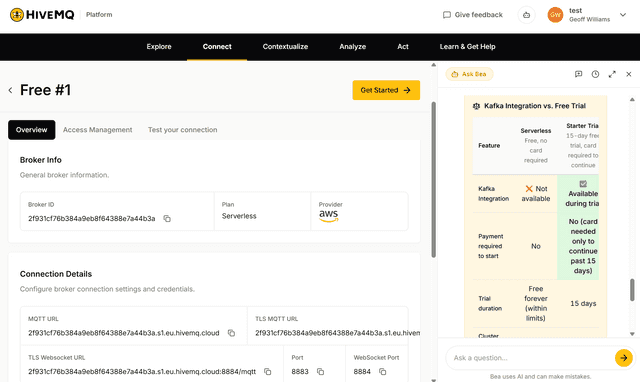
My HiveMQ testing was deliberately lighter than Pro Mosquitto. Since it's just MQTT, I knew I could send it data from my homelab if I wanted, so I tested it by building out the items in the green box in the diagram above.
To use the Kafka integration, I needed a Starter broker, not Serverless as it's not available on this plan.
Once the broker was running, Confluent Cloud/Kafka integration is set up right from the web UI by following the Confluent Cloud/Kafka integration instructions that HiveMQ provide.
The only gotcha I found was that the destination topic in Confluent Cloud must exist or I got the error cannot save configuration during set up.
Once the topic was created, I was able to publish a message from my laptop with mosquitto_pub and watch it arrive in a Kafka topic on Confluent Cloud:
mosquitto_pub -h geofftesth-xxxxxxxx.a01.euc1.aws.hivemq.cloud -p 8883 -u hivemq.client.xxxxxxxxxxxxx -P $PASSWORD -t test -m "Hellorld"Any MQTT client would work, but mosquitto_pub was already installed.
The mosquitto_pub test is good enough to prove that HiveMQ should work end-to-end if I reconfigured my homelab MQTT broker to use it.
Summary:
- There were no config files I needed to edit - it was all point and click, with the only wrinkle being the error when destination topics don't exist
- TLS is set up out-of-the box, albeit not with my own CA of course
- Data arrived in Confluent Cloud as-promised
- Really quite a nice SaaS offering
- On-prem version also available, but I didn't see a need to also test it
Aklivity Zilla Kafka Gateway
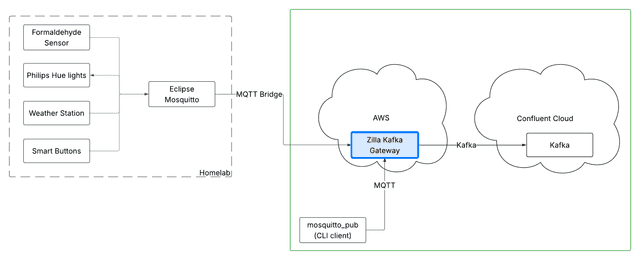
If you're thinking about MQTT as a means to an end for data collection and want to minimize your infrastructure build out, the approach from Aklivity with Zilla Kafka Gateway makes a lot of sense.
Architecturally, we replace the cloud MQTT Broker with a gateway - so we have something more akin to a smart proxy that's less like an MQTT broker but can still accept MQTT client connections.
The Zilla Kafka Gateway configuration file I created in the lab helps to clear up the distinction. It's all about routing events from North (MQTT Clients) to South (Confluent Cloud).
As well as the configuration file, I had to create the output topics in Confluent Cloud:
- mqtt-devices
- mqtt-messages
- mqtt-retained
- mqtt-sessions
I used mosquitto_pub to test the system within the green box in the diagram above. Since I didn't set up any MQTT authentication, the mosquitto_pub command is just:
mosquitto_pub -h localhost -p 7183 -t test -m "x"After sending a single message, the Zilla server crashed. I was able to get help with this through Aklivity Slack and this bug is fixed in Zilla 2.4.0.
I verified the fix works in my lab environment and confirmed multiple messages arrive in Confluent Cloud:
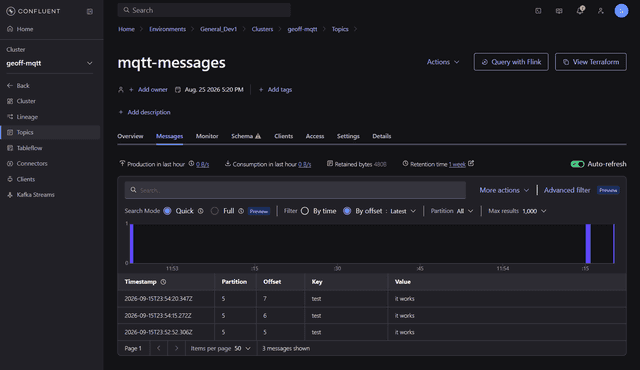
At this point I'd proved the gateway works, so I left the rest of the configuration as an exercise for the reader. The docs explain in more depth how to set up Kafka integration, security and topic mapping.
AWS IoT Core
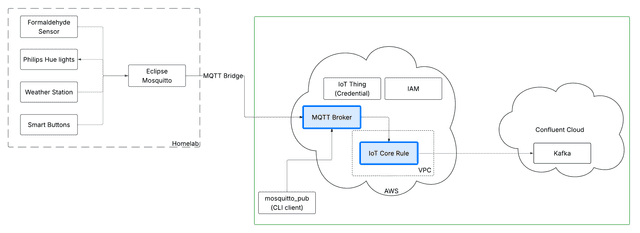
AWS IoT Core is a managed service for integrating IoT devices with AWS. It does present as an MQTT server and it can publish messages to Confluent Cloud just like Pro Mosquitto and HiveMQ, but it does this with its own distributed (and opinionated) architecture.
To test IoT Core, I built the architecture in the green box in the diagram above.
Authentication
For the TLS MQTT connection used here, you must use mTLS for authentication. Username and password are not supported by the default endpoint.
The AWS way to create an mTLS certificate for IoT Core is to Create a Thing. You have flexibility around how you do this: AWS Web Console, CLI, Terraform, etc. For simplicity, I used the console, which runs a workflow to walk through registration step-by-step.
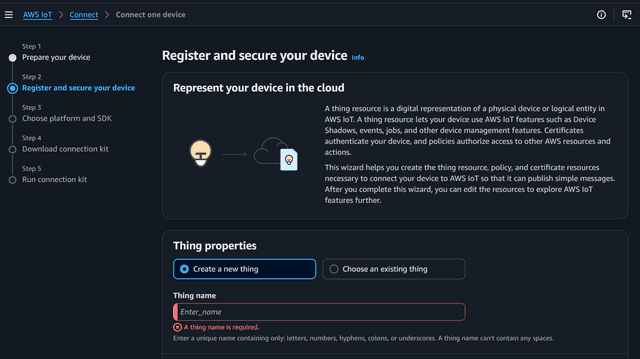
Critical choices in the registration flow are to:
- Select the Auto-generate a new certificate option
- Create/attach an IAM policy for IoT Core when prompted
- Download credential files at the end of the registration process - this is your only opportunity to do so
MQTT test client
With credentials obtained, I was able to use the MQTT Test Client to try publishing and subscribing to a topic:
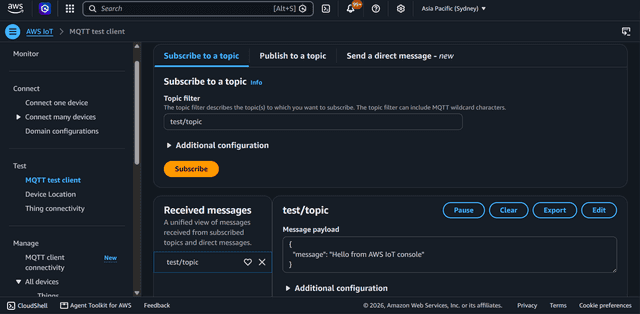
Publishing a message with mosquitto_pub from my laptop also worked, once I plugged in the mTLS credentials. The MQTT broker hostname and AWS CA certificate can be found in the MQTT Test Client screen:
mosquitto_pub \
  --cafile creds/AmazonRootCA1.pem \
  --cert creds/0d34830396fa3bf75cdaf431334cc1d1e4da76f39afe0c2a6c29xxxxxxxxxxxx-certificate.pem.crt \
  --key creds/0d34830396fa3bf75cdaf431334cc1d1e4da76f39afe0c2a6c29xxxxxxxxxxxx-private.pem.key \
  -h "xxxxxxxxxxxxxx-ats.iot.ap-southeast-2.amazonaws.com" \
  -p 8883 \
  -t "test/topic" \
  -m "hello from mosquitto_pub" \
  --tls-version tlsv1.2
Apache Kafka integration
Integrating Apache Kafka uses AWS IoT Core Rules. This is a different model of thinking to Pro Mosquitto and HiveMQ - we are not configuring something in the MQTT broker, we are configuring a separate microservice instead.
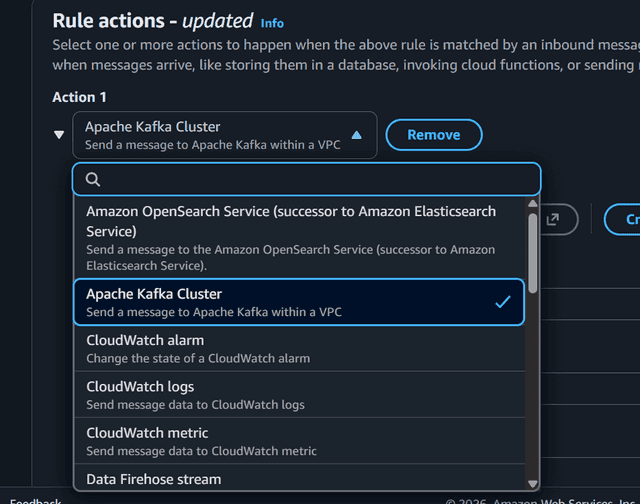
This is the point where I paid for the convenience of Lightsail. If you look closely at the Apache Kafka Cluster description, you will see it says within a VPC.
It's necessary to route Apache Kafka traffic from IoT Core Rules through a VPC. If you already use AWS heavily, you probably already have one handy, but in my case, I now had to write a bunch of Terraform to create:
- VPC
- Public/Private Subnets
- Internet Gateway
- NAT Gateway
- Route Tables
- Route Table Associations
- Security Group
- IAM Role
- IAM Role Policy
- IoT Topic Rule Destination
Only then could I plug these into the Apache Kafka Rule I was creating:
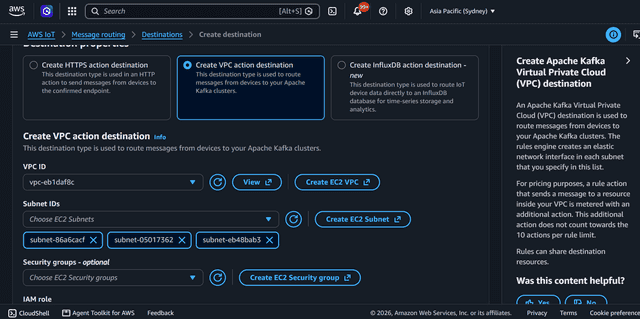
Of course, if you already have a VPC set up, most of this list goes away.
When configuring the username and password for Confluent Cloud, I tried to take another shortcut by just typing them in. This is explicitly not allowed on AWS IoT Core.

You must add a secret to Secrets Manager and access it via ${get_secret()} as illustrated or it simply won't work.
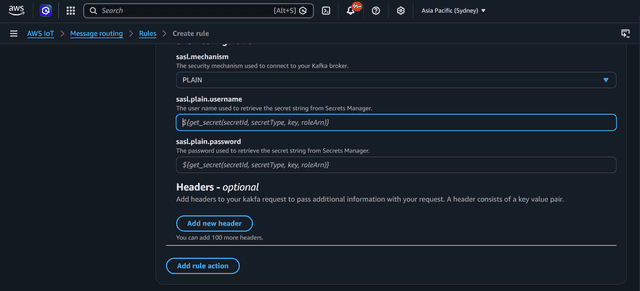
This means creating a secret and an IAM role that IoT Core can use to access it.
The final piece of the puzzle was writing some AWS IoT SQL to select the messages to send to Kafka. I wrote a simple expression to send all messages in test/topic:
SELECT * FROM 'test/topic'After this, I was able to see messages arriving in Confluent Cloud:
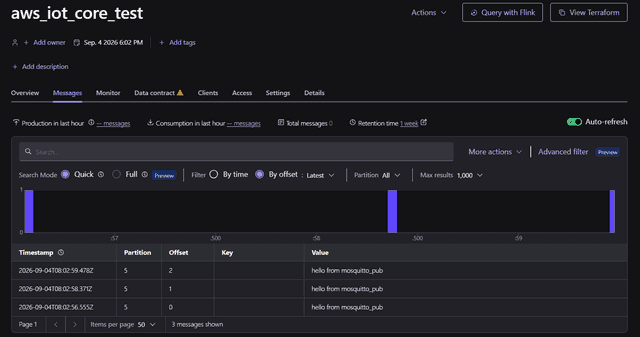
Everything about AWS IoT Core is geared around opinionated mass-management of a ton of devices - this can help or hinder, depending what you are trying to do.
Kepware
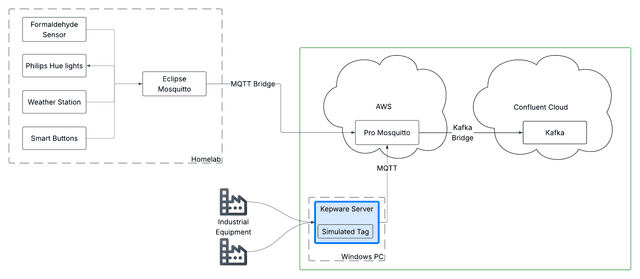
Now that all the cloud MQTT infrastructure has been tested and I know how I can get sensor data into Confluent Cloud without a lot of complex networking or disruption to local systems, let's finish the lab research with a practical example: connecting Kepware to the Pro Mosquitto server I left running in AWS.
You can think of Kepware as a protocol aggregation platform for specialist industrial protocols like Modbus, Siemens S7, OPC UA, MQTT, etc. Architecturally, it has more in common with a local MQTT broker than a lone sensor sending out data:
Kepware is a portfolio of industrial connectivity solutions that connect disparate legacy OT devices with software applications. Utilizing a scalable, unified architecture, Kepware provides the flexibility to combine drivers and consume multiple protocols in a single server, while offering a streamlined interface for remote visualization and connectivity configuration at scale.
Why Kepware? This is the software my customer runs at their sites around Australia and I want to prove that it can work with the architectures I proposed.
Kepware supports an MQTT client, so I should be able to hook up to Pro Mosquitto or HiveMQ and have my messages arrive in Confluent Cloud without much additional work.
There are a few different versions of Kepware available but I settled on the Windows edition since this is where I would expect the most challenges in operation. As you probably know from trips to the hospital or mechanic, specialist hardware vendors often just mandate Windows as it's the lowest common denominator.
As usual, I will be building the items in the green box in the diagram above. This time I added a spare Windows VM to run Kepware, but I'm drawing the line at industrial equipment and will not be adding 500 HP VFD motor controllers to the living room table, you will have to imagine these.
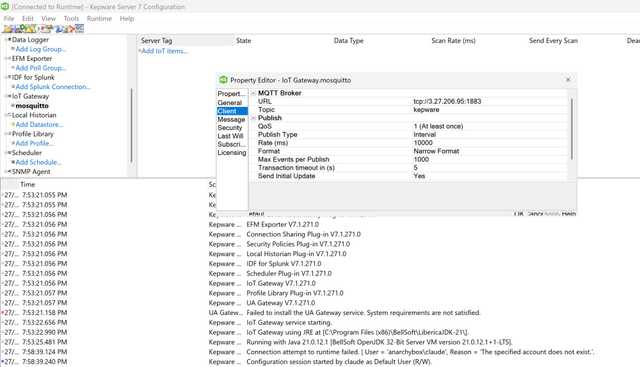
Kepware has a built-in MQTT client which I can use to publish data to an MQTT broker. This requires a separate service inside of Kepware Server called IoT Gateway which requires a 32-bit version of JDK 21 only. Nothing else will work.
In my research, BellSoft JDK worked; the x86 version is the 32-bit one.
With the right JDK edition installed, the IoT Gateway service starts and I was able to configure my Pro Mosquitto server as an IoT Gateway destination:
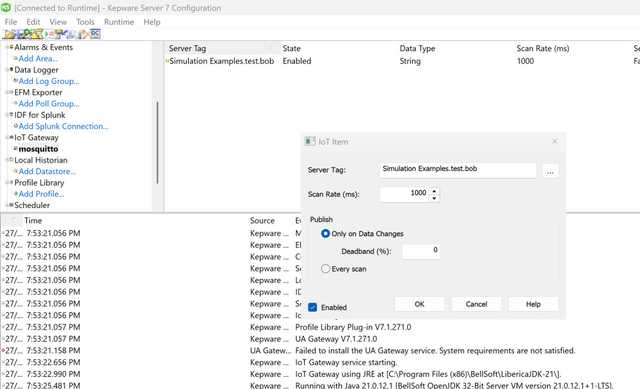
To send data over MQTT, I used Kepware's built-in simulation support since I don't have any real hardware. By creating a simulation example and forcing a tag change, I was able to trigger MQTT publishing:
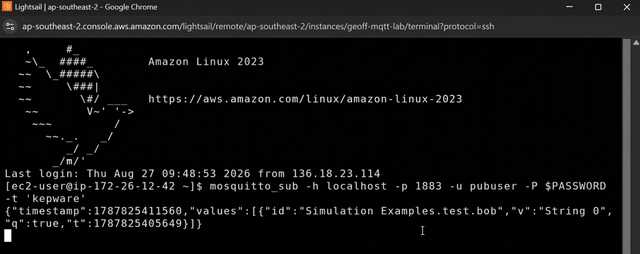
I watched the data arrive in my Lightsail instance:
Finally, I added a mapping for kepware to the topicMappings section of kafka-bridge.json and restarted Mosquitto:
[
    {
        "name": "mosquittoPro",
        "connection": {
            "brokers": ["pkc-xxxxx.ap-southeast-2.aws.confluent.cloud:9092"],
            "clientId": "mosquitto-broker",
            "allowAutoTopicCreation": true,
            "queueSize": 10,
            "sasl": {
                "mechanism": "plain",
                "username": "CONFLUENT_API_KEY",
                "password": "CONFLUENT_API_SECRET"
            },
            "retryPublishMinDelay": 250,
            "retryPublishMaxDelay": 250,
            "ssl": true
        },
        "topicMappings": [
            {
                "name": "mosquitto-pro-data",
                "kafkaTopic": "mosquitto-pro-data",
                "mqttTopics": ["fedmqtt/#"]
            },
            {
                "name": "kepware-test",
                "kafkaTopic": "kepware",
                "mqttTopics": ["kepware"]
            }
        ]
    }
]
My simulated tag change arrived a couple of seconds later in Confluent Cloud:
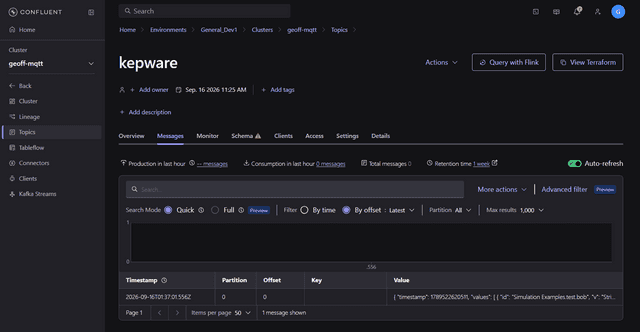
So Kepware plus a cloud MQTT broker looks like the way to go to get data out of this product.
Wrapping Up: Which approach should you use?
Every approach worked end-to-end in my lab. Which one you choose will depend on several factors in your requirements and architecture.
| Product | Best For | Weak Spots |
|---|---|---|
| Pro Mosquitto | Supported, Lightweight (C++) and bullet-proof MQTT server | SaaS offering needs work |
| HiveMQ | Slick SaaS platform, easy configuration, squarely aimed at mission critical enterprise customers. I didn't test the on-prem version but it can also publish to Kafka | Heavier than Mosquitto (Java), Cost |
| Zilla Kafka Gateway | Users who want to treat MQTT as a transport layer without a full MQTT broker | Crashed under basic testing, although a fix did land fast |
| Confluent MQTT Source Connector | When you don't own or cannot change the MQTT broker | Connector admin after rollout needs careful coordination to avoid data loss |
| AWS IoT Core | If you're already an AWS shop and don't want to manage infrastructure that isn't part of AWS and/or plan to manage large fleets of IoT devices using AWS's own tooling (e.g. Greengrass for edge deployments) | You must do things the IoT Core way. For me, this was by far the most complicated solution I tested |
| Kepware (IoT Gateway) | Industrial sites already running Kepware that want to extract data via MQTT | 32-bit Java required |
The first five options are cloud-side infrastructure choices, Kepware is an on-site protocol bridge that connects to them.
Pro Mosquitto and HiveMQ were both easy to set up, easy to reason about, and landed data in Kafka without issue. They both fulfill the same architectural purpose, so which one to choose comes down to personal preference and price.
Picking the right architecture really depends on what you're trying to achieve and what technology constraints are in place. For production, you also need to consider:
- Sizing, throughput and delivery guarantees
- Container orchestration platforms like ECS or EKS on AWS
- HA/Clustering for MQTT brokers
- Private-only networking
- Automated deployment, backup and DR
- Support
- Enterprise pricing
And coming back to the question from my customer that prompted all of this:
How do we get sensor data into Confluent Cloud?
My answer: provision a cloud MQTT broker somewhere and have that push messages directly to Confluent Cloud.