Enhance your career, get your certificate as a Data Streaming Engineer | Get your Certificate
Confluent Cloud Networking: Introduction


Justin Lee
Staff Solutions Engineer (Presenter)
Confluent Cloud Networking: Introduction
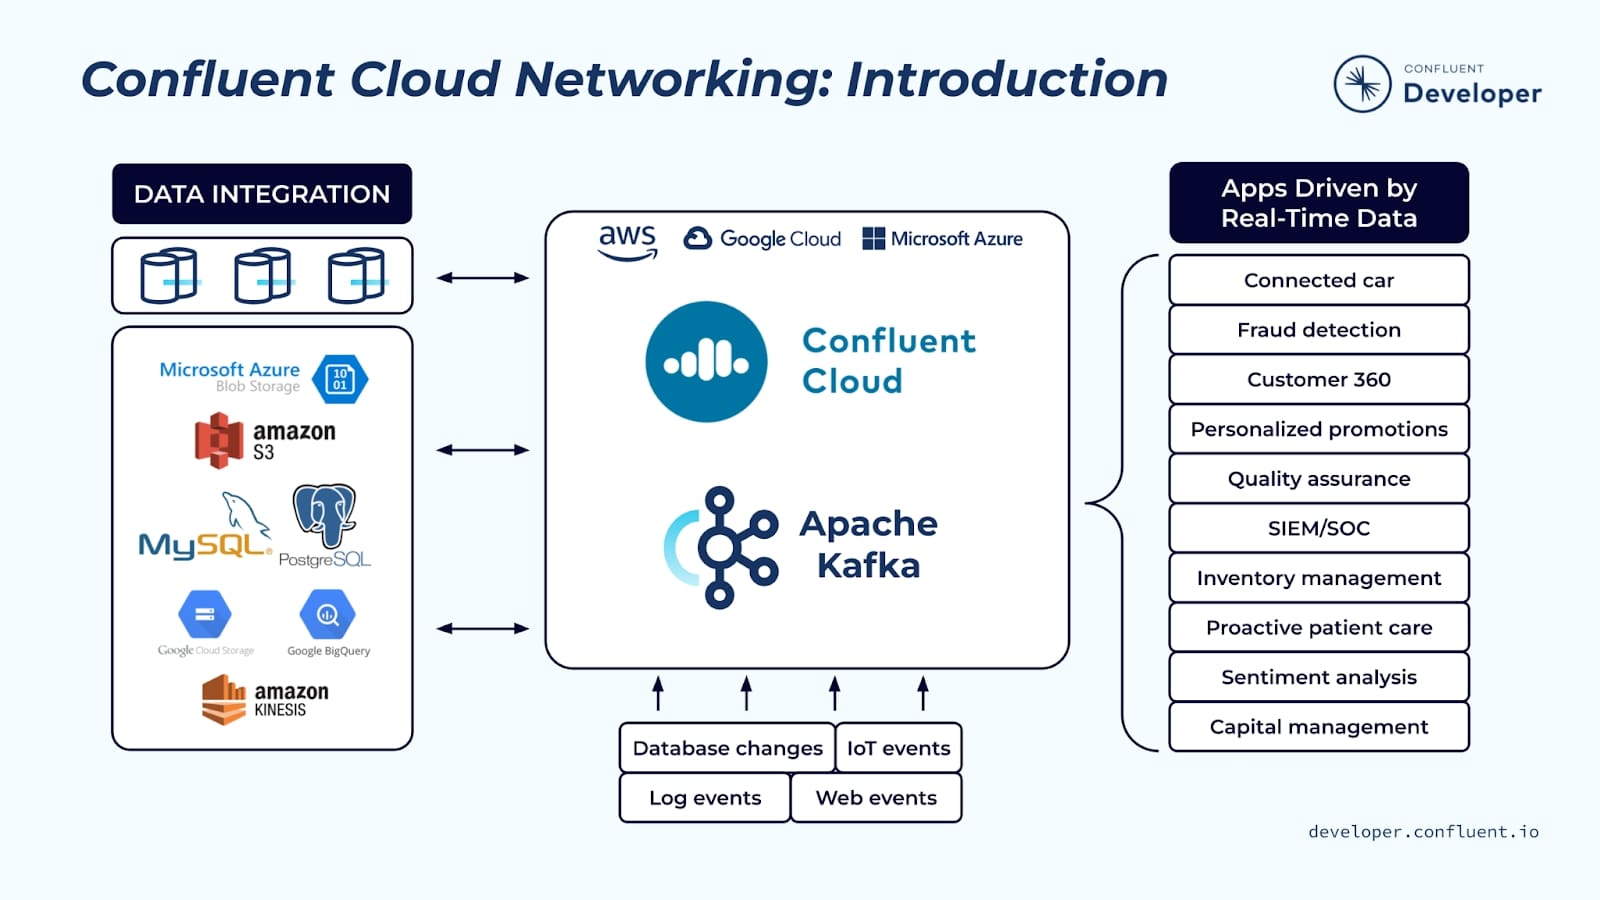
Let’s assume you are a Confluent Cloud user and need to transfer data back and forth between it and your apps. Confluent Cloud runs in its own virtual network in one of three cloud providers: AWS, Google Cloud, or Azure. Your apps run in another network—in the cloud or on premises. During this course, you will learn about the available network connectivity options for connecting your network with the Confluent Cloud network. You will also learn about the benefits of each option as well as any trade-offs that need to be considered. At the end of this course, you will be better prepared to decide which option is right for you.
Before we continue with this course, we want to provide a little bit of background information for a couple of key audience groups that this course is intended for: Apache Kafka® users that may be less familiar with cloud computing or cloud networking concepts, and networking people that may be less familiar with Kafka.
- First, we will quickly review some key networking fundamentals such as IP addresses and domain name services.
- Next, we will explore several cloud networking concepts that will come up in the modules that follow.
- Finally, we will cover a few key things about how Kafka clients connect with a Confluent Cloud cluster. There are a number of caveats and things to be aware of when working with Confluent Cloud, and we want to walk you through these before we dive into the different networking options.
Networking Fundamentals – IPv4 Addresses
There are a couple of key networking fundamentals that we need to understand before we discuss Confluent Cloud networking in depth. The first is IP addresses. If you’re already familiar with public and private IP addresses, and CIDR notation, you can skip this section. If CIDR is a new term for you, then hang around.
Devices that are part of a network are uniquely identified by an IP address. A portion of the address identifies the network the device belongs to and the remainder of the address identifies the device on that network. Traffic that is destined for the device is first routed to its network and then to the device itself.
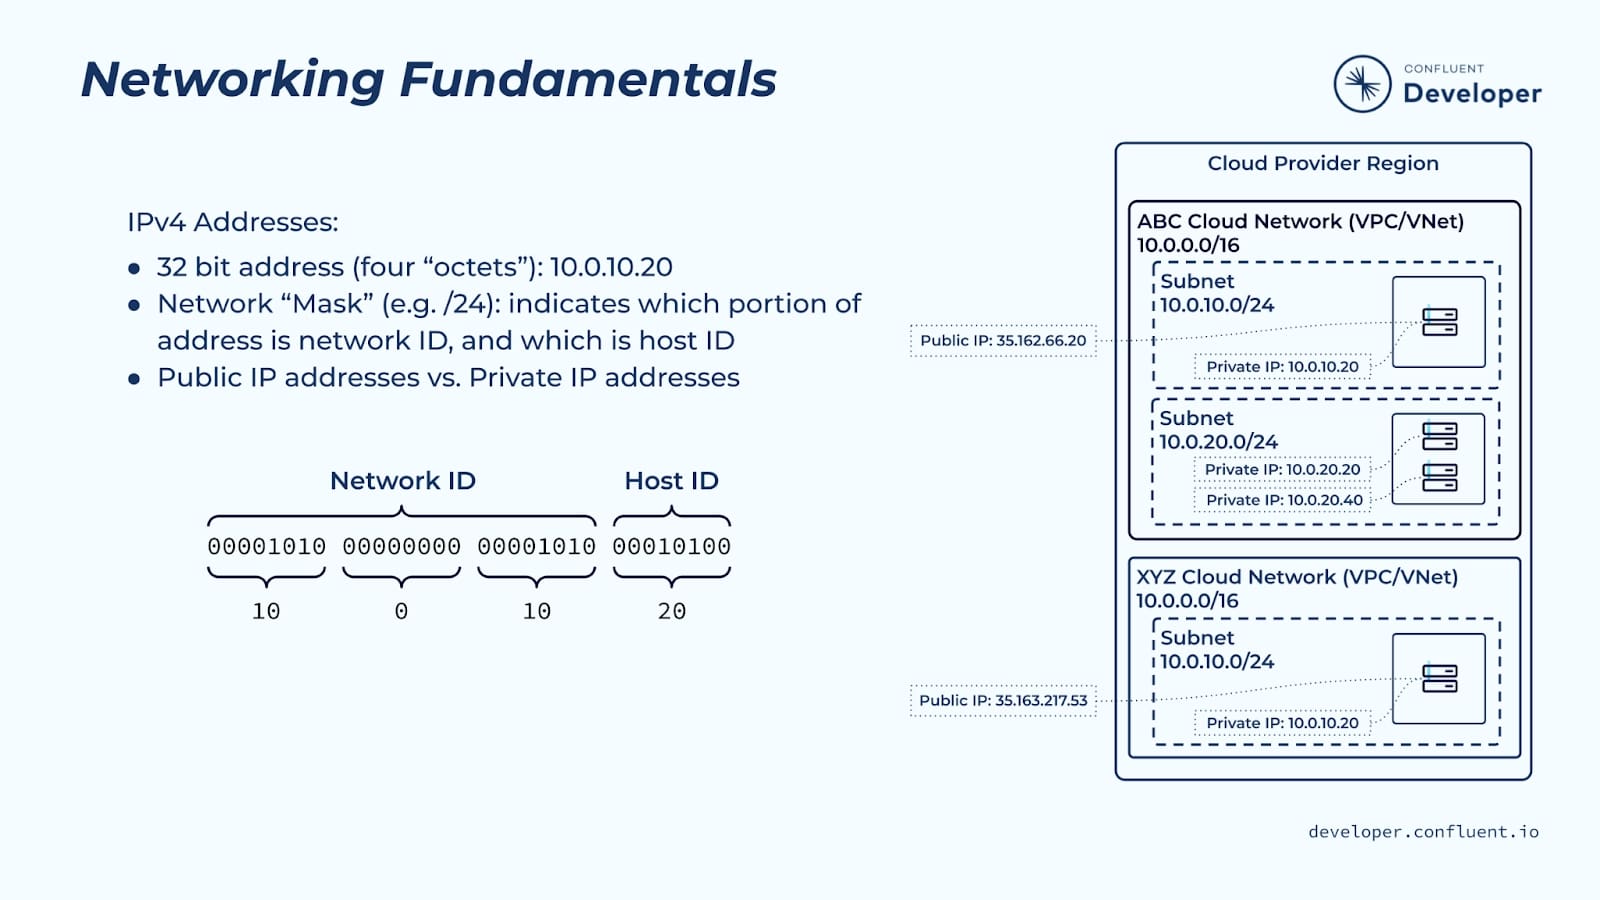
IPv4 addresses are 32 bits that are broken down into four “octets” of 8 bits each—for example, 10.0.10.20. Following the address is a network mask, which is separated from the address by a slash. The network mask—for example, /16—determines what portion of the address is the network ID and what portion is the host ID. A mask is applied from the left side of the address. A /16 mask, for example, says that the leftmost 16 bits of an address refer to the network ID, while the remaining 16 bits refer to the host ID.
A network is commonly referred to by its CIDR, which stands for Classless Inter-Domain Routing. A /16 CIDR network is one where the first two octets are the network ID—2 lots of 8 bits is 16—and the last two octets are the host ID. A /16 CIDR network can be broken down into smaller networks, e.g., /24 CIDR networks. The larger the mask value, the smaller the range of host IDs in the network.
Devices can be assigned both private and public IP addresses.
- All devices in cloud networks are assigned a private IP address. A subset of all available IPv4 addresses is dedicated to the use of private addresses.
- Private addresses are not directly accessible from the public internet. They are only known to devices within their private network.
- This allows the same IP address to be used by multiple organizations—each contained within its own private network.
- Public IP addresses are globally unique and are directly accessible from the public internet. If a device needs to be accessed over the internet, it can be assigned a public IP address. Otherwise, the device is typically only assigned a private IP address.
We will cover methods for communicating with devices that are part of a private network later in this course.
Depending on the networking option(s) you choose for your Confluent Cloud network architecture, you may have to fit Confluent Cloud IP address range(s) into your existing network infrastructure.
Networking Fundamentals – DNS
The second networking fundamental concept we need to understand is the Domain Name System (DNS). Again, if you’re already familiar with DNS, you can skip this section.
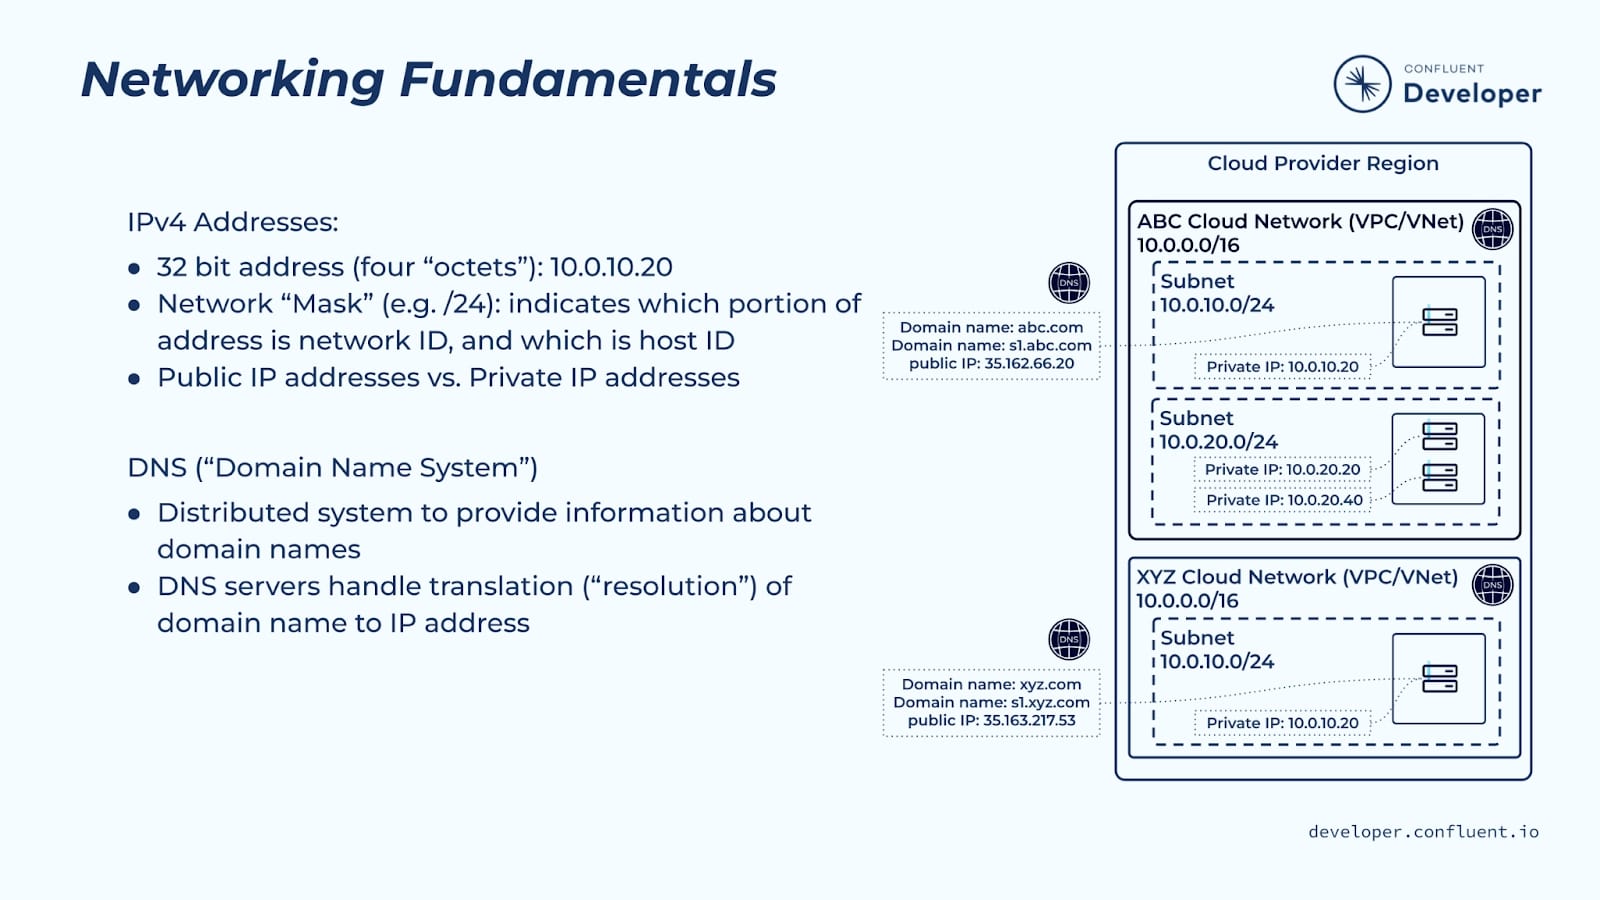
It can be very tedious referring to devices by their IP address so we typically assign them a friendly name that is known as the domain name. It is much easier to refer to devices using this domain name.
The Domain Name System is a distributed, hierarchical system that provides information about domain names and their corresponding IP addresses. This hierarchy consists of root nameservers at the top. At the next level are top-level domain (TLD) nameservers for top-level domains such as .com, .net, and .io. Below TLD nameservers are additional nameservers, which store domain name information for their respective domains (such as confluent.io). Your organization may also host its own nameservers, which share information with the rest of the DNS network.
From a client side, each client that needs to be able to access servers via domain names is configured with a set of DNS servers, which the client will use to resolve DNS names. The client will make DNS requests to these DNS servers; if the DNS server doesn’t know the answer to the DNS request, the DNS server will forward the request to another DNS server, and so on, until a response is found and returned back to the client.
DNS records describe the relationship between domain names and IP addresses.
- A records translate domain names to IP addresses
- CNAME (canonical name) records translate domain names to other domain names
A name resolution request occurs when establishing a network connection with a device by its domain name. This name resolution is an iterative process that works its way through the DNS hierarchy until it reaches the authoritative nameserver that holds the DNS record associated with the request. It is that nameserver that returns the corresponding IP address for the requested domain name.
Cloud Networking Fundamentals
Let’s now take these basic networking concepts and apply them to the cloud.
A cloud service provider (CSP) such as AWS, Google, or Azure, runs multiple services for customers, including “Infrastructure as a Service (IaaS),” which means it is running virtual infrastructure for a customer. This often includes virtual machines as well as the networks through which those machines can interact with other services. Different cloud providers have different patterns around how virtual networks and virtual machines interact with each other.
Different cloud providers have different names for the logical private networks they provide. AWS and Google call them Virtual Private Clouds or VPCs. Azure calls them Virtual Networks, or VNets. It isn’t strictly true, but it’s often helpful to think of cloud virtual machines as running “in” a VPC or VNet.
The implementation and terminology of this varies from cloud to cloud, but generally speaking, the following are true (in the context of IPv4 networking):
-
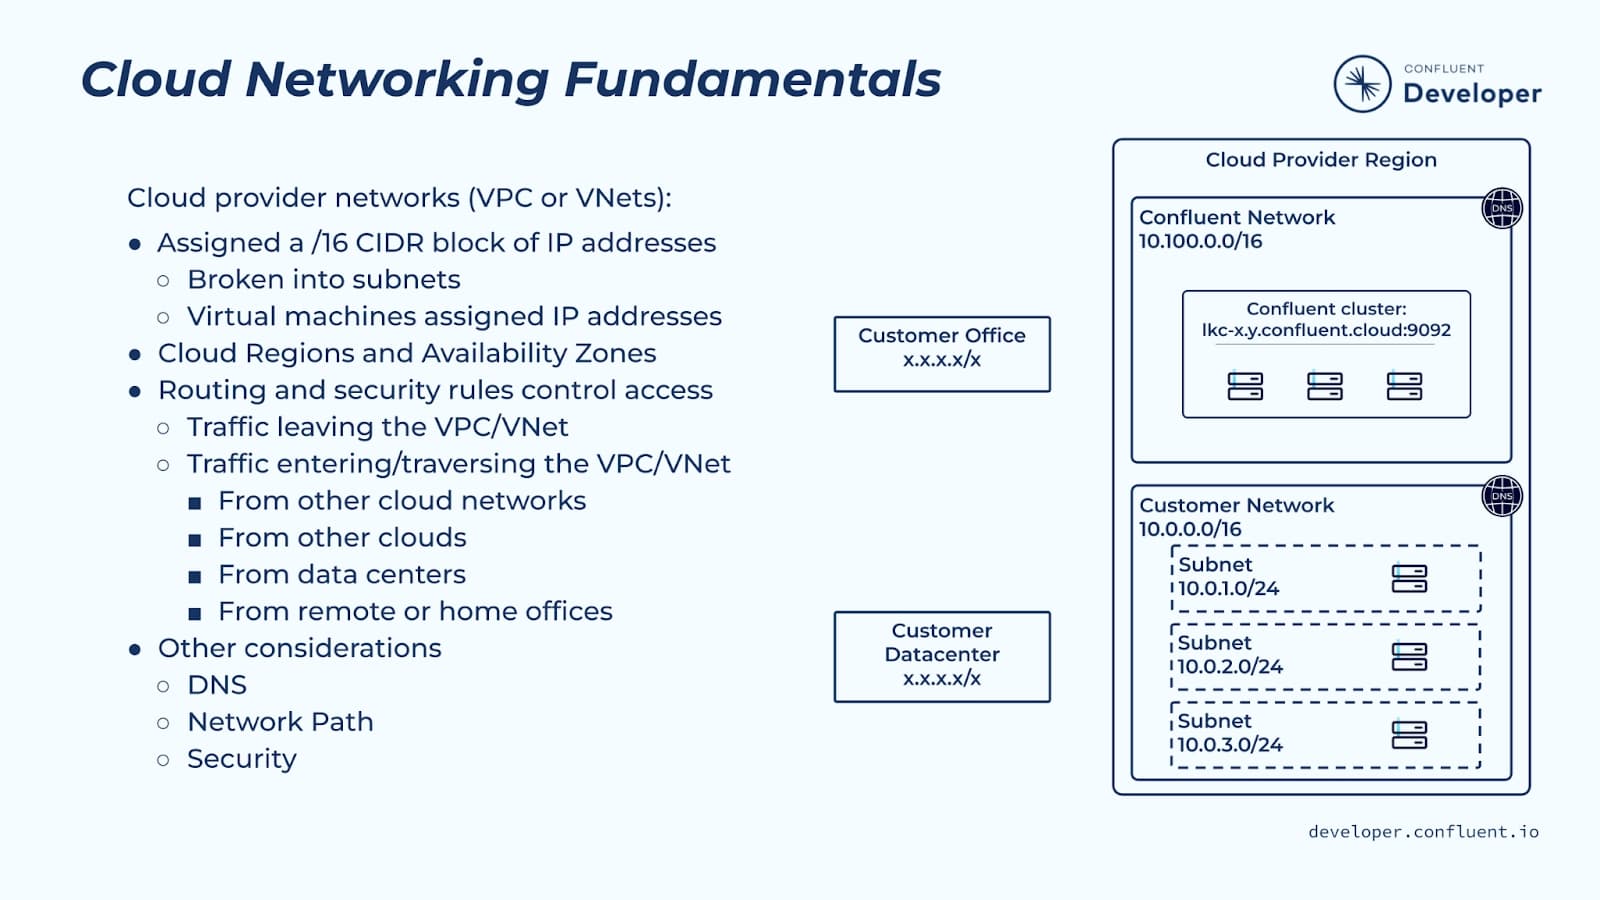
The VPC/VNet is typically assigned a /16 CIDR block of IPv4 addresses.
- This CIDR is broken into one or more subnets, each of which has a subset of the VPC/VNet address block, e.g., a /24 CIDR block
- Virtual machines running “in” the VPC/VNet will be assigned one or more interfaces, each of which may have a combination of the following:
- One or more “private” IP addresses allocated from the CIDR range of a subnet in the VPC/VNet
- Zero or more “public” IP addresses
-
Cloud providers break their infrastructure into cloud regions across the globe which correspond to groups of datacenters where infrastructure is running.
- Each region is broken down into availability zones (AZs) which are a subset of the region’s datacenters
- Availability zone datacenters are separated by enough distance such that a destructive event that impacts them, i.e., a flood or hurricane, should not impact others
- When you create a VPC or VNet, it runs in a specific cloud provider region
- You can connect VPCs or VNets within the same region using something called VPC/VNet peering
- Google Cloud supports global VPCs which span multiple regions, but each subnet in a Google VPC lives in a particular region—a subnet can’t span regions
-
When you create a virtual network, you use policies or rules to control traffic in the VPC/VNet:
- Routing rules control how traffic gets to where it needs to go
- This may include rules for traffic leaving the VPC/VNet in order to access other private networks or public networks
- This may also include rules for traffic entering or traversing the VPC/VNet
- Security rules are used to control who or what can access a service
- These can be accept or deny rules
- These may be specific to a set of IPs, machines, ports, protocols, or tags
- There is a logical precedence for these rules
- Depending on the cloud provider, these rules may apply at the interface level, the machine level, or at the subnet level
- Routing rules control how traffic gets to where it needs to go
-
Your network architecture can selectively control what can talk to what—for example, in some environments, you can directly access the internet, while in other environments, access to the internet may be blocked.
-
Separately, there may be scenarios where you expose parts of your infrastructure to the wider internet. For example, if your business has a public website, that website is accessible from anywhere in the world.
-
Also, in some cases, you may directly connect your cloud network to other cloud networks, or to your on-premises infrastructure, either directly or through a VPN or tunnel.
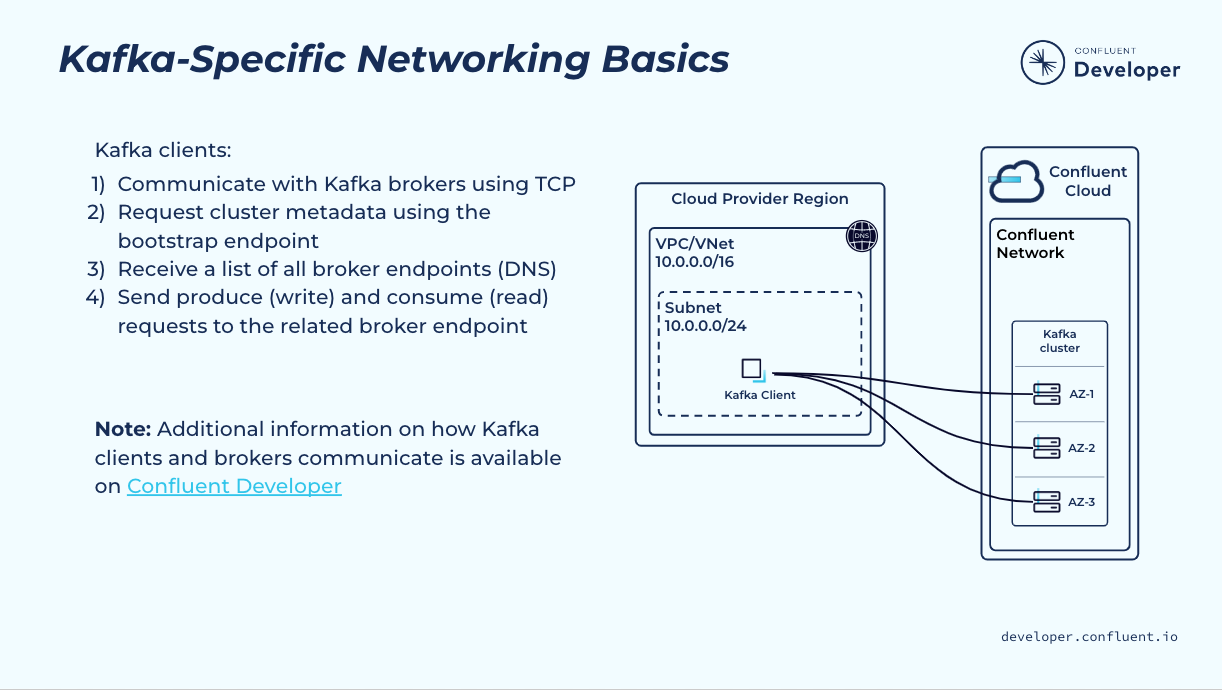
Kafka-Specific Networking Basics
Now that we have covered some basic networking concepts as they apply to Confluent Cloud, let’s now take a look at a few Kafka concepts that are also important from a Confluent Cloud perspective.
When designing a network architecture for Confluent (or Kafka), there are a few things to be aware of.
-
Kafka uses a binary protocol over TCP. It does not use HTTP (or HTTPS). It does support TLS, with either of these two options:
- security.protocol=SSL; Kafka protocol directly encrypted with TLS (supports mTLS, as well)
- security.protocol=SASL_SSL; Kafka protocol with both authentication and encryption
-
Kafka clients need to be able to access all of the brokers in a given Kafka cluster, and will initiate direct connections to individual brokers to produce or consume partitions that are active on those brokers. This means that you cannot access Kafka through a traditional load balancer, which assumes that your client doesn’t care which backend server it connects with. The data flow looks like this:
- A client is given one or more Kafka ‘bootstrap’ Kafka URLs (often in the form of a setting bootstrap.servers)
- The client will retrieve cluster metadata from the bootstrap servers (trying one at a time until it is successful); this metadata includes connectivity information for all brokers
- Once it has the metadata, the client will connect to individual brokers directly to perform various operations (produce, consume, etc.)
- If a client is trying to reach a specific broker, and the request arrives at the wrong broker, things will not work correctly.
-
Given the above, for Kafka to work properly:
- For each broker, the client needs a valid DNS name (or IP address) and port through which it can access that specific broker; this is the advertised listener
- In TLS environments, each broker needs a certificate that matches the DNS name that the client is accessing the broker through (either directly in the common name (CN) or as a subject alternative name (SAN)). Wildcards work according to standard DNS practices (e.g., *.some.domain.com will work; *-something.some.domain.com will not)
- The client will need to be able to:
- Resolve each broker’s DNS name to an IP address that it has a network path to
- Access the broker (through the IP address and port); this includes network path and firewalls
- Trust the certificate on the broker (either by trusting the CA chain that signed the certificate, or trusting the certificate directly)
- Match the provided (not resolved) advertised listener hostname/IP to the CN or SAN on the certificate
- Kafka client(s) support SNI, so all packets include the Server Name Indication extension to indicate which server the client is trying to reach.
In addition to the above, the server may require that the client provide some form of authentication; in Confluent Cloud, we use SASL_SSL with the SASL mechanism of PLAIN which is effectively APIkey/Secret authentication (all wrapped in SSL encryption).
Start Kafka in Minutes with Confluent Cloud
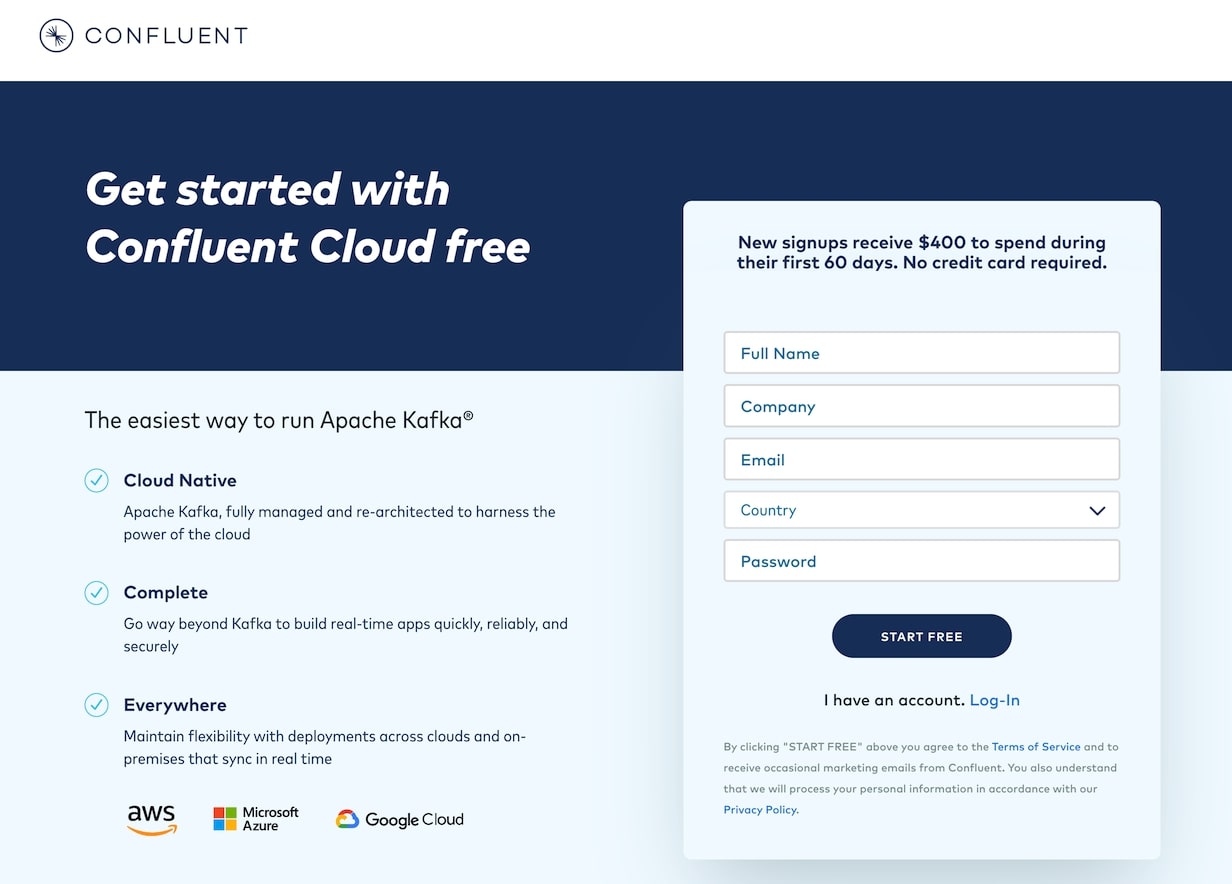
Throughout this course, we’ll introduce you to Confluent Cloud Networking through hands-on exercises. If you haven’t already signed up for Confluent Cloud, sign up now so when your first exercise asks you to log in, you are ready to do so.
- Browse to the Confluent Cloud sign-up page and fill in your contact information and a password. Then click the Start Free button and wait for a verification email.
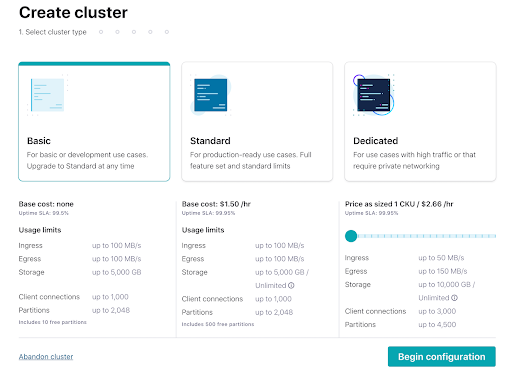
- Click the link in the confirmation email and then follow the prompts (or skip) until you get to the Create cluster page. Here you can see the different types of clusters that are available, along with their costs. For this course, the Basic cluster will be sufficient and will maximize your free usage credits. After selecting Basic, click the Begin configuration button.
- Choose your preferred cloud provider and region, and click Continue.

-
Review your selections and give your cluster a name, then click Launch cluster. This might take a few minutes.
-
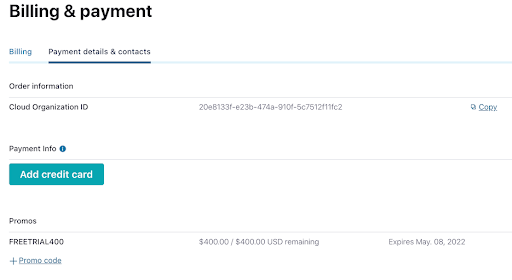
While you’re waiting for your cluster to be provisioned, be sure to add the promo code NETWORKING101 to get an additional $25 of free usage (details). From the menu in the top right corner, choose Administration | Billing & Payments, then click on the Payment details tab. From there click on the +Promo code link, and enter the code. You can also use the promo code CONFLUENTDEV1 to delay entering a credit card for 30 days.
You’re now ready to complete the upcoming exercises as well as take advantage of all that Confluent Cloud has to offer!
- Previous
- Next
Use the promo code NETWORKING101 & CONFLUENTDEV1 to get $25 of free Confluent Cloud usage and skip credit card entry.
Confluent Cloud Networking: Introduction
Hi, I'm Justin Lee with Confluent. Welcome to our course on networking in Confluent Cloud. Welcome to our course on networking in Confluent Cloud. In this course, we'll be discussing the various options available for connecting Kafka clients and services to your Kafka cluster running in Confluent Cloud. Networking is an area where even the most seasoned tech professionals can quickly find themselves in unfamiliar territory. If you're a developer, understanding how your data gets from point A to point B will be important for tracking down troublesome connectivity issues and can help point you to likely culprits as well as solutions. Knowing the technology, terminology, and how it works will make conversations with the ops team much more productive. Confluent Cloud runs in its own virtual network in one of three cloud providers: Confluent Cloud Networking: Introduction AWS, Google Cloud, or Azure. You have the apps running in another network in the cloud or on premise. You need to connect the networks to send data back and forth. You need to do this bearing in mind your security, privacy, and cost requirements. During this course, you will learn about the available network connectivity options for connecting your network with a Confluent Cloud network. You will also learn about the benefits of each option as well as any trade offs that need to be considered. At the end of this course, you will be better prepared to decide which option is right for you. Before we continue with this course, we want to provide a little bit of background information for a couple of key audience groups that this course is intended for. On the one hand, Kafka people that may be less familiar with cloud computing or cloud networking concepts. And on the other hand, networking people that may be less familiar with Kafka. First, we will quickly review some key networking fundamentals such as IP addresses and domain name services. From there, we will explore several cloud networking fundamental concepts that will come up in the modules that follow. Finally, we will cover a few key things about how Kafka clients connect with a Confluent Cloud cluster. There are a couple of key networking fundamentals that we need to understand before we discuss Confluent Cloud networking in depth. The first of these is IP addresses. If you're already familiar with public and private IP addresses and CIDR notation, you can skip this section. If CIDR's a new term for you, then hang around. Devices that are part of a network are uniquely identified by IP address. A portion of the address identifies the network the device belongs to, and the remainder of the address identifies the device on that network. Traffic that is destined for that device is first routed to its network and then to the device itself. IPv4 addresses are 32 bits that are broken down into four octets of eight bits each. For example, 10.0.10.20. Following the address is the network mask which is separated from the address by a slash. The network mask, for example, /16 determines what portion of the address is the network ID and what portion is the host ID. A mask is applied from the left side of the address. A /16 mask, for example, says that the left most 16 bits of an address refer to the network ID while the remaining 16 bits refer to the host ID. A network is commonly referred to by its CIDR range, which stands for classless inter-domain routing. A /16 CIDR network can be broken down into smaller networks. For example, a /24 CIDR network is a subset of a /16 CIDR network. The larger the mask value, the smaller the range of host IDs in that network. Devices can be assigned both private and public IP addresses. All devices in cloud networks are assigned a private IP address. A subset of all available IPv4 addresses is dedicated to the use of private addresses. Private addresses are not directly accessible from the public internet. They are only known to devices within their private network. This allows the same IP address to be used by multiple organizations, each contained within its own private network. Public IP addresses are globally unique and are directly accessible from the public internet. If a device needs to be accessed over the internet, it must be assigned a public IP address. Otherwise, the device is typically only assigned a private IP address. We will cover methods for communicating with devices that are part of a private network later in this course. Depending on the networking options you choose for your Confluent Cloud network architecture, you may have to fit Confluent Cloud IP address ranges into your existing network architecture. The second networking fundamental concept that we need to understand is the domain name system or DNS. Again, if you're already familiar with DNS, you can skip this section. It can be very tedious referring to devices by their IP address. So we typically assign them a friendly name that is known as the domain name. It is much easier to refer to devices using this domain name. The domain name system is a distributed hierarchical system that provides information about domain names and their corresponding IP addresses. This hierarchy consists of route name servers at the top. At the next level are top level domain or TLD name servers for top level domains, such as .com, .net, or .io. Below TLD name servers are additional name servers which store domain name information for their respective domains. For example, confluent.io. Your organization may also host its own name servers which share information with the rest of the DNS network. From a client side, each client that needs to be able to access servers via domain names is configured with a set of DNS servers which a client will use to resolve DNS names. The client will make DNS requests to these DNS servers. If the DNS server doesn't know the answer to the DNS request, the DNS server will forward the request to another DNS server and so on until a response is found and returned back to the client. DNS records describe the relationships between domain names and IP addresses. There are several different types of DNS records. For example, an A record translates a domain name to an IP address. A CNAME record translates domain names to other domain names. A name resolution request occurs when establishing a network connection with a device by its domain name. This name resolution is a recursive process that works its way through the DNS hierarchy until it reaches the authoritative name server that holds the DNS record associated with this request. It is that name server that returns the corresponding IP address for the requested domain name. Let's now take these basic networking concepts and apply them to the cloud. A cloud service provider or CSP such as AWS, Google, or Azure runs multiple services for customers, including infrastructure as a service which means it is running virtual infrastructure for a customer. This often includes virtual machines, as well as the networks through which those machines can interact with other services. These cloud providers have different patterns Cloud Networking Fundamentals around how virtual networks and virtual machines interact with each other. Cloud providers have different names for the logical private networks they provide. AWS and Google call them virtual private clouds or VPCs. Azure calls them virtual networks or VNets. It isn't strictly true but it's often helpful to think of cloud virtual machines as running in a VPC or a VNet. The implementation and terminology of this varies from cloud to cloud. But generally speaking, the following are true. The VPC or VNet is typically assigned a /16 block of CIDR addresses. A CIDR is broken into one or more subnets, each of which is a subset of a VPC or VNet address block. For example, a VNet or VPC with a /16 CIDR range may have subnets with /24 CIDR ranges. Virtual machines running in the VPC or VNet will be assigned one or more interfaces. Each interface will have one or more private IP addresses assigned to it. In addition, each interface may optionally have one or more public IP addresses. Cloud providers break their infrastructure into cloud regions across the globe, which correspond to groups of data centers, where infrastructure is running. Each region is broken down into availability zones which are a subset of the region's data centers. Availability zone data centers are separated by enough distance so that a destructive event such as a flood or hurricane should not impact all of them at once. When you create a VPC or VNet, it runs in a specific cloud provider region. You can connect VPCs or VNets within the same region using something called VPC or VNet peering. Google Cloud supports global VPCs which span multiple regions, but each subnet in a Google VPC lives in a particular region. A subnet can't span regions. When you create a virtual network, use policies or rules to control traffic in the VPC or VNet. Routing rules control how traffic gets to where it needs to go. This may include rules for traffic leaving the VPC or VNet in order to access other private networks or public networks. This may also include rules for traffic entering or traversing the VPC or VNet. Separately, security rules are used to control who or what can access a service. They can be accept or deny rules. They may be specific to a set of IPs, machines, ports, protocols, or tags. And there is a logical precedence for these rules. Depending on the cloud provider, these rules may apply at the interface level, at the machine level, or at the subnet level. Your network architecture can selectively control what can talk to what. For example, in some environments you can directly access the internet. In other environments, access to the internet may be prohibited. Separately, there may be scenarios where you expose parts of your infrastructure to the wider internet. For example, if your business has a public website, such as confluent.io, that website is accessible from anywhere in the world. Also, in some cases you may connect your cloud provider to other cloud networks or to your on-premise infrastructure either directly or through a VPN or tunnel. Now that we have covered some basic networking concepts as they apply to Confluent Cloud, let's also look at a couple Kafka concepts that are important from a Confluent Cloud perspective. When designing a network architecture for Confluent or for Kafka, there are a few things to be aware of. Kafka uses a binary protocol over TCP. It doesn't use HTTP and it doesn't use HTTPS. It does support TLS with either one of these two options. You can use the security protocol of SSL where the Kafka protocol is directly encrypted with TLS and this supports mTLS as well. Or you can use a security protocol of SASL_SSL. This is a Kafka protocol that supports both authentication and encryption. Kafka clients need to be able to access all of the brokers in a given Kafka cluster and will initiate direct connections to individual brokers to produce or consume partitions that are active on those brokers. This means that you cannot access Kafka through a traditional load balancer which assumes that your client doesn't care which backend server it connects with. The data flow in Kafka looks like this. A client is given one or more Kafka bootstrap server URLs, Kafka Specific Networking Basics often in the form of a setting called bootstrap.servers. The client will retrieve cluster metadata from the bootstrap servers, trying one at a time until it's successful. This metadata includes connectivity information for all of the brokers in the cluster. Once it has the metadata, the client will connect to individual brokers directly to perform various operations. For example, it will produce or consume messages to a given Kafka broker. If a client is trying to reach a specific broker and their request arrives at the wrong broker, things will not work correctly. Given the above, in order for Kafka to work properly, for each broker, the client needs a valid DNS name or IP address and port to which it can access that specific broker. This is the advertised listener. In TLS environments, each broker needs a certificate that matches the DNS name that the client is accessing the broker through, either directly in the common name or CN or as a subject alternative name or SAN. Wildcards work according to standard DNS practices. For example, *.domain.com will work, *-something.domain.com will not. The client will need to be able to do the following. It will need to be able to resolve each broker's DNS name to an IP address, that it has a network path too. It will need to be able to access the broker through the IP address and port. This includes the network path and firewalls. The client will also need to be able to trust the certificate on the broker, either by trusting the CA chain that signed the certificate or trusting the certificate directly. The certificate must match the provided, not resolved, advertised listener hostname or IP to the CN or SAN on the certificate. Kafka clients support SNI so all packets include the server name indication extension to indicate which server the client is trying to reach. In addition to the above, the server may require that the client provides some form of authentication. In Confluent Cloud, we use SASL_SSL with a SASL mechanism of plain. This is effectively an API key and secret which are used for authentication. And all this is wrapped in a TLS encryption. In this course, we'll have a number of exercises you can follow where you'll be producing data too and consuming data from Confluent Cloud. For those who don't already have a Confluent Cloud account, my colleague Danica Fine will walk you through the process to create one. First off, you'll want to follow the URL on the screen. On the signup page, enter your name, email, and password. Be sure to remember these sign in details as you'll need them to access your account later. Click the Start free button and wait to receive a confirmation email in your inbox. The link in the confirmation email will lead you to the next step where you'll be prompted to set up your cluster. You can choose between a Basic, Standard, or Dedicated cluster. Basic and Standard clusters are serverless offerings where your free Confluent cloud usage is only exhausted based on what you use, perfect for what we need today. For the exercises in this course, we'll choose the Basic cluster. Usage costs will vary with any of these choices, but they are clearly shown at the bottom of the screen. That being said, once we wrap up these exercises, don't forget to stop and delete any resources that you created to avoid exhausting your free usage. Click review to get one last look at the choices you've made and give your cluster a name, then launch. It may take a few minutes for your cluster to be provisioned, and that's it. You'll receive an email once your cluster is fully provisioned. But in the meantime, let's go ahead and leverage that promo code from settings, choose Billing & payment. You'll see here that you have $400 of free Confluent Cloud usage. But if you select the Payment details & context tab, you can either add a credit card or choose to enter a promo code. And with that done, you're ready to dive in. In addition, we have a promo code for additional Confluent Cloud credit in this video's description. Thank you for joining us, we'll see you in the next module.
Be the first to get updates and new content
We will only share developer content and updates, including notifications when new content is added. We will never send you sales emails. 🙂 By subscribing, you understand we will process your personal information in accordance with our Privacy Statement.