Hands-On: Use the Schema Registry


Wade Waldron
Principal Software Practice Lead
Hands-On: Use the Schema Registry
Note: This exercise is part of a larger course. You are expected to have completed the previous exercises.
In this exercise, we are going to start looking at a very simple model of an order system. We will define a basic schema for what the order should look like. Then, we will execute a small application that will push random order data into a topic with that schema. Later in the exercise, we will apply a small evolution to the schema and update the code accordingly.
Prerequisites
The rest of the exercises in this course rely on Java. You will need to have a Java development environment set up, including:
- JDK (Version 18 recommended)
- Maven (Version 3.8+ recommended)
- An editor or IDE (Eg. IntelliJ, Eclipse, VS Code)
Download the Code
Our first step is to download the code that we will use in this, and future exercises.
You can clone the GitHub repository containing everything you need here:
In this repository, you will find an exercises folder, a staging folder, and a solutions folder. Your work will take place in the exercises folder. You can use the solutions as a reference if you get stuck.
Stage the Exercise
Inside the exercises folder, you will find an exercise.sh script. This utility script will automatically set up and even solve exercises for you.
To start with, we want to stage the current exercise. To do this, you can run the following command:
./exercise.sh stage 07Note: This will copy new files into your exercises folder. Have a look at what is there.
If at any point, you wish to automatically solve the exercise, you can execute:
./exercise.sh solve 07You can also copy individual solution files by running:
./exercise.sh solve 07 <FILENAME>If you ever just want to open a solution file for reference, you can find them under the solutions folder.
Note: Exercises are numbered according to their absolute position within the course (including lecture videos). That's why this exercise is numbered 07.
Add Cluster and Schema Registry API Keys
To use the downloaded code, you will need to add your Cluster API credentials and your Schema Registry API credentials in a couple of places.
-
Open the pom.xml file.
-
In the <properties> section you will find three blank properties. Fill the following properties with the required values:
<schema.registry.url>{{ SR_URL }}</schema.registry.url>
<schema.registry.apikey>{{ SR_API_KEY }}</schema.registry.apikey>
<schema.registry.apisecret>{{ SR_API_SECRET }}</schema.registry.apisecret>
You can obtain the schema registry url by navigating to the Environment and viewing the details on the right hand side of the screen:
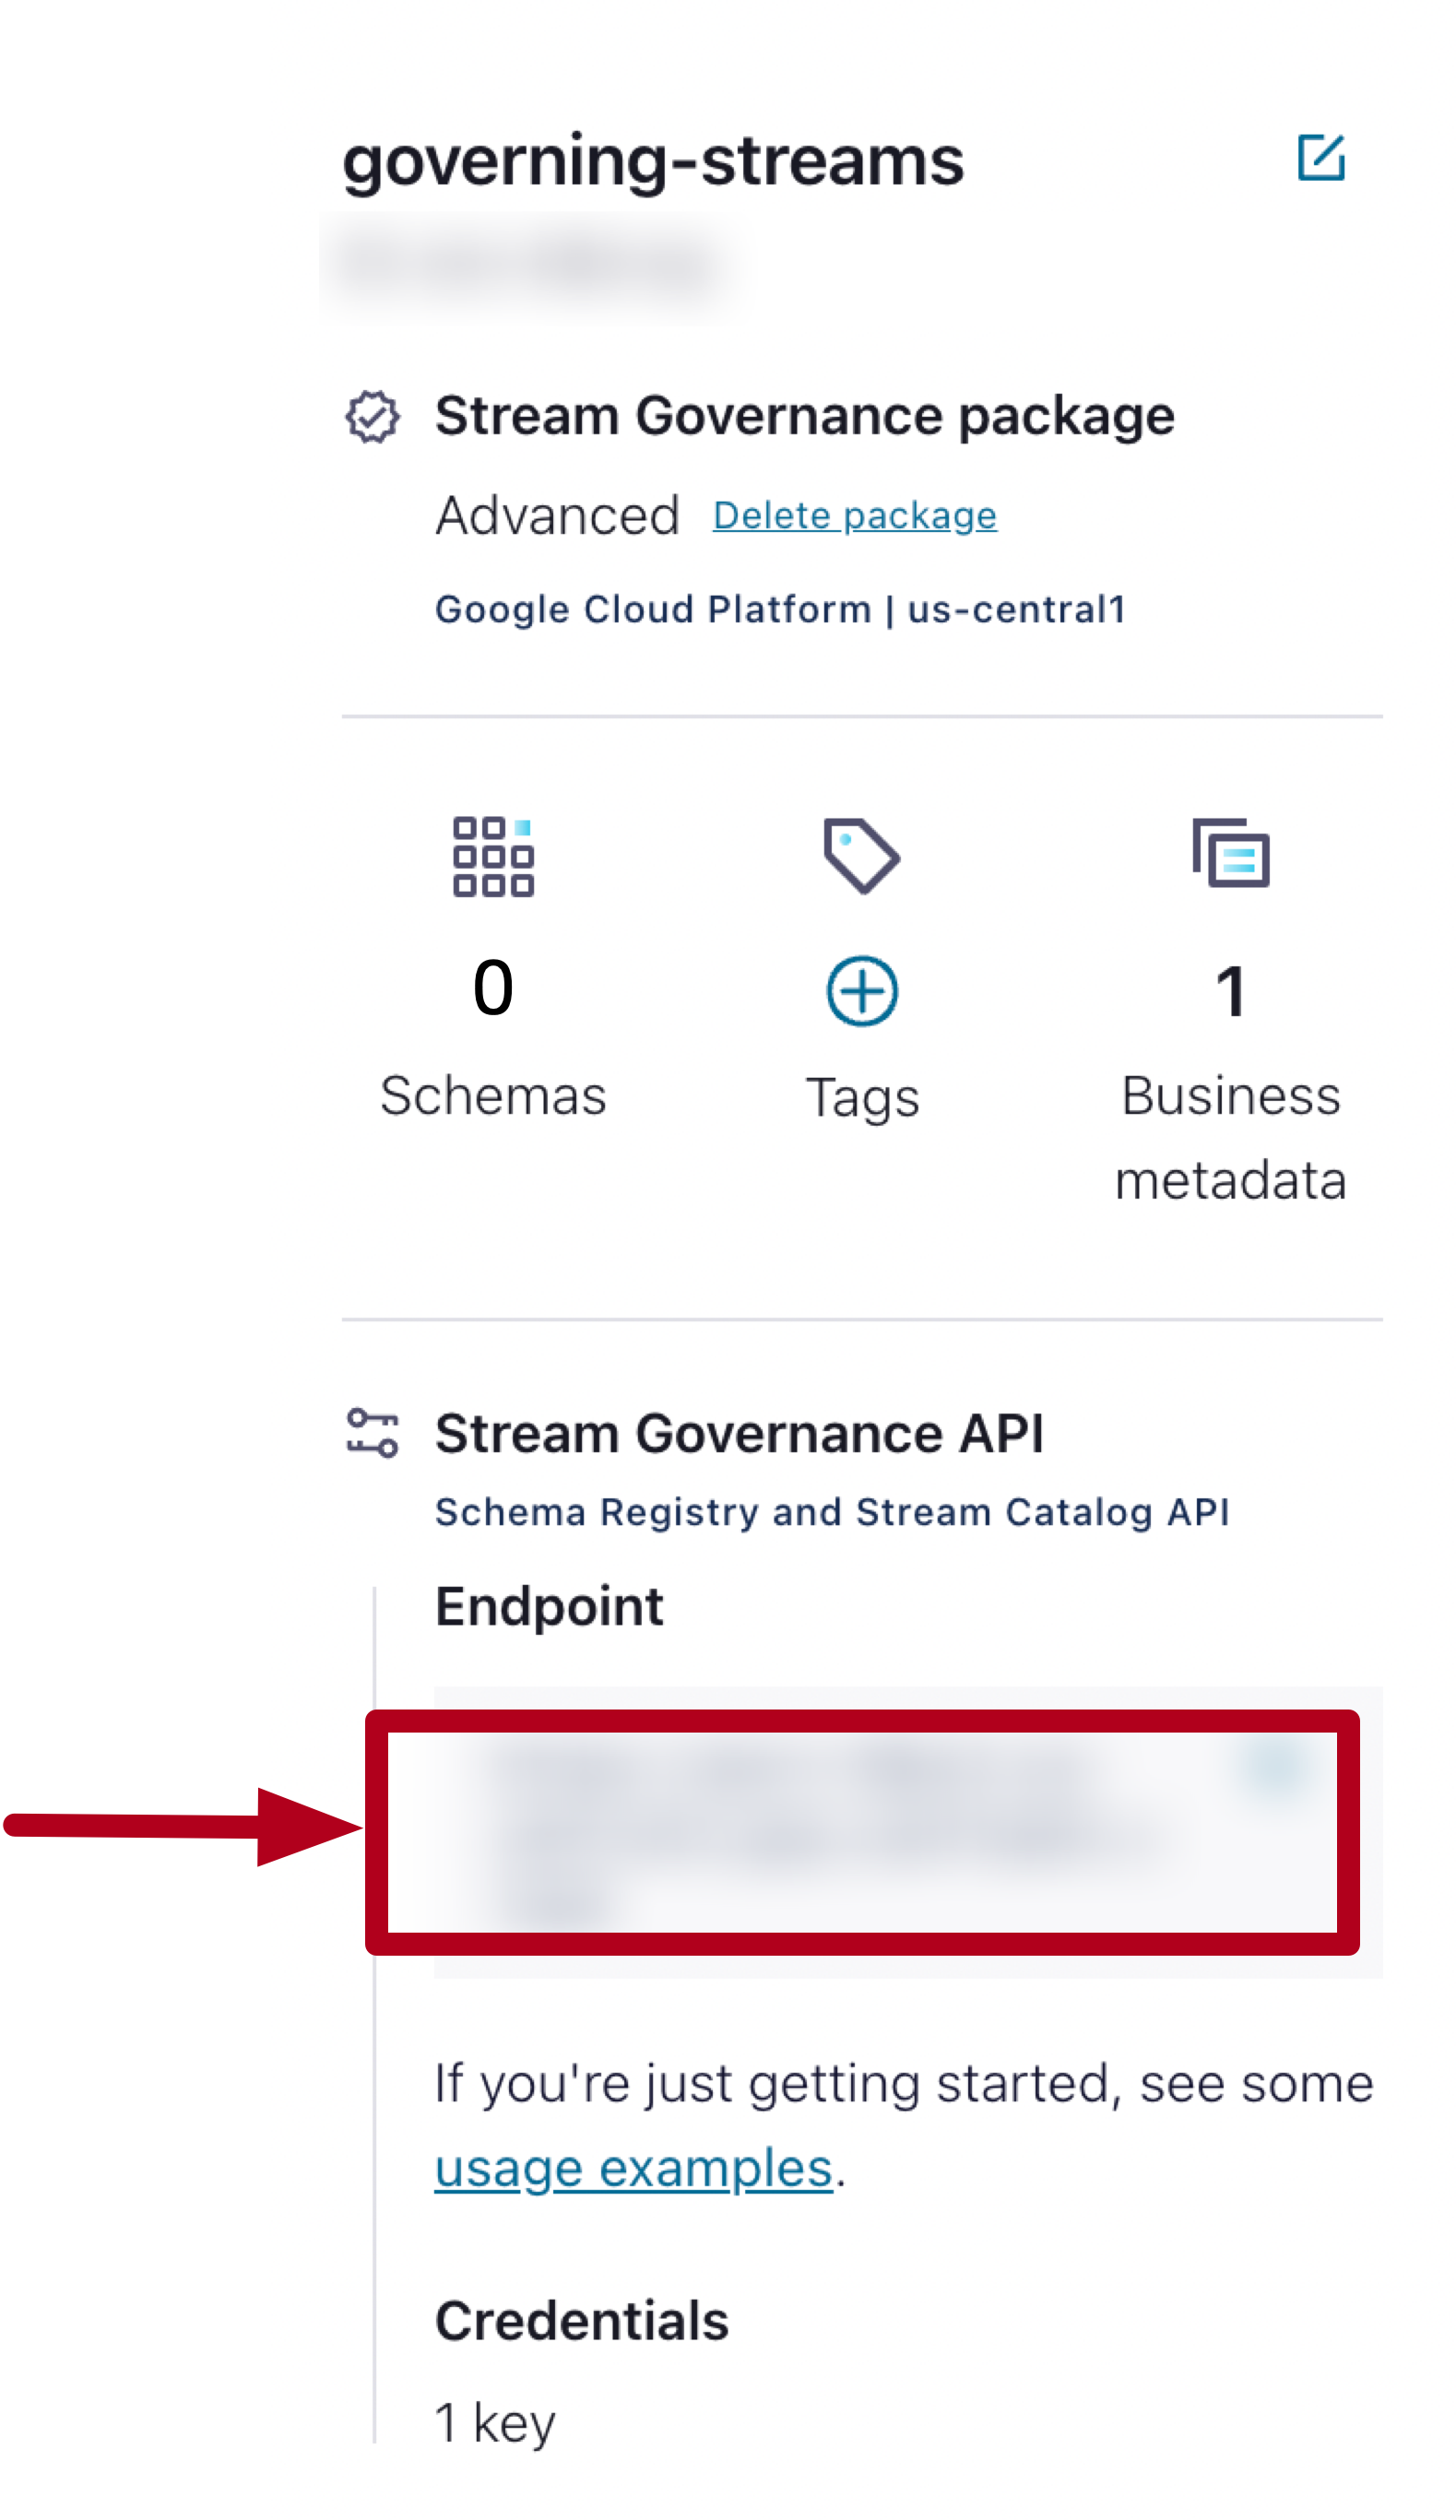
You should already have saved the API key for the Schema Registry when you set it up.
-
Open the src/main/resources/java.config file.
Have a look through the file. You'll find several placeholders for information you will need to fill in. Also note the use of the following settings:
auto.register.schemas=false
use.latest.version=true
As a general rule of thumb, you may not want to auto-register schemas. This can be dangerous because a mistake in your application could potentially replace the current version of the schema. For a production application you might want to be a little more careful about how schemas get registered.
In addition, we are also telling the Schema registry to use the latest version of the schema, rather than trying to derive the schema from the data being passed in.
These two settings are often used together (in fact, use.latest.version=true requires auto.register.schemas=false) to provide a more stable and predictable behavior from the schema registry.
-
Replace the following placeholders with the corresponding values (Note: SR = Schema Registry):
{{ CLUSTER_URL }}
{{ CLUSTER_API_KEY }}
{{ CLUSTER_API_SECRET }}
{{ SR_URL }}
{{ SR_API_KEY }}
{{ SR_API_SECRET }}
You can obtain the Cluster URL by navigating to the Cluster Overview > Cluster Settings, and looking for the Bootstrap Server.
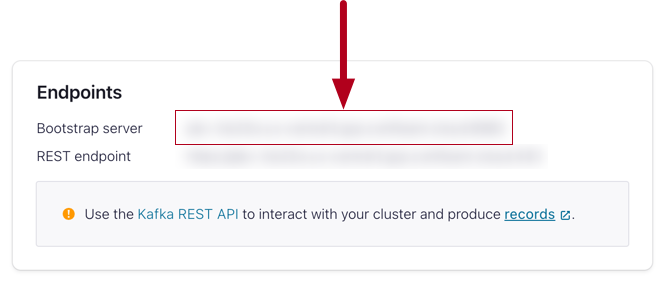
You should already have saved the API key for the Cluster when you set it up. Note: The file you download when you create the key also contains the bootstrap server address.


Command Line Reference
You can obtain your Schema Registry URL from the command line using the following (Endpoint URL):
confluent sr cluster describeTo obtain your Confluent Cluster URL you can use (Endpoint, but remove "SASL_SSL://"):
confluent kafka cluster describeCreate a Topic
Next, we need to create a topic for our application to push messages into. In this case, we are going to push a series of OrderCreated events into the topic. Therefore, it makes sense to name the topic OrderCreated. However, in a larger, more complex system, we might want to include additional data in the topic name, such as a namespace.
-
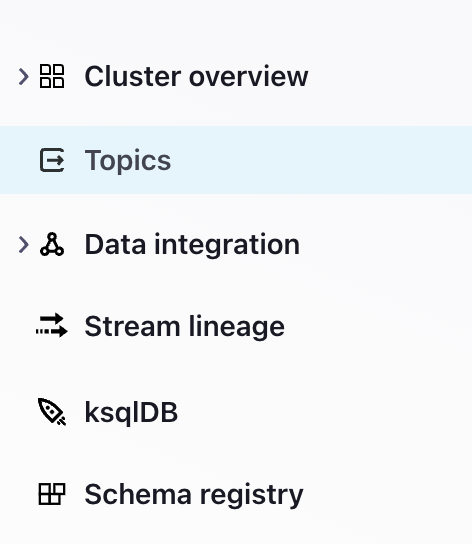
In the left-hand side navigation for your cluster, select Topics.
-
Create a new topic.
-
Name the topic OrderCreated to reflect the events that will be pushed into it. Otherwise, use the default settings for the topic.

Command Line Reference
If you prefer, you can also do this from the command line interface by running:
confluent kafka topic create OrderCreatedAdd a Schema
Now that we have a topic created, our next step is to attach a schema. There are multiple ways this can be acheived. However, perhaps the simplest is from within the topic itself.
-
If you aren't already inside the topic view, navigate to Topics, and select the OrderCreated topic.
-
At the top, you will see a set of tabs. Select the tab for Schema.
-
When presented with a choice for setting the Key or Value schema, choose Value (this is the default).
-
Select Set a schema.
-
You are given a choice of JSON Schema, Avro, and Protobuf. Select Avro for your Schema.
-
Next, we need to provide the schema itself. We are going to use the following schema:
{
    "type":"record",
    "name":"OrderCreated",
    "doc":"An event that is produced each time an order is created.",
    "namespace":"io.confluent",
    "fields":[
        {
            "name":"orderId",
            "doc":"The unique identifier for the order.",
            "type":"string"
        },
        {
            "name":"items",
            "doc":"A list of items in the order",
            "type": {
                "type":"array",
                "items":{
                    "name":"Item",
                    "type":"record",
                    "fields":[
                        {
                            "name":"itemId",
                            "doc":"The unique identifier for the item.",
                            "type":"string"
                        },
                        {
                            "name":"quantity",
                            "doc":"The quantity of the item in the order.",
                            "type":"int"
                        }
                    ]
                }
            }
        }
    ]
}
Note: Take a close look at the schema above. You will need to modify it later. In particular, notice that each element in the schema has a doc field with a description attached to it. This can be very useful for ensuring that the users of your schema understand exactly what is going into it.
-
Validate the schema and then Create it.
Note: Take a moment to look at the schema that has been created. You should be able to navigate the tree of objects that has been created inside the schema view.
-
Using the left-hand navigation, select the Schema registry.

Here, you should see that a Schema has been created named OrderCreated-value. The naming for the schemas follows the pattern topic-value or topic-key depending on whether you are creating a schema for the key or value of the message.

Command Line Reference
If you prefer, you can also do this from the command line interface by creating a file containing the schema (eg. OrderCreated.avsc) and then running:
confluent sr schema create --schema OrderCreated-value.avsc --subject OrderCreated-valueNote: You will be prompted for the API key and secret for your Schema Registry.
Download and Compile the Schema
Next, we need to make use of the schema inside our application. Our application has been set up to use the Avro plugin in order to generate code based on the schema. It also has a plugin for interacting with the schema registry.
-
Before we download the schema, let's quickly try to compile the code using the following command:
mvn clean compile packageThis will fail because it doesn't know what an OrderCreated event is. We haven't defined it.
-
To resolve this, let's download our schema using the Schema Registry maven plugin:
mvn schema-registry:downloadThis will place the schema file in your src/main/resources/avro folder. Open the folder and have a look at the downloaded schema.
-
Try compiling the code again. This time, the Avro plugin will compile the schema into the corresponding Java code, allowing the rest of the code to compile successfully.
Run the Application
Now that we have compiled the code, we can run the application.
-
Run the OrderService by executing:
mvn exec:java -Dexec.mainClass="io.confluent.OrderService" -
The application should begin producing messages to the OrderCreated topic. You can view these messages by navigating to the topic and selecting the Messages tab.
-
Let the application run for a few moments, then terminate it using <CTRL-C>.
Update the Schema
Next, we are going to apply a small update to the schema. The original schema might have been suitable for a simple in-person ordering system. However, for a more complex system, we are going to want to associate our order with a customer. We have decided to do this by attaching the customer's email to the order (We'll discuss in a later exercise why using the email address might be a bad idea).
-
Navigate to the schema either from the topic or through the schema registry.
-
Click the Evolve Schema button. This will open your schema for editing.
-
Copy and paste the following into the fields section of the schema (beneath the orderId):
{ "name":"email", "doc":"The email address for the customer placing the order.", "type":"string" }, -
Try to validate the schema.
Oops, something has gone wrong. The schema won't validate? What has happened?
The current schema is incompatible with older versions. We still have an old version of the producer that is going to be creating messages that don't have an email address associated with them. We may also have consumers that haven't been updated. In order to ensure that we continue to support the older producers and consumers, we need to provide a default value for this new addition.
In providing a default value, we will be able to update our consumers to use the new schema. The default value will ensure that those consumers can read the data, even if the producer isn't updated to include it yet.
Best Practice: When working with backward compatibility update the schema, then update the consumers to use the new schema, and finally update the producer. This ensures that your consumers will always be able to process the messages being produced.
-
Add a default value to the email address:
{ "name":"email", "doc":"The email address for the customer placing the order.", "type":"string", "default":"null" }, -
Validate and save the schema.
-
Notice that in the Schema view you have an option to select different versions of the schema. This will allow you to see which versions are available and compare them as required.
Best Practice: Always use the current version if possible.
Command Line Reference
To perform an update at the command line, you can simply create the schema a second time using the same name. This will add a new version of the schema. If the new version is incompatible, then the command will fail.
confluent sr schema create --schema OrderCreated-value.avsc --subject OrderCreated-valueUpdate the OrderService
Now that we have an updated schema, the next step is to update our message producer. Let's return to the OrderService and update the code.
-
Download the new schema by running:
mvn schema-registry:downloadIf you'd like, you can open the downloaded file to see the changes.
-
If you try to compile the code, you'll discover that there is no suitable constructor for the OrderCreated class. This is because there is now an additional field to account for.
-
Open OrderService.java and locate where the OrderCreated is being initialized. Just above that code, you will see where we generate an email. Pass the email into the constructor for OrderCreated.
Note: The order of the parameters depends on the order they were defined in the Schema. Which parameter will be the email?
Note: The changes you will be making in Java are very minor and we recommend trying them on your own. However, if you aren't comfortable editing Java code, you can copy the solution using the command:
./exercise.sh solve 07 OrderService.java -
Compile and run the application again.
Your application will now be producing messages according to the new version of the schema, rather than the old.
Finish
This brings us to the end of this exercise.
Use the promo codes GOVERNINGSTREAMS101 & CONFLUENTDEV1 to get $25 of free Confluent Cloud usage and skip credit card entry.
Be the first to get updates and new content
We will only share developer content and updates, including notifications when new content is added. We will never send you sales emails. 🙂 By subscribing, you understand we will process your personal information in accordance with our Privacy Statement.