Enhance your career, get your certificate as a Data Streaming Engineer | Get your Certificate
How to filter duplicate events per-time window from a Kafka topic with Flink SQL
How to filter duplicate events per-time window from a Kafka topic with Flink SQL
Consider a topic with events that represent clicks on a website. Each event contains an IP address, a URL, and a timestamp. In this tutorial, we'll leverage Flink SQL to deduplicate these click events on a per-time window basis.
Setup
Let's assume the following DDL for our base clicks table:
CREATE TABLE clicks (
    ip_address VARCHAR,
    url VARCHAR,
    ts TIMESTAMP(3),
    -- declare ts as event time attribute and use strictly ascending timestamp watermark strategy
    WATERMARK FOR ts AS ts
);
Deduplicate events
Given the clicks table definition above, we can deduplicate IP address / URL pairs on a per-time window basis with the following query:
SELECT window_start, window_end, ip_address, url
FROM (
        SELECT window_start, window_end, ip_address, url,
               ROW_NUMBER() OVER ( PARTITION BY window_start, window_end, ip_address, url ORDER BY ts ) AS rownum
        FROM TABLE(TUMBLE(TABLE clicks, DESCRIPTOR(ts), INTERVAL '1' HOUR))
     )
WHERE rownum <= 1;
Let's look at this from the inside subquery out. The subquery orders events by time and assigns a unique number per IP address and URL and per 1-hour window to each row. This process makes it possible to eliminate duplicate records where the row number is greater than one. Let’s discuss the critical parts of the subquery:
- ROW_NUMBER() starting at one, this assigns a unique, sequential number to each row
- PARTITION BY specifies how to partition the data for deduplication. This should be the column(s) which will only have one row per value after deduplication. In our case here it’s the window boundaries plus the IP address and URL.
- ORDER BY orders by the provided column, and it’s required to be a time attribute. The time attribute column can be processing time (system time of the machine running the Flink job) or event time. By default ORDER BY puts rows in ascending (ASC) order. By using ASC order you’ll keep the first row. Should you want to keep the last row you should use ORDER BY <time_attribute> DESC
- FROM TABLE(TUMBLE(...)) is where we specify 1-hour tumbling windows via the TUMBLE windowing TVF (table-valued function).
Running the example
You can run the example backing this tutorial in one of three ways: a Flink Table API-based JUnit test, locally with the Flink SQL Client against Flink and Kafka running in Docker, or with Confluent Cloud.
Flink Table API-based test
Prerequisites
- Java 11, e.g., follow the OpenJDK installation instructions here if you don't have Java.
- Docker running via Docker Desktop or Docker Engine
Run the test
Clone the confluentinc/tutorials GitHub repository (if you haven't already) and navigate to the tutorials directory:
git clone git@github.com:confluentinc/tutorials.git
cd tutorials
Run the following command to execute FlinkSqlFindingDistinctTest#testFindDistinct:
./gradlew clean :deduplication-windowed:flinksql:testThe test starts Kafka and Schema Registry with Testcontainers, runs the Flink SQL commands above against a local Flink StreamExecutionEnvironment, and ensures that the deduplicated results are what we expect.
Flink SQL Client CLI
Prerequisites
- Docker running via Docker Desktop or Docker Engine
- Docker Compose. Ensure that the command docker compose version succeeds.
Run the commands
Clone the confluentinc/tutorials GitHub repository (if you haven't already) and navigate to the tutorials directory:
git clone git@github.com:confluentinc/tutorials.git
cd tutorials
Start Flink and Kafka:
docker compose -f ./docker/docker-compose-flinksql.yml up -dNext, open the Flink SQL Client CLI:
docker exec -it flink-sql-client sql-client.shFinally, run following SQL statements to create the clicks table backed by Kafka running in Docker, populate it with test data, and run the deduplication query.
CREATE TABLE clicks (
    ip_address VARCHAR,
    url VARCHAR,
    ts TIMESTAMP(3),
    -- declare ts as event time attribute and use strictly ascending timestamp watermark strategy
    WATERMARK FOR ts AS ts
) WITH (
    'connector' = 'kafka',
    'topic' = 'clicks',
    'properties.bootstrap.servers' = 'broker:9092',
    'scan.startup.mode' = 'earliest-offset',
    'key.format' = 'raw',
    'key.fields' = 'ip_address',
    'value.format' = 'avro-confluent',
    'value.avro-confluent.url' = 'http://schema-registry:8081',
    'value.fields-include' = 'EXCEPT_KEY'
);
INSERT INTO clicks
VALUES ('10.0.0.1', 'https://acme.com/index.html', TO_TIMESTAMP('2023-07-09 01:00:00')),
('10.0.0.12', 'https://amazon.com/index.html', TO_TIMESTAMP('2023-07-09 01:10:00')),
('10.0.0.13', 'https://confluent/index.html', TO_TIMESTAMP('2023-07-09 01:20:00')),
('10.0.0.1', 'https://acme.com/index.html', TO_TIMESTAMP('2023-07-09 01:30:00')),
('10.0.0.12', 'https://amazon.com/index.html', TO_TIMESTAMP('2023-07-09 01:40:00')),
('10.0.0.1', 'https://acme.com/index.html', TO_TIMESTAMP('2023-07-09 02:10:00')),
('10.0.0.1', 'https://acme.com/index.html', TO_TIMESTAMP('2023-07-09 03:10:00'));SELECT window_start, window_end, ip_address, url
FROM (
SELECT window_start, window_end, ip_address, url,
ROW_NUMBER() OVER ( PARTITION BY window_start, window_end, ip_address, url ORDER BY ts ) AS rownum
FROM TABLE(TUMBLE(TABLE clicks, DESCRIPTOR(ts), INTERVAL '1' HOUR))
)
WHERE rownum <= 1;The query output should look like this. Note that there is no row for the event that occurred at time 03:10:00 because the 03:00:00 - 04:00:00 window is still open.
           window_start              window_end                     ip_address                            url
2023-07-09 01:00:00.000 2023-07-09 02:00:00.000                       10.0.0.1    https://acme.com/index.html
2023-07-09 01:00:00.000 2023-07-09 02:00:00.000                      10.0.0.12  https://amazon.com/index.html
2023-07-09 01:00:00.000 2023-07-09 02:00:00.000                      10.0.0.13   https://confluent/index.html
2023-07-09 02:00:00.000 2023-07-09 03:00:00.000                       10.0.0.1    https://acme.com/index.html
When you are finished, clean up the containers used for this tutorial by running:
docker compose -f ./docker/docker-compose-flinksql.yml downConfluent Cloud
Prerequisites
- A Confluent Cloud account
- A Flink compute pool created in Confluent Cloud. Follow this quick start to create one.
Run the commands
In the Confluent Cloud Console, navigate to your environment and then click the Open SQL Workspace button for the compute pool that you have created.
Select the default catalog (Confluent Cloud environment) and database (Kafka cluster) to use with the dropdowns at the top right.
Finally, run following SQL statements to create the clicks table, populate it with test data, and run the deduplication query.
CREATE TABLE clicks (
    ip_address VARCHAR,
    url VARCHAR,
    ts TIMESTAMP(3),
    -- declare ts as event time attribute and use strictly ascending timestamp watermark strategy
    WATERMARK FOR ts AS ts
)
DISTRIBUTED BY (ip_address) INTO 1 BUCKETS;
INSERT INTO clicks
VALUES ('10.0.0.1', 'https://acme.com/index.html', TO_TIMESTAMP('2023-07-09 01:00:00')),
('10.0.0.12', 'https://amazon.com/index.html', TO_TIMESTAMP('2023-07-09 01:10:00')),
('10.0.0.13', 'https://confluent/index.html', TO_TIMESTAMP('2023-07-09 01:20:00')),
('10.0.0.1', 'https://acme.com/index.html', TO_TIMESTAMP('2023-07-09 01:30:00')),
('10.0.0.12', 'https://amazon.com/index.html', TO_TIMESTAMP('2023-07-09 01:40:00')),
('10.0.0.1', 'https://acme.com/index.html', TO_TIMESTAMP('2023-07-09 02:10:00')),
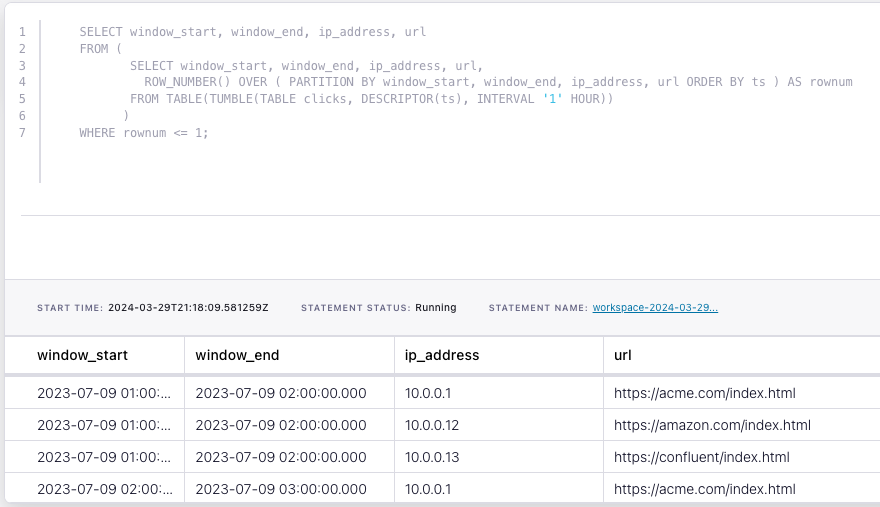
('10.0.0.1', 'https://acme.com/index.html', TO_TIMESTAMP('2023-07-09 03:10:00'));SELECT window_start, window_end, ip_address, url
FROM (
SELECT window_start, window_end, ip_address, url,
ROW_NUMBER() OVER ( PARTITION BY window_start, window_end, ip_address, url ORDER BY ts ) AS rownum
FROM TABLE(TUMBLE(TABLE clicks, DESCRIPTOR(ts), INTERVAL '1' HOUR))
)
WHERE rownum <= 1;The query output should look like this. Note that there is no row for the event that occurred at time 03:10:00 because the 03:00:00 - 04:00:00 window is still open.