Enhance your career, get your certificate as a Data Streaming Engineer | Get your Certificate
Create an Application Delivery Pipeline with GitOps (Exercise)

Gilles Philippart
Principal Software Practice Lead
Overview
Start from scratch and in under 10 minutes, have a GitOps system that auto-deploys a streaming application in a Kubernetes cluster, using just a handful of config files in a Git repository.
Instructions
In this exercise, we're going to see how to deploy and run a Kafka streaming application on Kubernetes using the GitOps approach.
You will:
- Create a local Kubernetes cluster.
- Install the FluxCD GitOps tool.
- Build and package a simple Kafka producer application.
- Deploy this application by just committing code to GitHub.
You'll need:
- A Confluent Cloud cluster. The staging cluster you provisioned in the previous hands-on exercise will do. If you don't have one yet, follow https://docs.confluent.io/cloud/current/get-started/index.html.
- A GitHub account
- Homebrew
Note: there's a troubleshooting section at the bottom of this exercise.
Install Kind
You need a Kubernetes cluster to deploy FluxCD and run the sample application. If you don't already have a Kubernetes cluster to play with, you can create one with Kind.
Once you have Homebrew installed, just run:
brew install kindCreate a local Kubernetes cluster
Next up, create a cluster
kind create cluster --name stagingWe're going to use kubectl just as a handy file creation tool and also to peek into the cluster to see what's going on.
brew install kubectlLet's check if we can see the Kubernetes node created by Kind:
kubectl get nodesHere's what you should see:
NAME                                   STATUS   ROLES           AGE   VERSION
staging-control-plane   Ready    control-plane   19s   v1.27.1
Install FluxCD
Next up, let's install the FluxCD GitOps tool.
brew install fluxcd/tap/fluxYou will need to export your GitHub username and a classic GitHub Personal Access Token, just make sure that this token has the permissions to read/write repositories AND packages too.
export GITHUB_USER=<your github username>
export GITHUB_TOKEN=<your github personal access token>
Let's verify that we have all we need before going further with FluxCD:
flux check --preIf you see the following, it's all good!
► checking prerequisites
✔ Kubernetes 1.27.1 >=1.25.0-0
✔ prerequisites checks passed
Let's have flux go through the bootstrap process to create a new GitHub repository and link it to your freshly installed Kubernetes cluster. You will have to type or paste your GitHub personal access token.
flux bootstrap github \
  --owner=$GITHUB_USER \
  --repository=streaming-applications-gitops \
  --context=kind-staging \
  --branch=main \
  --path=./clusters/staging \
  --personal
Note that in this exercise, we're going to use a few flux create commands to create the files locally, but we're also going to write yaml files directly too to prove that there's nothing special about the flux create command. Ultimately, it's all about having the right files in the right place in the repo!
Once the bootstrap is done, when you list the namespaces, you should see that the flux bootstrap command has created a flux-system namespace:
kubectl get nsThis is what I got on my machine:
NAME                 STATUS   AGE
default              Active   106s
flux-system          Active   24s
kube-node-lease      Active   106s
kube-public          Active   106s
kube-system          Active   106s
local-path-storage   Active   102s
In order to make changes to your cluster, you must first clone the streaming-applications-gitops GitHub repository on your machine:
git clone https://github.com/$GITHUB_USER/streaming-applications-gitops
cd streaming-applications-gitops
A key concern when adopting GitOps is how you handle your secrets as it's out of question to store them in clear in the Git repository.
Secrets Managements
In order to store our secrets, we're not going to use the Sealed Secret option which I mentioned in the video course, but rely on Flux native secrets decryption instead. Flux built-in decryption feature works great with CNCF SOPS and Age encryption.
Let's install both tools:
brew install age sopsGenerate a key pair with Age:
age-keygen -o private.agekeyCreate a Kubernetes Secret in the flux-system namespace with the private key:
kubectl create secret generic sops-age --namespace=flux-system --from-file=private.agekeySave the public key to a file in the repo:
age-keygen -y private.agekey > clusters/staging/public.agekeyStore the private key in a safe place like a Vault and only use it for disaster recovery. It's best to delete the private key from your filesystem to avoid pushing it upstream:
rm private.agekeyBefore we move on and create the files necessary to deploy our apps, we're going to configure some infrastructure components.
Create the 'infrastructure' directory structure
mkdir -p infrastructure/controllers
mkdir -p infrastructure/staging
Install the Weave GitOps Dashboard
It's always nice to have a dashboard to see what's going on, so let's install the Weave GitOps Dashboard:
Install the open source Weave GitOps CLI with:
brew tap weaveworks/tap
brew install weaveworks/tap/gitops
Create the dashboard Helm Repository and Release configuration file with:
PASSWORD="admin"
gitops create dashboard ww-gitops \
  --password=$PASSWORD \
  --export > infrastructure/controllers/weave-gitops-dashboard.yaml
Create the following Kustomization file as clusters/staging/infrastructure.yaml:
apiVersion: kustomize.toolkit.fluxcd.io/v1
kind: Kustomization
metadata:
  name: infrastructure
  namespace: flux-system
spec:
  decryption:
    provider: sops
    secretRef:
      name: sops-age
  interval: 2m
  retryInterval: 1m
  timeout: 5m
  sourceRef:
    kind: GitRepository
    name: flux-system
  path: ./infrastructure/controllers
  prune: true
  wait: true
Remember, nothing will be deployed until we commit and push.
Deploy the infrastructure
Commit and push our infrastructure components:
git add clusters infrastructure
git commit -m "Deploy infrastructure"
git push origin main
# this command will block until all things are ready (ks stands for kustomization)
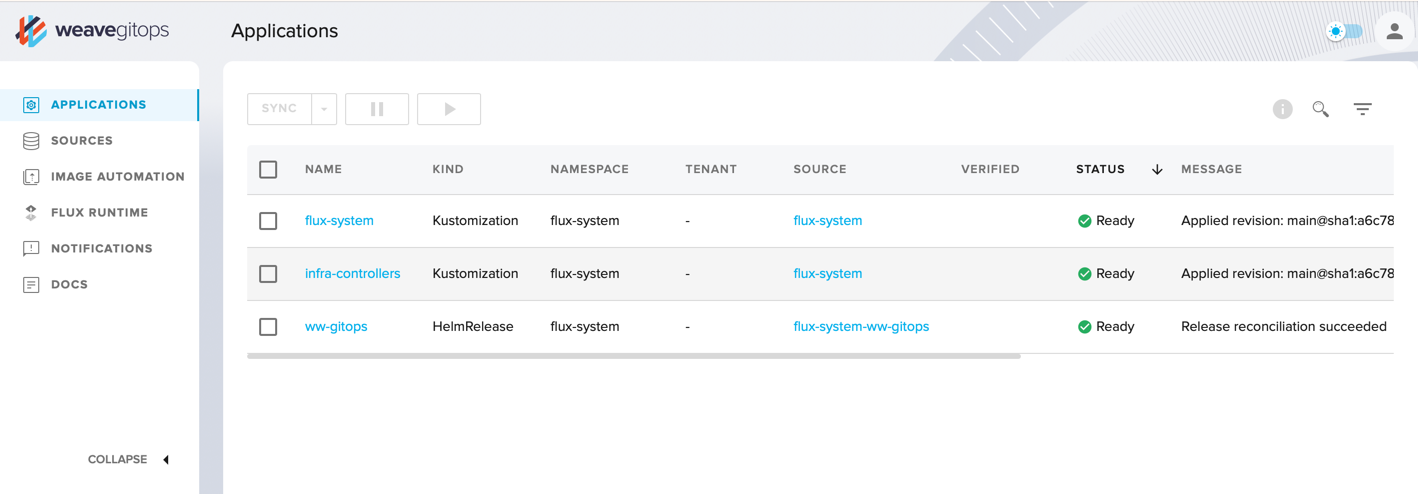
flux reconcile ks flux-system --with-sourceOnce done, run the following command to wait for the infrastructure components to be installed:
flux reconcile ks infrastructureWhen this command terminates, in a separate terminal, create a client tunnel by forwarding the service port to your host machine:
kubectl port-forward svc/ww-gitops-weave-gitops -n flux-system 9001:9001Point your browser to http://localhost:9001, the login is admin and the password is admin too. You will be able to use the dashboard to understand what's going on and troubleshoot issues.
Next, let's configure application deployment.
Create the apps directory structure
Create the following directories:
mkdir -p apps/base/simple-streaming-app
mkdir -p apps/staging
Create secrets to connect to Confluent Cloud
Create the following Kubernetes Secret file to store the Confluent Cloud client properties (update the values with yours):
kubectl create secret generic client-credentials \
    --from-literal=bootstrap-server=YOUR_BOOTSTRAP_SERVER \
    --from-literal=cluster-api-key=YOUR_CLUSTER_API_KEY \
    --from-literal=cluster-api-secret=YOUR_CLUSTER_API_SECRET \
    --from-literal=schema-registry-url=YOUR_SCHEMA_REGISTRY_URL \
    --from-literal=schema-registry-api-key=YOUR_SCHEMA-REGISTRY-API-KEY \
    --from-literal=schema-registry-api-secret=YOUR_SCHEMA-REGISTRY-API-SECRET \
    --dry-run=client \
    --namespace=demo-apps \
    -o yaml > apps/staging/client-credentials-secret.yaml
In my case, the client-credentials-secret.yaml file looks like this:
apiVersion: v1
data:
  bootstrap-server: WU9VUl********
  cluster-api-key: WU9VUl********
  cluster-api-secret: WU9VUl********
  schema-registry-api-key: WU9VUl********
  schema-registry-api-secret: WU9VUl********
  schema-registry-url: WU9VUl********
kind: Secret
metadata:
  creationTimestamp: null
  name: client-credentials
Let's encrypt it in-place:
sops --age=$(cat clusters/staging/public.agekey) \
--encrypt --encrypted-regex '^(data|stringData)$' \
--in-place apps/staging/client-credentials-secret.yaml
If you open the apps/staging/client-credentials-secret.yaml file, you will see that the value of the data property has been encrypted.
Create a secret for your Helm Chart registry
Flux needs permission to access your Helm Charts registry in order to fetch the helm charts from your own private GitHub Container Registry.
Create a secret for your token:
flux create secret oci ghcr-auth \
  --url=ghcr.io \
  --username=flux \
  --password=${GITHUB_TOKEN} \
  --export > apps/staging/ghcr-auth.yaml
Also encrypt the sensitive data with:
sops --age=$(cat clusters/staging/public.agekey) \
--encrypt --encrypted-regex '^(data|stringData)$' \
--in-place apps/staging/ghcr-auth.yaml
Create a secret to access your Docker Images registry
You also need to generate a docker registry secret, so that Flux can pull docker images from your own private GitHub Container Registry:
kubectl create secret docker-registry docker-regcred \
--dry-run=client \
--docker-server=ghcr.io \
--docker-username=$GITHUB_USER \
--docker-password=$GITHUB_TOKEN \
--namespace=demo-apps \
-o yaml > apps/staging/docker-secret.yaml
Once again, encrypt the sensitive data in-place:
sops --age=$(cat clusters/staging/public.agekey) \
--encrypt --encrypted-regex '^(data|stringData)$' \
--in-place apps/staging/docker-secret.yaml
Create a file apps/base/simple-streaming-app/namespace.yaml to have the namespace automatically created too:
apiVersion: v1
kind: Namespace
metadata:
  name: demo-apps
  labels:
    toolkit.fluxcd.io/tenant: demo-dev-team
Create a file apps/base/simple-streaming-app/release.yaml:
apiVersion: helm.toolkit.fluxcd.io/v2beta1
kind: HelmRelease
metadata:
  name: simple-streaming-app
  namespace: demo-apps
spec:
  interval: 10m # check for drift in-cluster
  releaseName: simple-streaming-app
  chart:
    spec:
      chart: simple-streaming-app
      reconcileStrategy: ChartVersion
      interval: 2m # check for new chart versions every two minutes
      sourceRef:
        kind: HelmRepository
        name: simple-streaming-app-helm-repo
  install:
    remediation:
      retries: -1 # retry forever for demo purpose
  upgrade:
    remediation:
      retries: -1 # retry forever for demo purpose
Create a flux source for the application Helm Repository
flux create source helm simple-streaming-app-helm-repo \
  --url=oci://ghcr.io/$GITHUB_USER/charts \
  --interval=1m \
  --namespace=demo-apps \
  --secret-ref=docker-regcred \
  --export > apps/base/simple-streaming-app/repository.yaml
Finally, create a Kustomization file apps/base/simple-streaming-app/kustomization.yaml:
apiVersion: kustomize.config.k8s.io/v1beta1
kind: Kustomization
namespace: demo-apps
resources:
  - namespace.yaml
  - repository.yaml
  - release.yaml
Customize values for staging
We're going to customize the versions of the helm chart versions we allow to deploy in the staging cluster. Create the file apps/staging/simple-streaming-app-values.yaml:
apiVersion: helm.toolkit.fluxcd.io/v2beta1
kind: HelmRelease
metadata:
  name: simple-streaming-app
  namespace: demo-apps
spec:
  chart:
    spec:
      version: ">=0.1-alpha"
  test:
    enable: false
Finally, create the Kustomization file apps/staging/kustomization.yaml:
apiVersion: kustomize.config.k8s.io/v1beta1
kind: Kustomization
resources:
  - ../base/simple-streaming-app
  - docker-secret.yaml
  - client-credentials-secret.yaml
patches:
  - path: simple-streaming-app-values.yaml
    target:
      kind: HelmRelease
Build, package and publish the example application
Note that in this hands-on exercise, for the sake of brevity, we're going to build and package the app manually instead of building a CI/CD pipeline.
Fork the https://github.com/confluentinc/simple-streaming-app repository under your own username and then clone it on your machine.
git clone https://github.com/$GITHUB_USER/simple-streaming-app && cd simple-streaming-app In the deploy/simple-streaming-app/values.yaml file, replace YOUR_GITHUB_USERNAME with your own GitHub username.
Next, log into the GitHub Container Registry with Docker:
echo $GITHUB_TOKEN | docker login ghcr.io -u $GITHUB_USER --password-stdinFirst, let's build the Docker image:
docker build -t ghcr.io/$GITHUB_USER/simple-streaming-app:0.1.0 .
docker push ghcr.io/$GITHUB_USER/simple-streaming-app:0.1.0
Next up, log into the Helm Registry:
echo $GITHUB_TOKEN | helm registry login ghcr.io/$GITHUB_USER --username $GITHUB_USER --password-stdinLet's build the application helm chart package:
cd deploy
helm package simple-streaming-app
Finally, publish it to GitHub Container Registry under /charts:
export CHART_VERSION=$(grep 'version:' ./simple-streaming-app/Chart.yaml | tail -n1 | awk '{ print $2 }')
helm push ./simple-streaming-app-${CHART_VERSION}.tgz oci://ghcr.io/$GITHUB_USER/charts/
Point your browser to your own Helm Chart repository and verify that it's there:
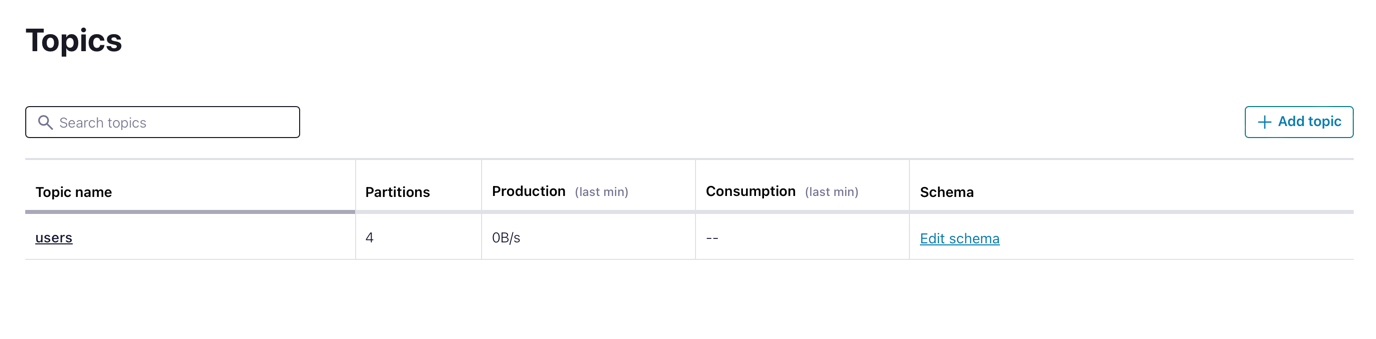
open https://github.com/users/$GITHUB_USER/packages/containerCreate the users topic
Before we deploy the application, we need the topic in Confluent Cloud. You can either:
- Create a pre-task that runs a curl command and use the Confluent Cloud Topic Creation API.
- Create a pre-task with the Weave GitOps Terraform Controller to reconcile a Terraform Topic resource the GitOps way
For the sake of brevity, just create the users topic manually in the Confluent Cloud UI console.
Deploy the application in the Staging cluster
Our last step is to actually deploy the application in the staging cluster.
You must create the following file as clusters/staging/apps.yaml:
apiVersion: kustomize.toolkit.fluxcd.io/v1
kind: Kustomization
metadata:
  name: apps
  namespace: flux-system
spec:
  dependsOn:
    - name: infrastructure
  decryption:
    provider: sops
    secretRef:
      name: sops-age
  interval: 1m0s
  sourceRef:
    kind: GitRepository
    name: flux-system
  path: ./apps/staging
  prune: true
  wait: true
  timeout: 1m0s
It's time to deploy the applications, you just have to commit and push:
git add apps clusters
git commit -m "Deploy apps"
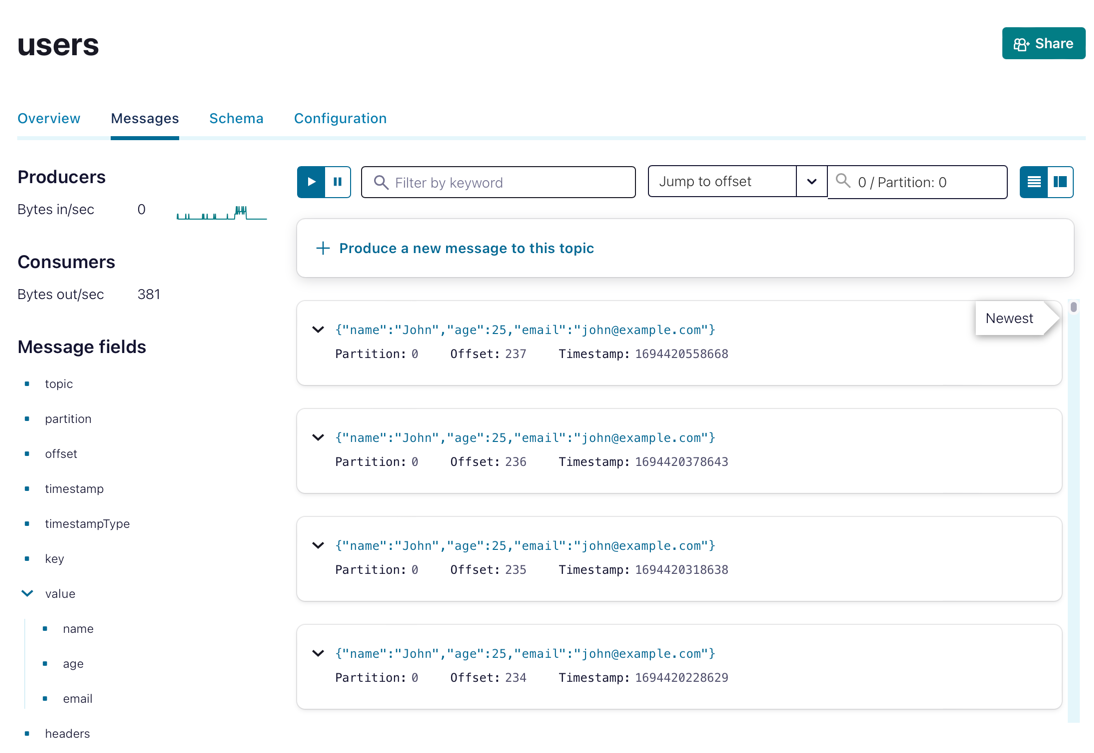
git push origin mainOnce the application deployment is reconciled, you will see that messages will be published every 30 seconds in the users topic in your Confluent Cloud Cluster.
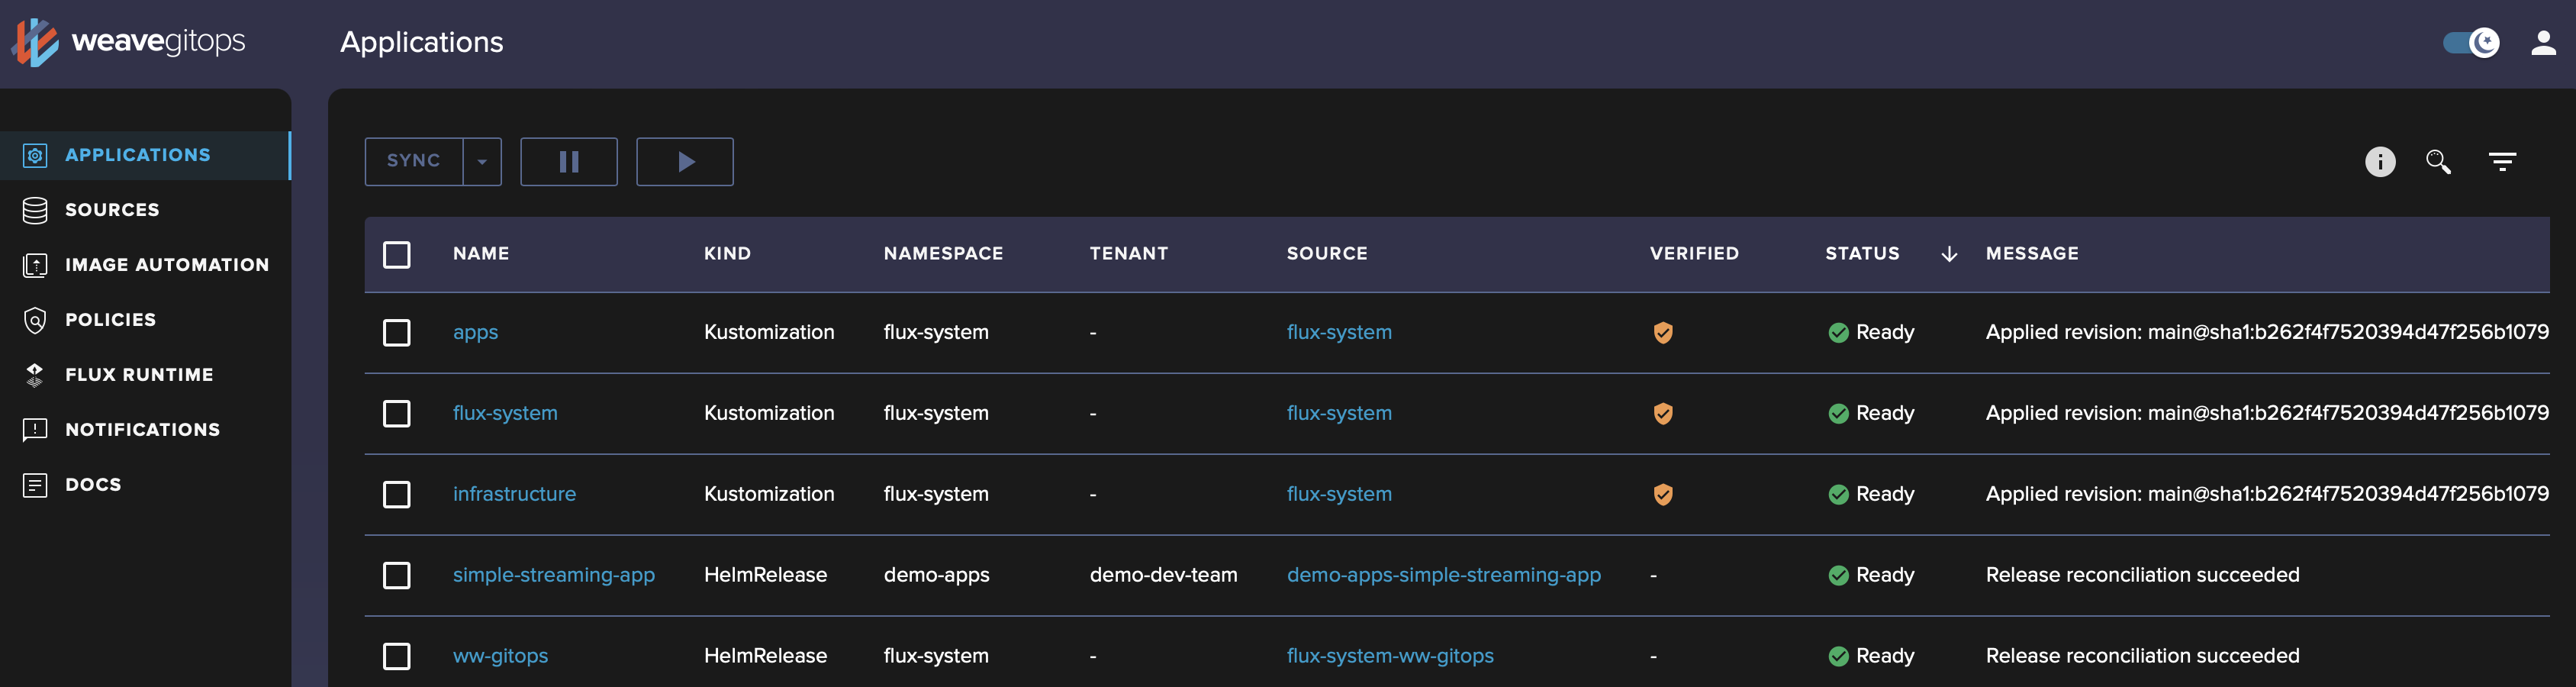
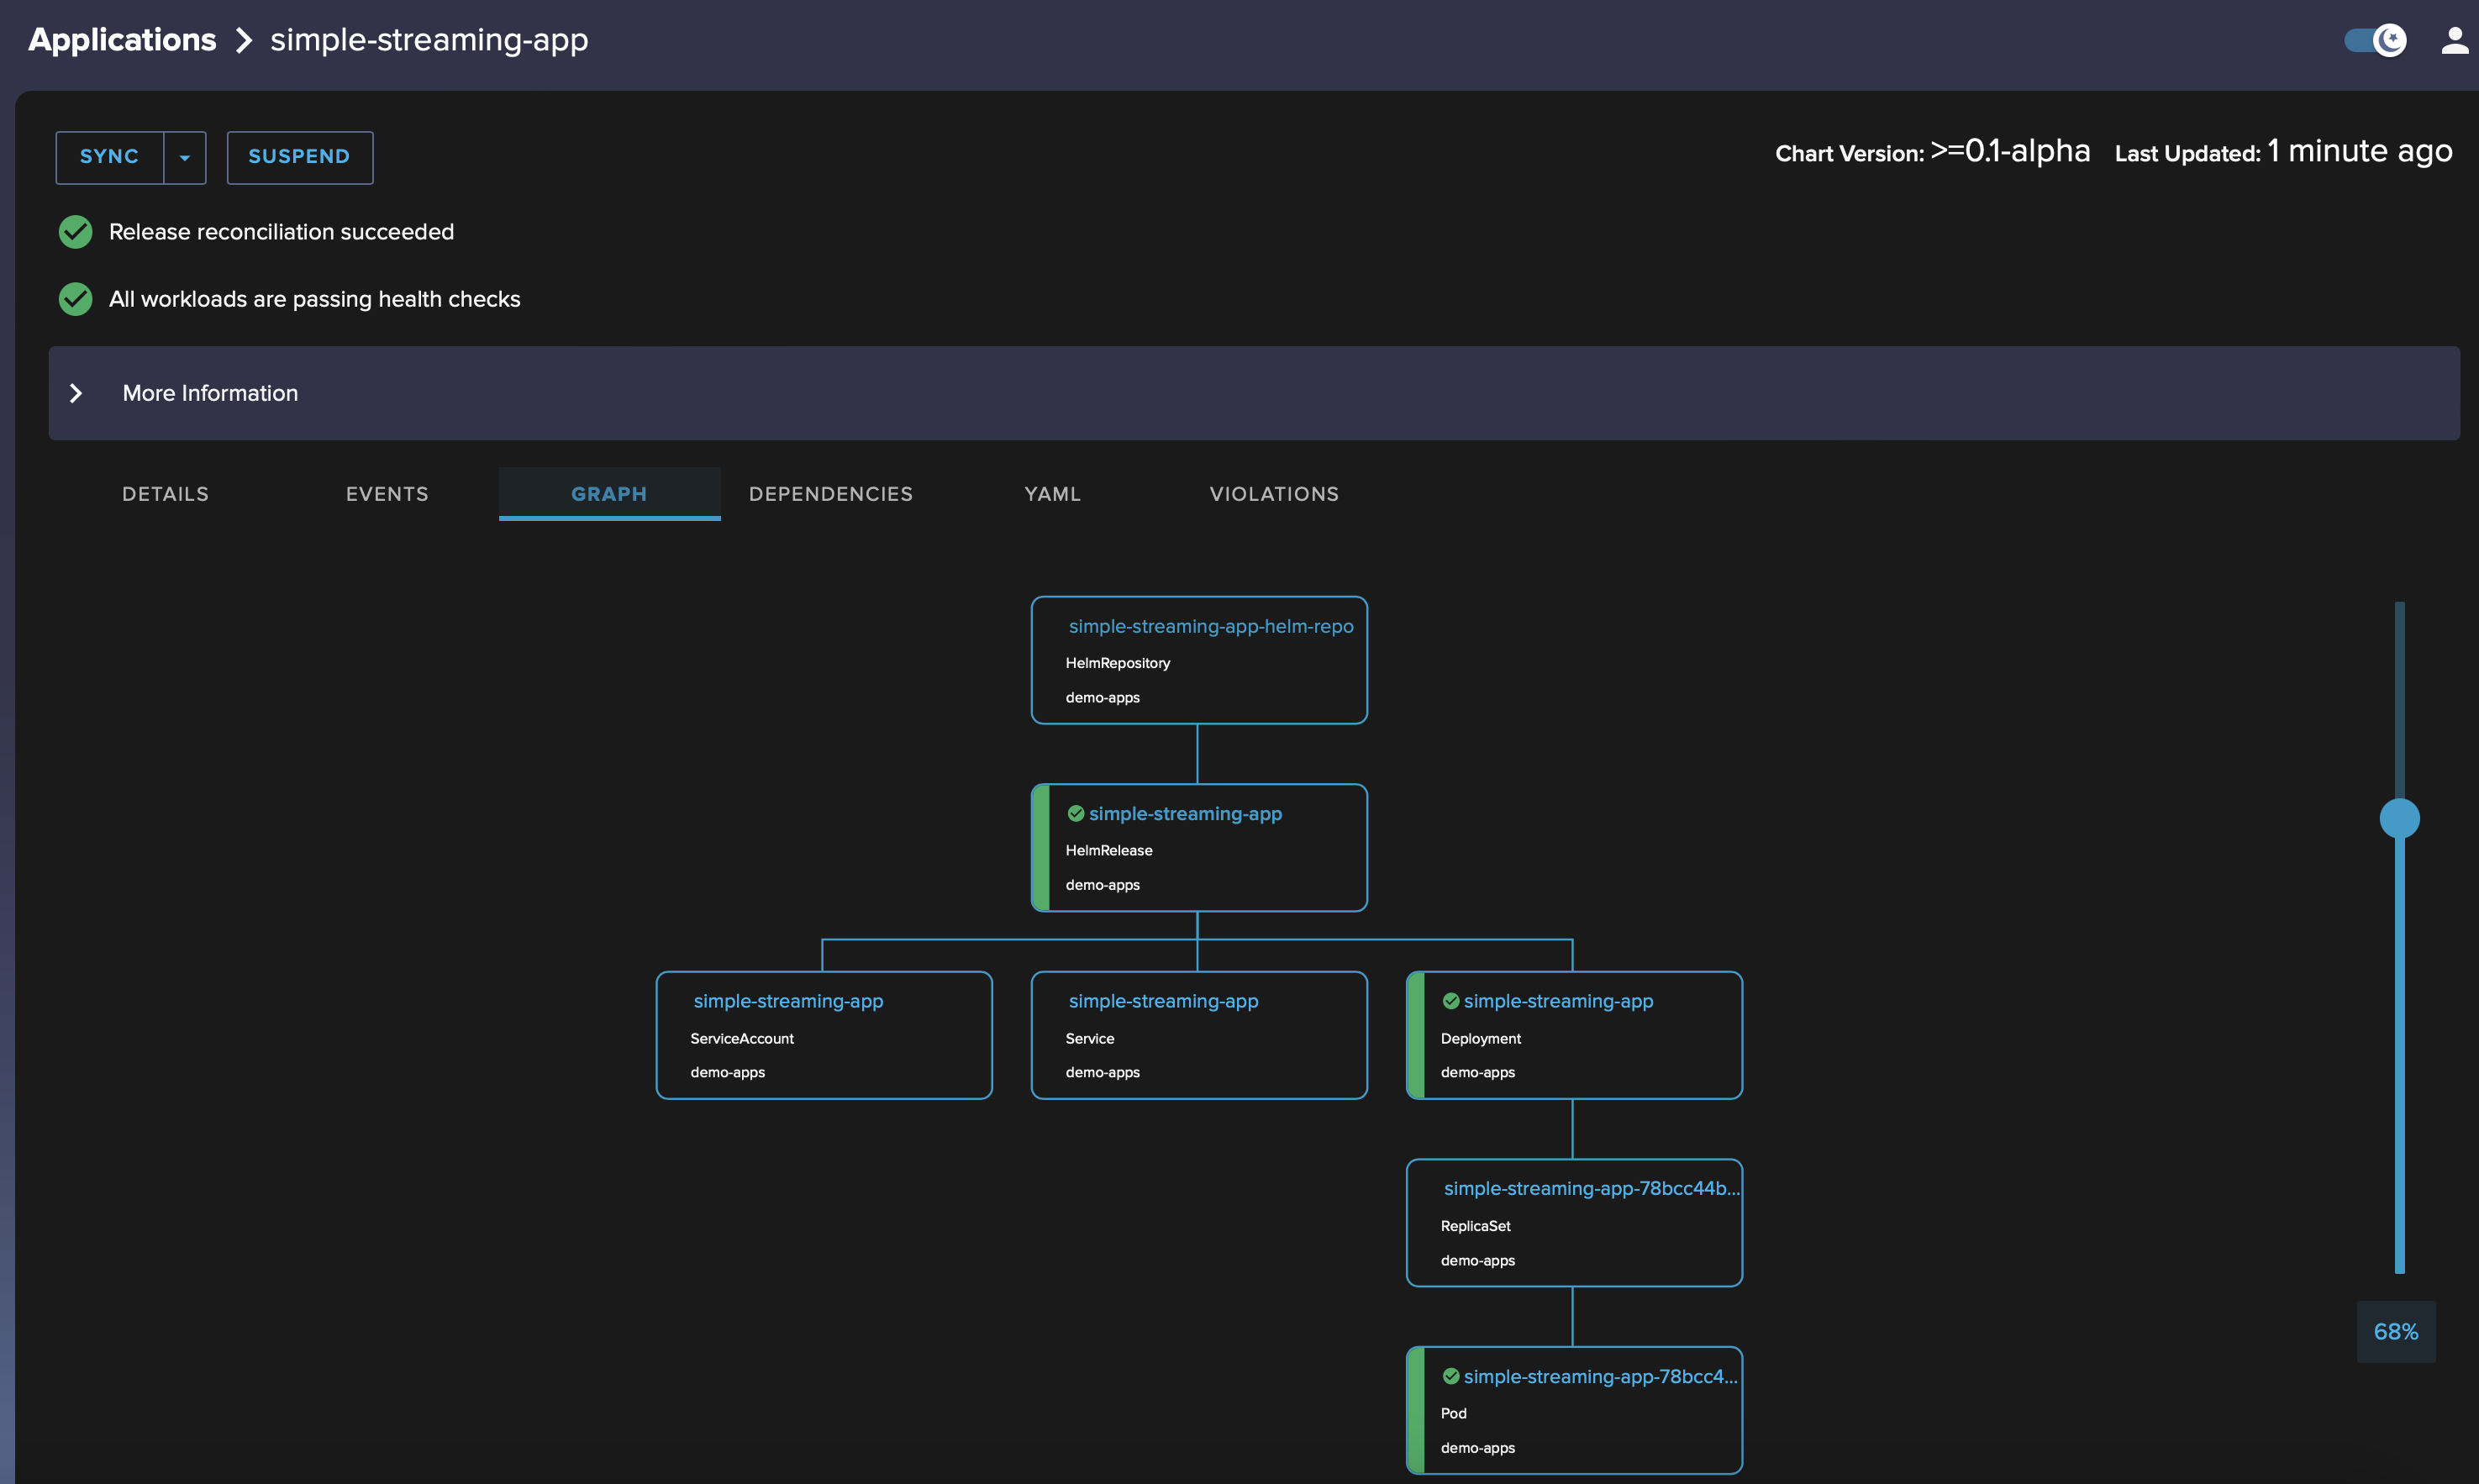
The Flux dashboard at http://localhost:9001 should now be showing all the deployed components:
You can also drill down in each one and display a relationship graph, e.g. for simple-streaming-app:
Update the application
Let's verify that publishing a new version of the application will have it deployed automatically.
-
Update SimpleStreamingApp.java and change the name and email from John and john@example.com to Jane and jane@example.com.
-
Bump version and appVersion values in Charts.yaml to 0.2.0
-
In the top directory of the repo, run
docker build -t ghcr.io/$GITHUB_USER/simple-streaming-app:0.2.0 . docker push ghcr.io/$GITHUB_USER/simple-streaming-app:0.2.0 -
Package the new Helm chart with cd deploy && helm package simple-streaming-app
-
Publish it to ghcr.io with:
export CHART_VERSION=$(grep 'version:' ./simple-streaming-app/Chart.yaml | tail -n1 | awk '{ print $2 }')
helm push ./simple-streaming-app-${CHART_VERSION}.tgz oci://ghcr.io/$GITHUB_USER/charts/
Wait for a moment, and you will see new messages published with Jane, congratulations!
Troubleshooting
If you encounter an error, first validate that all your files are valid by using the validate.sh script here, note that you need to brew install kustomize kubeconform to run the script.
If you want to check that you have configured the apps kustomization correctly run
flux tree kustomization appsThe output should be:
Kustomization/flux-system/apps
├── Namespace/demo-apps
├── Secret/demo-apps/client-credentials
├── Secret/demo-apps/docker-regcred
├── HelmRelease/demo-apps/simple-streaming-app
│   ├── ServiceAccount/demo-apps/simple-streaming-app
│   ├── Service/demo-apps/simple-streaming-app
│   └── Deployment/demo-apps/simple-streaming-app
└── HelmRepository/demo-apps/simple-streaming-app-helm-repo
Use the flux events command or the UI dashboard to see the events that occurred in Flux.
Going further
If you want to go further, you can :
- investigate multi-tenancy with Manage multi-tenant clusters with Flux
- implement a production promotion workflow similar to what we've done in the previous hands-on exercise using GitHub Actions and Pull Requests. You can find instructions for doing so on Promote Flux Helm Releases with GitHub Actions.
Closing remarks
- This exercise is loosely inspired from the GitOps workflow example for multi-env deployments with Flux, Kustomize and Helm. written by the Flux team.
- Kudos to Stefan Prodan from Weaveworks for reviewing this exercise and suggesting improvements.
Use the promo codes KAFKAPROD101 & CONFLUENTDEV1 to get $25 of free Confluent Cloud usage and skip credit card entry.
Be the first to get updates and new content
We will only share developer content and updates, including notifications when new content is added. We will never send you sales emails. 🙂 By subscribing, you understand we will process your personal information in accordance with our Privacy Statement.