Enhance your career, get your certificate as a Data Streaming Engineer | Get your Certificate
Completing the Event Model (Exercise)


Bobby Calderwood
Sr. Director of Architecture
Exercise: Completing the Event Model
Overview
The outcome of Exercise 1 was a storyboard of our system, e.g. the sequence of business Events with Interfaces highlighting key moments of the user experience. Using this storyboard as our starting point, we'll complete our Event Model by identifying our Command and Read Model API, connecting the model components together with data flow arrows, and identifying and integrating our Event Streams. As before, more detailed instructions can be found in the GitHub repository.
Completing this Exercise with Evident Design
Create a new Event Model in Evident Design for each step, and follow the instructions in that step by adding elements to the modeling canvas. On the first step, you can begin by importing the outcome of Exercise 1. For all subsequent steps, you can import the result.json of the previous step to get you to a consistent starting point before proceeding.
Completing this Exercise with sticky notes or a drawing app
For each step, add components to your modeling canvas to complete the described outcome. At the beginning of the next step, check the PNG of the prior step result and ensure your canvas resembles that consistent starting point before proceeding.
Step 1
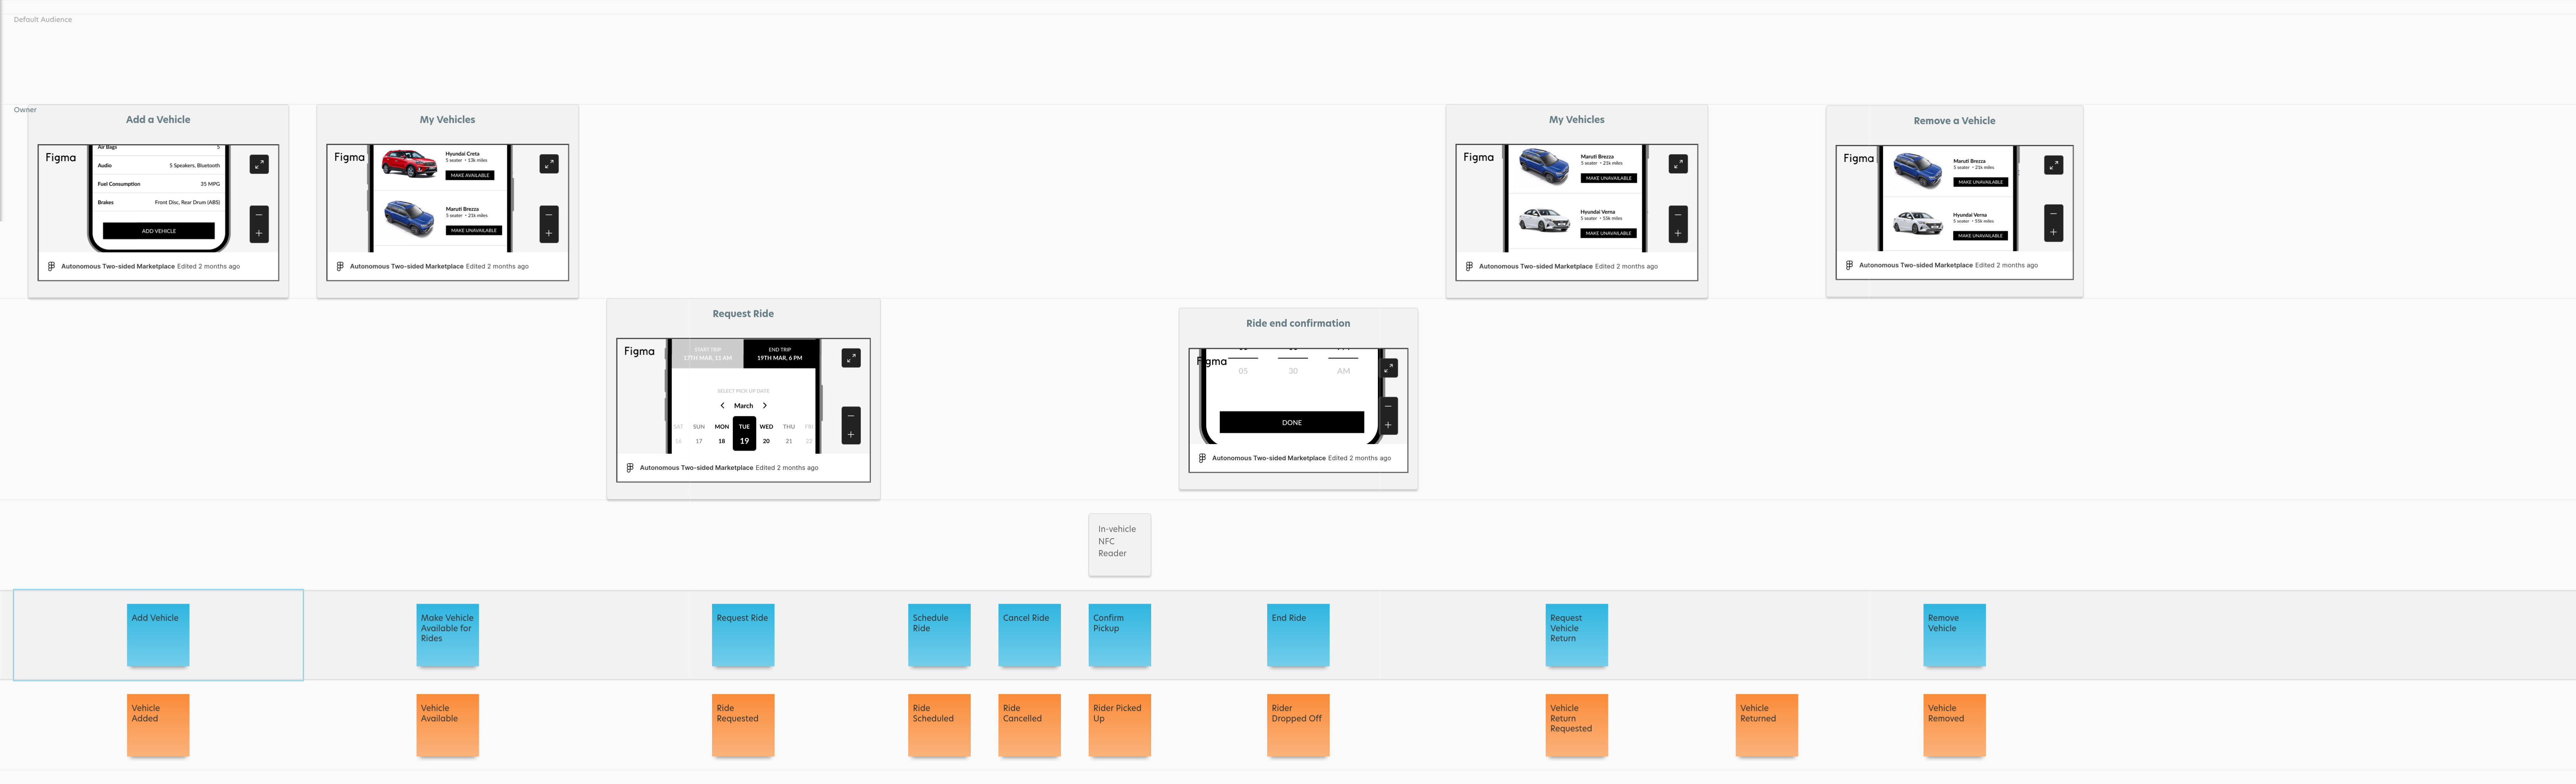
The outcome of Exercise 1 was a storyboard of our system, e.g. the sequence of business Events with Interfaces highlighting key moments of the user experience. The goal of this step is to add in the Commands that will empower our users to change the system. Commands are represented by blue stickies that are placed in the Timeline lane between the Interface where the user invokes the Command and its resulting Event. These commands are named as verb phrases in the imperative, e.g. "Request Ride" or "Add Vehicle". When done, the model should look something like this:
Step 2
The outcome of the previous step was the addition of Commands to empower our users to affect changes in the system. In order for our users to know what changes to make, we'll need to inform them about the state of the system via Read Models. The goal of this step is to add in the Read Models. Read Models are represented by green sticky notes that are placed within the Timeline lane. They are named views of the current state of domain entities, e.g. "Ride" or "My Vehicles". When completed, the model should look something like this:

Step 3
The outcome of the previous step was the addition of Read Models to inform our users about the state of the system. When combined with the outcome of step 1, we now have a complete API of Commands and Read Models. The goal of this step is simply connect the "slices" via data-flow arrows: We connect Interface to Command to Event to connect a state change slice. We connect Event to Read Model to Interface to connect a state-view slice. When we're done, the information flow should resemble a sine-wave, like this:

We'll draw data flows for the other two types of slices, external state import and internal state export, as we encounter them in the next two steps.
Step 4
The outcome of the previous step was to connect our first two types of slices, state change and state view, via arrows to visualize the data flow. We still have some gaps in this data flow, which we'll identify in this step and address in the next. The goal of this step is to identify the separate Streams of Events. In our case, we have Events that pertain to Vehicles and their availability, and then other Events that pertain to the lifecycle of a particular Ride. Separate these Events into separate horizontal lanes representing Streams, which will make the model look like this:

Step 5
The outcome of the previous step was the identification of separate Streams and organization of the various Events into horizontal lanes representing these Streams. You'll notice gaps in the data flow that roughly correspond with breaks between Events on the separate Streams. These represent points where we'll need to integrate these Streams using our third and fourth types of slice: the external state import slice and the internal state export slice.
In this exercse, identify and construct on the modeling canvas the necessary type of integration:
- For an external state import slices triggered on external Events, we can connect an Event from an external Stream to a Command, and that Command to an Event on our local Stream. For external state import slices triggered on the state of an external Read Model, we can connect the external Read Model to a job/gear-type Interface to a local Command to a local Event.
- For an internal state export slice, we connect a "TODO-list" Read Model to a job/gear-type Interface, the job/gear-type Interface to an external Command, and then either record a local Event recording the result of that Command (and connect these via an arrow), or else we observe the effect of our Command on the external Event Stream and perform an external state import.
When finished, the data flow in the model should be complete, and each Stream should be clearly defined, self-contained, causally complete, and have defined integration contracts in place with other Streams, and the model should look like this:

Use the promo codes EVNTMODELING101 & CONFLUENTDEV1 to get $25 of free Confluent Cloud usage and skip credit card entry.
Be the first to get updates and new content
We will only share developer content and updates, including notifications when new content is added. We will never send you sales emails. 🙂 By subscribing, you understand we will process your personal information in accordance with our Privacy Statement.