Enhance your career, get your certificate as a Data Streaming Engineer | Get your Certificate
Event Modeling - Building the Storyboard (Exercise)


Bobby Calderwood
Sr. Director of Architecture
Event Modeling - Building the Storyboard (Exercise)
Overview
In this hands-on exercise, we'll brainstorm and sequence the Event narrative for Autonomo, and then add Interfaces to create a storyboard that envisions the user experience. More information on completing this step can be found in the GitHub repository.
Completing this Exercise with Evident Design
Create a new Event Model in Evident Design for each step, and follow the instructions in that step by adding elements to the modeling canvas. On the first step, you'll begin with a blank model. For all subsequent steps, you can import the result.json of the previous step to get you to a consistent starting point before proceeding.
Completing this Exercise with sticky notes or a drawing app
For each step, add components to your modeling canvas to complete the described outcome. At the beginning of the next step, check the PNG of the prior step result and ensure your canvas resembles that consistent starting point before proceeding.
Step 1
The goal of this step is to brainstorm all the events within our business process. Events are represented as orange sticky notes that are placed below the Timeline lane, and are named as verb phrases in the past tense, e.g. "Ride Requested" or "Vehicle Added". Add as many events to your modeling canvas as necessary to describe both the vehicle owner/inventory management and the ride-lifecycle business processes. Don't worry about ordering these events or making mistakes: go broad first, then we'll narrow down and sequence in the next few steps. When you're done, the model should look something like this:

Step 2
In the last step, we brainstormed the events in no particular order. These include:
- Vehicle Returned
- Vehicle Removed
- Vehicle Added
- Ride Scheduled
- Ride Canceled
- Rider Dropped Off
- Ride Requested
- Rider Picked Up
- Vehicle Available
- Vehicle Return Requested
The goal of this step is to sequence these events into a plausible narrative on your modeling canvas.
When you're done, the model should look something like this:

Step 3
In the last step, we ended up with a set of events sequenced into a business narrative:
- Vehicle Added
- Vehicle Available
- Ride Requested
- Ride Scheduled
- Ride Cancelled
- Rider Picked Up
- Rider Dropped Off
- Vehicle Return Requested
- Vehicle Returned
- Vehicle Removed
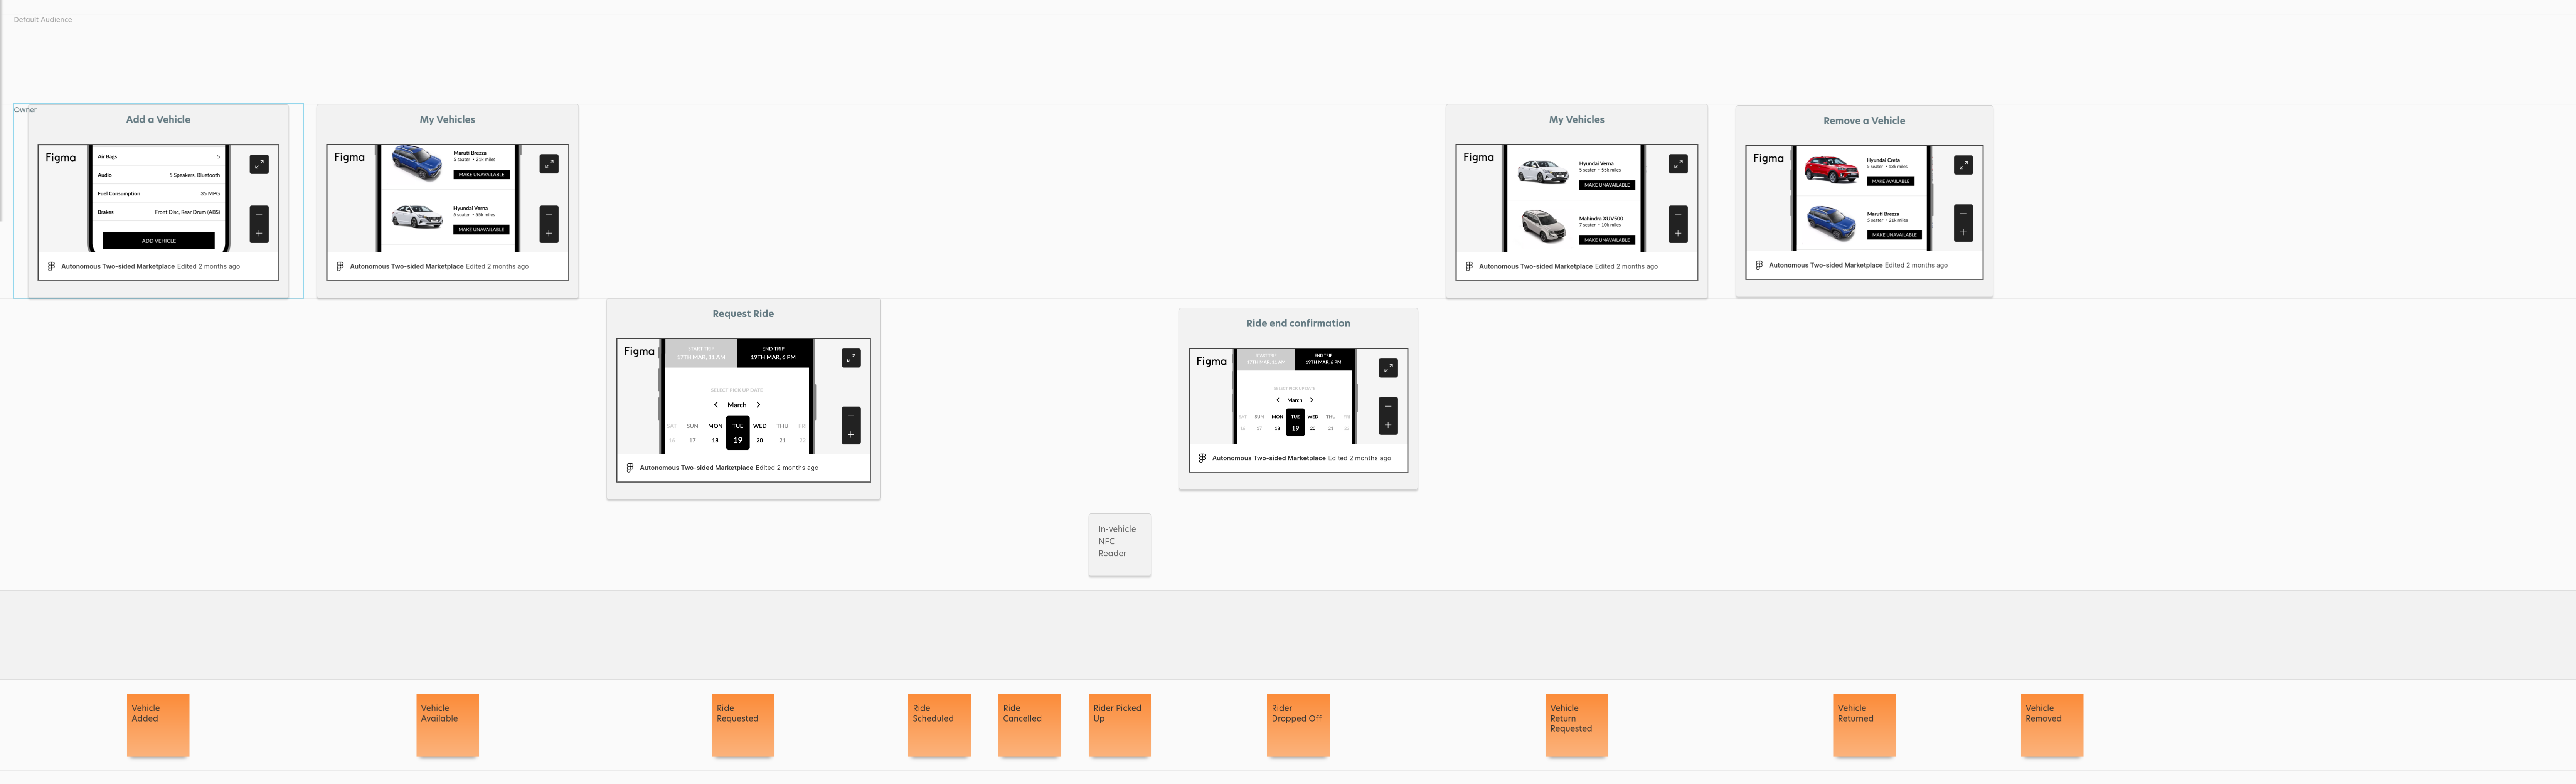
The goal of this step is to add key moments in the user experience to the timeline of events. If the sequence of events is like the script of a film, then this step is like creating the storyboard: adding visuals to the key plot points.
Interfaces are represented by white printer paper with mockups drawn on them. As with any good storyboard, we'll need to identify the various characters involved in the plot. This is done by separating our Interfaces into horizontal lanes representing the various Audiences (aka personas or roles) that use our system.
When you're done, the model should look something like this:
 json export
Resources
Use the promo codes EVNTMODELING101 & CONFLUENTDEV1 to get $25 of free Confluent Cloud usage and skip credit card entry.
Be the first to get updates and new content
We will only share developer content and updates, including notifications when new content is added. We will never send you sales emails. 🙂 By subscribing, you understand we will process your personal information in accordance with our Privacy Statement.