Enhance your career, get your certificate as a Data Streaming Engineer | Get your Certificate
Hands On: Sending Messages to Apache Kafka with Spring Boot


Viktor Gamov
Developer Advocate (Presenter)
Hands On: Sending Messages to Apache Kafka with Spring Boot
Note: This exercise is part of a larger course. You are expected to have completed the previous exercises.
This exercise uses the library Java Faker to produce from your Java application to an Apache Kafka topic on Confluent Cloud. Note that this builds on the Confluent Cloud/Spring Boot installation you did in the Introduction to Spring Boot for Confluent Cloud exercise. You can see the code for modules 1–10 in a combined GitHub repo and you can also refer there for a list of imports as well as a sample build.gradle file.
Add a Mock Library, a Producer, and Serialization Config
-
Go to build.gradle in your Java application and find the dependencies object. Add Java Faker (you can find its installation string on GitHub):
implementation 'com.github.javafaker:javafaker:1.0.2' -
Next, begin to set up Spring Boot to send messages to Kafka. Open SpringCcloudApplication.java and create a Producer class with a Lombok annotation for dependency injection:
@RequiredArgsConstructor
  class Producer {
    private final KafkaTemplate<Integer, String> template
}
(With respect to dependency injection, it’s good to use constructor dependency injection or property dependency injection, but not field dependency injection.)
-
Next, add Java Faker code to produce some messages (from “The Hobbit,” incidentally), and also add Flux, a reactive library that lets you push a message per second:
 @RequiredArgsConstructor
 @Component
 class Producer {

 	private final KafkaTemplate<Integer, String> template;

   	Faker faker;

   	@EventListener(ApplicationStartedEvent.class)
   	public void generate() {

    		faker = Faker.instance();
     		final Flux<Long> interval = Flux.interval(Duration.ofMillis(1_000));

    	final Flux<String> quotes = Flux.fromStream(Stream.generate(() -> faker.hobbit().quote()));

     	Flux.zip(interval, quotes)
      		.map(it -> template.send("hobbit", faker.random().nextInt(42), it.getT2())).blockLast();
   	}
 }
Note that Flux.zip lets you combine the two Flux parameters and enables you to send your messages to the topic hobbit on Confluent Cloud. Faker.random() generates your keys and the @EventListener annotation from Spring runs the class when the application is started.
-
Now you need to tell Confluent Cloud the serialization method to use for keys and values by specifying it in application.properties:
spring.kafka.producer.key-serializer=org.apache.kafka.common.serialization.IntegerSerializer
spring.kafka.producer.value-serializer=org.apache.kafka.common.serialization.StringSerializer
Establish and Inspect Your Topic on Confluent Cloud
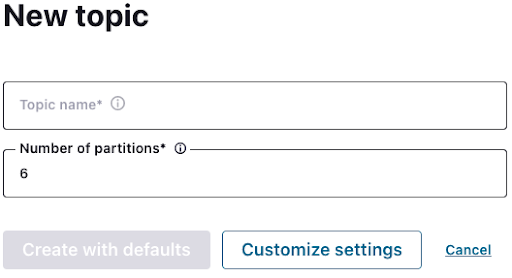
- Next, set up a topic to send to on Confluent Cloud. Go to the cluster you created in the Introduction to Spring Boot for Confluent Cloud exercise, select Add topic and then create the new topic hobbit, using Create with defaults.
- Now run your application and log in to Confluent Cloud. Go to your cluster, then Topics, hobbit, and Messages, and you should see your first events streamed to Confluent Cloud.
Use the promo code SPRING101 & CONFLUENTDEV1 to get $25 of free Confluent Cloud usage and skip credit card entry.
Hands On: Sending Messages to Apache Kafka with Spring Boot
Hi, this is Victor Gamov with Confluent. And in this lessons, I will show you how you can use Spring Boot and Spring Kafka project to send messages to Confluent Cloud. Let's get to it. In our previous lesson, I showed you how you can create a new project using start.spring.io and how you can configure this project to connect to Confluent Cloud. We'll be using the same thing that we used on the previous lesson, so we're not gonna be repeating ourselves again. If you missed that part, please come back and the refresh your knowledge how you can start a new project and what kind of dependencies you need in this application. Speaking about dependencies, in order to make this exercise a little bit more interesting instead of just sending some of the random hello world messages, I will be using the library called JavaFaker that generates some of the relatively realistic data. In our particular case, we're gonna be using some predefined generators to send those messages in the Kafka topic. So I'm going into my dependencies sections and I'm going here and saying... You can always find this information in a GitHub. JavaFaker has GitHub project located here. You can find the link in the description below. And if you using Maven, you can find the way how we can set up the Maven. In my particular case, I'm using Gradle, so in this case, I will be using this configuration to add this as a dependency. I edit here, refresh my Gradle configuration. And now I want to start using Spring Boot libraries to produce and send some messages to Kafka. Let's create a class called Producer. And to send message in the Kafka topic, we're gonna be using component called Kafka template. I already explained the ways how you can configure the Kafka templates and what kind of method's available there. So here I will show you how we can use it. So let's start with this Kafka templates. Call it templates. In this case, we're gonna be sending messages with some integer key and a string value. So we're gonna be using this types here. Now we are gonna make this private, and I'm gonna make it final. This is where my Lombok comes handy that will allow us to generate a required arguments constructor. So in this case, I don't need to create this manual dependency injection. In general, it's good to use with constructor dependency injection or property dependency injection. Do not use like a field dependency injection that will require some additional magic in order to access those fields. So in this particular case, this Kafka template will be injected by Spring and configured by Spring Boot. And it will be injected in my code. And gonna be using this JavaFaker class. Public void generate. So in this case, I need to send a message say every second, and this message will contain some of the interesting data. In my particular case, I wanna be using some of the predefined faker generators. Faker.hobbit and quotes. So we're gonna be using some of the quotes from a book about hobbit. So we're gonna be using this to push it into Kafka topics. Let's create instance of this faker which say, faker.instance dot... That's what we're gonna be using today. Next thing is that we need to create a code that will be randomly methods of the faker in a regular basis. In this case, we are gonna be using a little bit of a reactive programming, we're gonna be using this component called flux that allows us to generate a message every second. Flux.interval duration of millis. In this particular case, we're gonna do a thousand millis and it's gonna be one second. We're gonna use this as a var which is called the interval. Next thing is to have our faker to generate our message. We're gonna be using another method from our flux called flux.fromStream and it's gonna be using new supplier function that will generate our string. And we're gonna be implementing methods on the supplier. In this particular case, we're gonna say, faker.hobbit quote. So in this case, it will invoke this. Let's clean up this code. It looks nice. We'll say just a flux or let's even call it quotes. Now, in order to combine those two fluxes, we need to use methods flux.zip. So we will use this one. Our first one is interval. Second one is quotes. And we will apply method map that will finally... We will invoke this method in our producer code. This is a receiver tuple as a parameter. So because it has some elements from first flux and for some elements, from another flux. For this, we're gonna be implement methods apply. We'll call it it, and as a result, so what we wanna do in this method, in this method we want to use our template, send a message to topic, hobbit. Our key is gonna be something that a faker can give us. For example, faker.random .nextInteger of some 42... Always good random number. And the next thing is that we're gonna get to this it. It's gonna be our string. That's something that was generated by this flux. And in order this code to work, let's just do blockLast. I don't want this code to go away. I want it to run indefinitely. And essentially we also don't need information about type. So the Java is smart enough to understand this. Now how this code will be invoked, we're gonna be using this event listener annotation from spring. And when these applications, my Spring Boot application will be started, this code will be invoked. In order to make this work as well I need to make this as a constructor. Oh, component. I'm sorry. And that would be it. So we need to do a few more things here in our application . So we do have a connection to our Confluent Cloud. So the next thing we need to tell what kind of data we will be sending. Generally, Kafka don't care what kind of data you're store in this. But since it's a Java application, Java application generally cares what kind of objects you want to send. And in order to turn this objects into stream of bytes, we need to specify what? We need to specify serializer, of course. So kafka.producer.key-serializer. So since we're producing this data in integer format, we need to specify this org.apache.kafka... Sorry, Kafka. Common.serialization, and it's gonna be Integer Serializer for kafka.producer.value-serializer. We'll need to specify org.apache.kafka.common.serialization.StringSerializer. So next thing is that we mentioned this topic called hobbit, but we need to create this. For that we need to go in our Confluent Cloud. On the previous steps of this tutorial, this lesson, we created this spring.kafka cluster here. So in this case, I'm going here inside the topic and go in here, create this topic, hobbit. And I will create this with defaults. In the future lessons I'll show you how you can use a programmatic approach to create those topics when your application needs. But for this example, it's okay to create this manually. I will open this window and keep this open while my application will be up and running. Now, so in this case, what I need to do here is just a run this application. It will be compiled and up and running. My producer will connect... See, this is properties from my producer. My producer will be connect to Confluent Cloud. Everything's working fine. Gonna be using that Integer Serializer for a key, and for the value, it's gonna be String Serializer as well. As you can see, all this messages are consumed by Confluent Cloud UI. And you can see all those messages are arriving here nicely. However, sometimes you want to use or sometimes, like most of the times you want to use programmatic approach to consume those messages. In the next lesson, I will show you how we can use Kafka Listener to consume those messages from a Kafka topic programmatically.
Be the first to get updates and new content
We will only share developer content and updates, including notifications when new content is added. We will never send you sales emails. 🙂 By subscribing, you understand we will process your personal information in accordance with our Privacy Statement.