Enhance your career, get your certificate as a Data Streaming Engineer | Get your Certificate
Hands On: Receiving Messages with KafkaListener


Viktor Gamov
Developer Advocate (Presenter)
Hands On: Receiving Messages with KafkaListener
Note: This exercise is part of a larger course. You are expected to have completed the previous exercises.
Note that this exercise builds upon the Introduction to Spring Boot for Confluent Cloud and Sending Messages to Confluent Cloud with Spring Boot exercises. You can see the code for modules 1–10 in a combined GitHub repo and you can also refer there for a list of imports as well as a sample build.gradle file.
Create a Consumer, Set a Deserializer and Inspect Your Console Data
-
First, create a new Consumer class with a method consume and an annotation with the topic that you’d like to listen to, as well as a groupId. You can simply print the messages received:
@Component class Consumer { @KafkaListener(topics= {"hobbit"}, groupId="spring-boot-kafka") public void consume(String quote) { System.out.println("received= " + quote); } } -
You also need to specify a deserializer for your messages in application.properties:
spring.kafka.consumer.key-deserializer=org.apache.kafka.common.serialization.IntegerDeserializer
spring.kafka.consumer.value-deserializer=org.apache.kafka.common.serialization.StringDeserializer
(In future lessons, you will use more complex serialization/deserialization types as well as schemas.)
-
Restart your application, and you should eventually see hobbit messages arrive in your console.
Inspect Your Data on Confluent Cloud
- In Confluent Cloud, go to Consumers on the left-side menu.
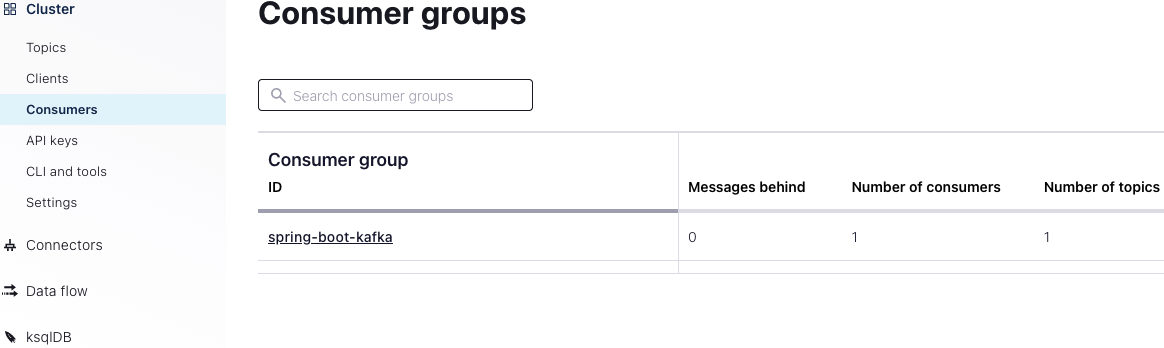
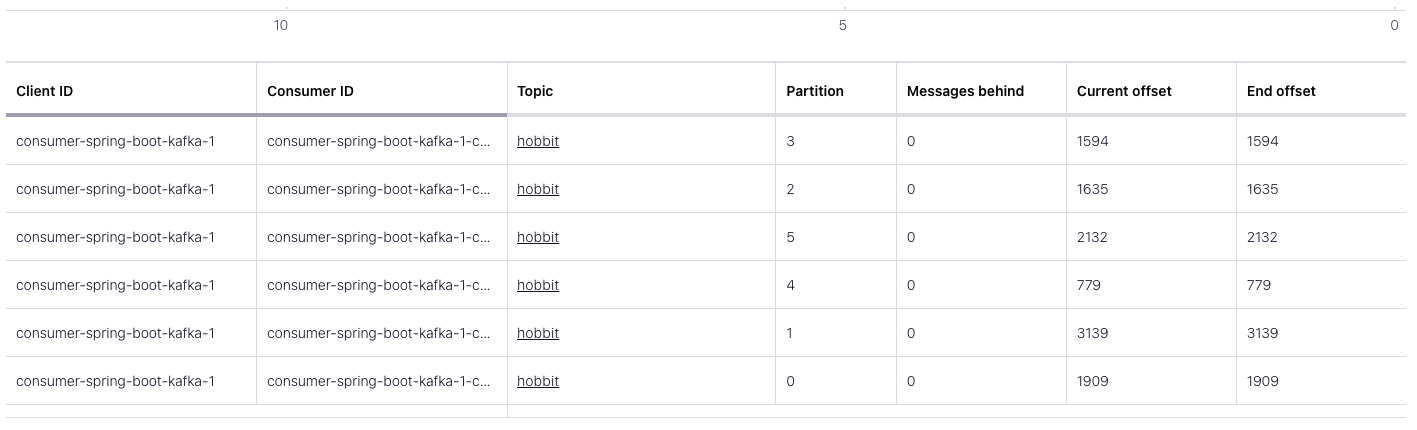
You’ll see the group “spring-boot-kafka,” which you specified in your code under groupId. You can see that the consumer group is using all six partitions in your topic, and you can see offsets and consumer lag:
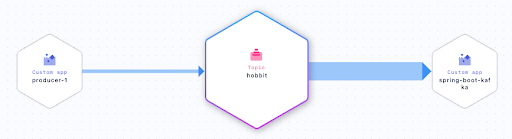
- Now if you click on hobbit on the same screen (under Topic), then Data Lineage, you can see the topic and its dependencies, i.e., your producer and consumer apps:
Adjust Parameters in Your Java Application
-
Note that you can change the names of your consumer and producer back in your Java application under application.properties:
spring.kafka.producer.client-id=spring-boot-producer -
You can also get information about your keys by changing your consume method and injecting a ConsumerRecord for type:
@Component
class Consumer {

    @KafkaListener(topics = {"hobbit"}, groupId = "spring-boot-kafka")
    public void consume(ConsumerRecord<Integer, String> record) {
      System.out.println("received = " + record.value() + " with key " + record.key());
    }
}
Run your application again and you will see keys for each message.
Use the promo code SPRING101 & CONFLUENTDEV1 to get $25 of free Confluent Cloud usage and skip credit card entry.
Hands On: Receiving Messages with KafkaListener
Hi, this is Victor Gamov with Confluent. And in this lesson, I will show you how you can use Kafka-Listener to receive new messages from Kafka topic in Confluent Cloud. Let's get to it. In the previous lesson, you learnt how you can send a new messages into Kafka topic, and we use Confluent Cloud UI to consume those messages. And this is the time where you will learn how you can do this programmatically using Spring Boot and Spring Kafka. Let's create a new class called Consumer. In this class we will have some methods called public, void, consume. And in this methods, we need to do something with this data. So we can say it's gonna be string quote. And in this case, I will do KafkaListener annotation here. I need to specify what's the topic. In our case, it will be hobbit. You can subscribe to multiple topics as you know and group ID is important in the property that we need to specify. Spring-boot-Kafka Listener. Now, in order to do something with this quote, we will just do... And let's call it... We need to make this as a component and we're good to go. Also, we need to tell default deserializer what kind of data is coming into our application. So in this case, we can do kafka.consumer.value-deserializer. And in this case, we're gonna be using, org.apache.kafka.common.serialization.SringDeserializer. And so we not forget about the key deserializer as well. So we go in kafka.consumer.key-deserializer. And we need specified org.apache.kafka.common.serialization/IntangerDeserializer. Since we have a data in format and integer for key and the string for our value, I need to specify those deserializers here. In the future lessons I'll show you how we can use a more complex types and how we can use schemas with this application and how we can configure your application to use all this nice things. Now, my consumer is ready to roll. I need to go and restart my application. Takes some time to compile this. Location is up and running. And now we start seeing all this new messages arriving in this console. So let's take a look what do we see in Confluent Cloud. In the Confluent Cloud, we can go to this left-side menu and find the consumers. Sometimes it will take some time to refresh, so it's always good to refresh it. And now see the same group that I specified in my code over here saying that it is gonna be spring-boot-Kafka Listener. I see this consumer group is consuming all partitions, all six partitions in my topic, and I can see offsets, I can see consumer lag here, all these nice things. And also, if I go to this hobbit topic, I will be able to see a different dependencies or different applications that connected to this topic. In this particular case, that's my consumer application. Custom app. And that's my producer application. Also custom app. So essentially in my application configuration, my Spring Boot application configuration, I will be able to change this. By default, producer one is default client ID. You can change this in Spring Boot application. Like here, and you can go and say... Producer.client-id I can say spring-boot-producer. Also, if you're interested in your application, if you're interested to getting also information about the keys, you can do that as well. And let me show you how you can do that. So let me stop this application real quick. I'm getting back to my code. And instead of right now, instead of string, instead of value, I actually can't inject here and consumer record. And in this case, my consumer record will be key as an integer, and my value as a string. And I can say, record, and I can say this dot value, and something like plus with key, record.key. So now if I run this application once again, we should be able to get access to a record key. As we can see here, all this new messages start arriving with this updated information. My consumer is again, up and running, and we will be able to see what this consumer does. Now you know how you can consume messages from Confluent Cloud using Spring Boot and Kafka Listener.
Be the first to get updates and new content
We will only share developer content and updates, including notifications when new content is added. We will never send you sales emails. 🙂 By subscribing, you understand we will process your personal information in accordance with our Privacy Statement.