Enhance your career, get your certificate as a Data Streaming Engineer | Get your Certificate
Hands On: Introduction to Spring Boot for Apache Kafka


Viktor Gamov
Developer Advocate (Presenter)
Hands On: Introduction to Spring Boot for Apache Kafka
This exercise sets up a new Spring Boot project with Spring for Apache Kafka and connects it with Confluent Cloud.
Set Up and Download a Project from Spring Initializr
-
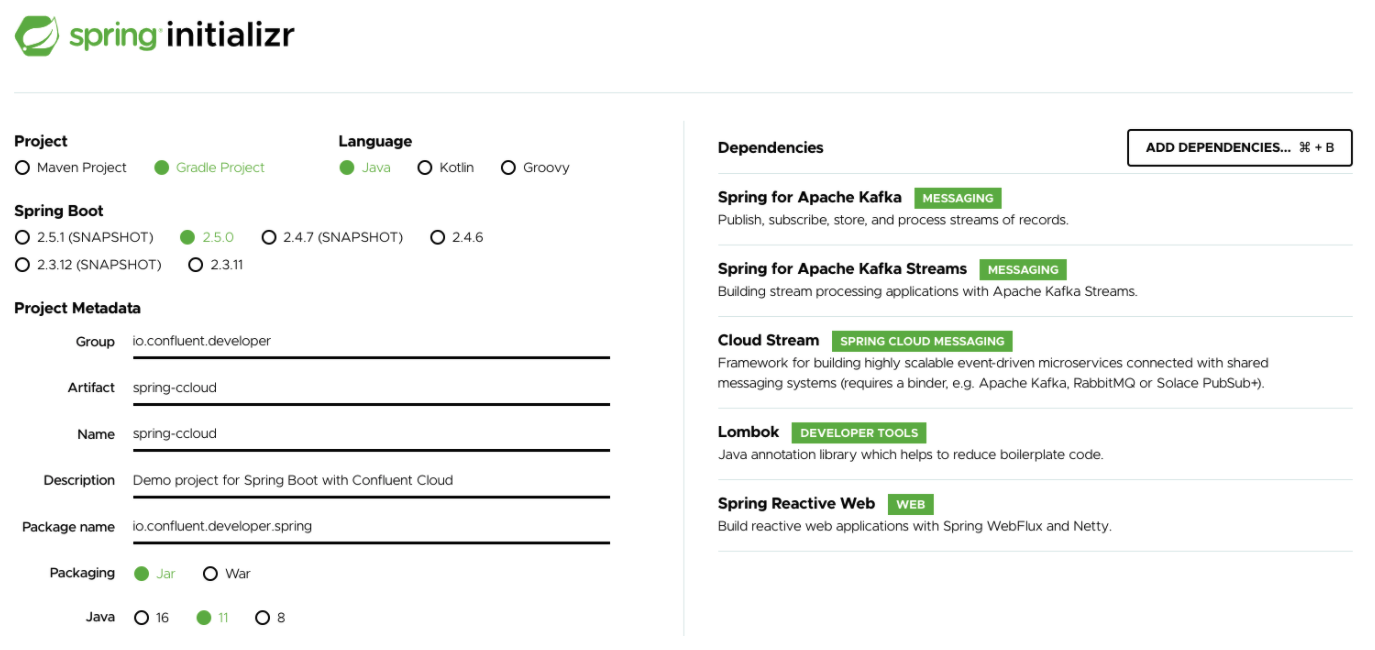
Go to start.spring.io and add a new project, selecting Gradle, Java, and the default version of Spring Boot.
-
Add your project’s metadata as Group: ”io.confluent.developer,” Artifact: “spring-ccloud,” Description: “Demo project for Spring Boot with Confluent Cloud,” and Package Name: “io.confluent.developer.spring.”
Select Jar packaging and Java 11.
-
Click the Add Dependencies button and add Spring for Apache Kafka, Spring for Apache Kafka Streams, Cloud Stream, Lombok, and Spring Reactive Web.
-
Click Generate to download a ZIP archive. In your terminal, unzip the file:
unzip spring-ccloud.zipThen open the spring-ccloud directory in your IDE.
Set Up Confluent Cloud
-
Now, open a browser and navigate to Confluent Cloud (if you don’t have an account, you can sign up for a free trial (details) and use the promo code SPRING101 for an additional $25 of free usage). You can also use the promo code CONFLUENTDEV1 to delay entering a credit card for 30 days.
-
In the default environment, go to Add Cluster, then create a Basic cluster, and click Begin configuration.
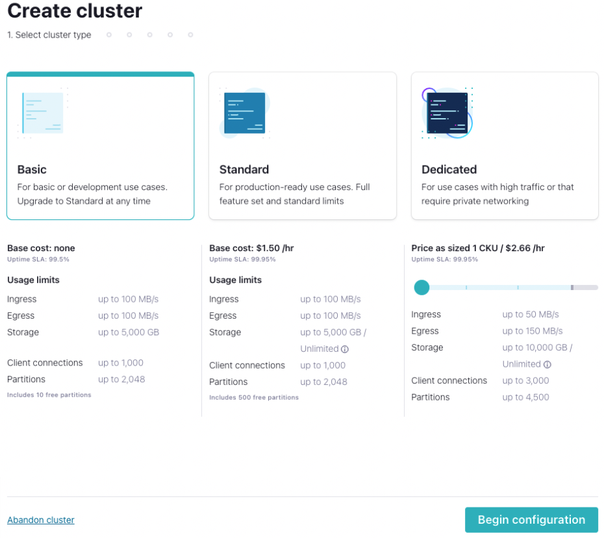
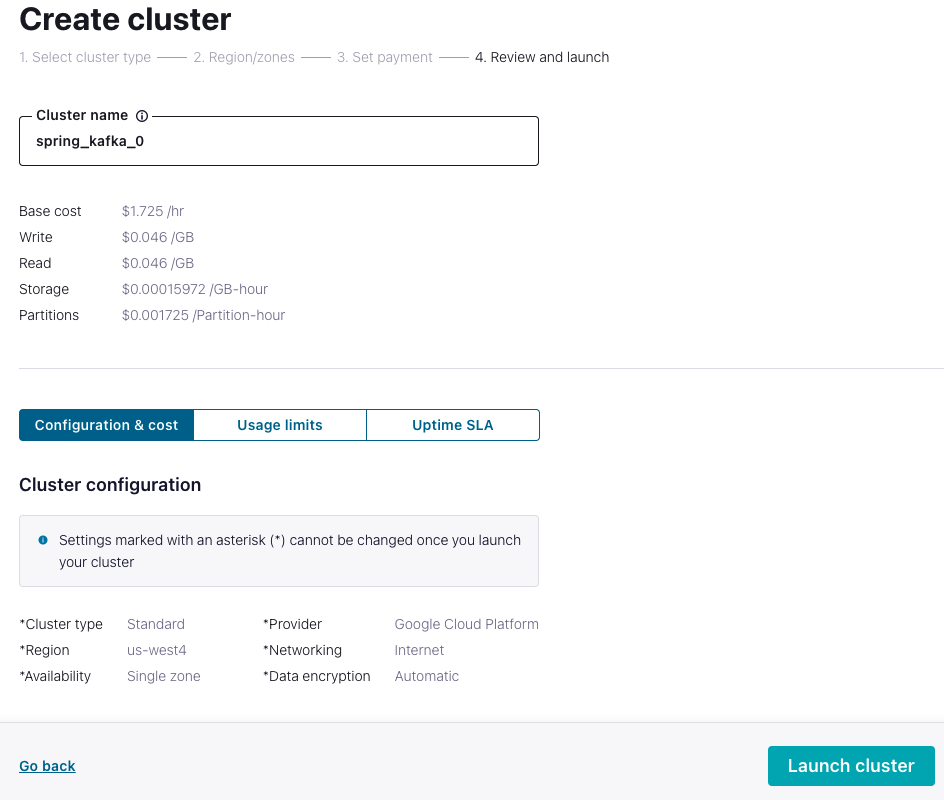
- Select Google Cloud, a close region, and single zone availability (the associated costs are listed, but the free usage will be more than enough for this course). Name your cluster and click Launch cluster. Keep in mind that you should delete your cluster when you are finished with it to avoid extra costs. Instructions for deleting are given at the end of Hands On: Confluent Cloud Schema Registry.
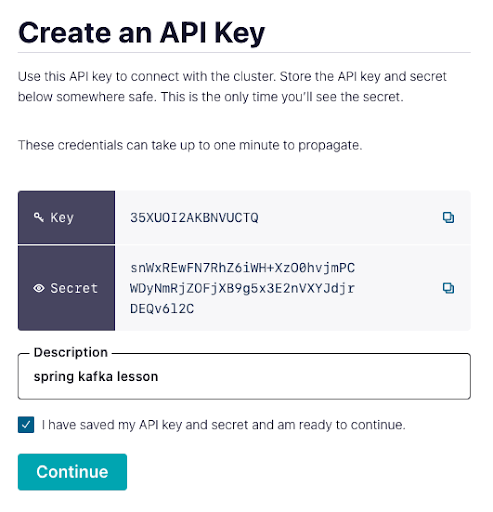
- To get your Spring Boot config, go to Clients on the left menu and select Spring Boot. Underneath the config, select Create Kafka cluster API key & secret. Add the description spring kafka lesson, select I have saved my API key and secret and am ready to continue, and click Continue to populate your credentials.
Add Confluent Cloud Credentials to Spring
-
Copy the “#Kafka” section of your config, click Done, and then go back to your IDE with Spring.
--- # Kafka spring.kafka.properties.sasl.mechanism=PLAIN spring.kafka.bootstrap-servers=pkc-lzvrd.us-west4.gcp.confluent.cloud:9092 spring.kafka.properties.sasl.jaas.config=org.apache.kafka.common.security.plain.PlainLoginModule required username='{{ CLUSTER_API_KEY }}' password='{{ CLUSTER_API_SECRET }}'; spring.kafka.properties.security.protocol=SASL_SSL -
Under src/main/resources/application.properties, paste the config.
Use the promo code SPRING101 & CONFLUENTDEV1 to get $25 of free Confluent Cloud usage and skip credit card entry.
Hands On: Introduction to Spring Boot for Apache Kafka
Hi, this is Victor Gamov from Confluent. And in this lesson, I will show you how you can set up and use Spring Boot project for KAFKA and use it with Confluent Cloud. Let's get to it. We gonna start at one place where you can start all your new Spring Boot projects. It's the "start.spring.io". For this, we're going to be using Gradle Project and we will stick to Java today. We're gonna use stable version of Spring Boot and by the time of recording, it was 2.4.5. Let's put some of the Group ID and Artifact ID and Name of the project here. So, I'm gonna be using "io.confluent.developer" naturally. Let's call it "spring-ccloud", keep the name like this, with say "Demo Project for Spring Boot with Confluent Cloud" and we need to fix this package here. I'm going to be using Java packaging "Jar". Gonna be using Java 11. In this case, I also need to add a few more dependencies. We're going to be starting with a Spring Boot for Apache Kafka for Kafka streams. We're also going to be using Spring Cloud Stream later in this lesson so we will use this as a dependency here as well. We add Lombok because we're gonna be using Java but I also want to remove some of the boilerplate code. We use Lombok and the one last but not least, a Reactive Web for Spring Boot. In some of the lessons, I will show you how we can expose certain services through the rest, and this is what we're gonna be using. So, once we're ready, I click "Generate" and download zip archive on my computer and I'm going to my terminal and I need to unzip it. I'm going to my "Downloads" folders and I'll click "unzip spring-ccloud". And I opened my IDE in this folder. While this project is opening in my IDE, let's switch to Confluent Cloud. You can open your browser and then navigate to your Confluent Cloud account. This is important to know that to use this, you need to have your account created. You can pause this video right now, go to Confluent Cloud, sign up this. You can find the promo code in the description below in this video. And after that, you can return to this video and continue to this lesson, all right? Do it right now. So you have already created your new account in Confluent Cloud. You might see some default environment and it's okay to stick to default environment. I like to have environments for different use cases in this particular case for my Spring Kafka, I already have spring Kafka environment. So in this environment, I will create a new cluster that we're going to be using in this lesson and some other lessons that we're going to be teaching in this course. So I'll click "Get started with the cluster". I'm gonna be using "Standard" cluster. I go to start "begin the configuration". I will stick with the Google Clouds. U.S. East is closer to me. I'm on the east coast in the United States. "us-east4", I will be using single zone. Click continue. I will call it "spring_kafka_0". Maybe I will be using something, some new clusters, so it's always good to put index here. And when I click "Launch cluster", I should be able to use this cluster in my application. Now, to connect my Spring Boot application, I need to do a few more things here. If I go to "Clients", and I'll find this button here called "Spring Boot". When I click it, it will be populated with some of the template that you will use to configure your Spring Boot application. In this particular case, you can see there's two things: "Cluster_API_KEY" and "Cluster_API_SECRET" are missing here so we want to replace it with the real values. So I'm going and I click here and I can say "spring kafka lesson" and I click continue and now my key and API password were populated here. So what I do here, I'm just go ahead and copy this things here and go into my project. In my project I will find this "application.properties" and this is where I need to put my configuration for this project. There will be a bootstrap server, some of the security credentials, and this is how you configure your project to use with Confluent Cloud. In the next lesson, I will show you how we can use this project that we just configured and connected to Confluent Cloud to send messages and receive messages from Confluent Cloud.
Be the first to get updates and new content
We will only share developer content and updates, including notifications when new content is added. We will never send you sales emails. 🙂 By subscribing, you understand we will process your personal information in accordance with our Privacy Statement.