Enhance your career, get your certificate as a Data Streaming Engineer | Get your Certificate
Hands On: Confluent Cloud Schema Registry and Spring Boot


Viktor Gamov
Developer Advocate (Presenter)
Hands On: Confluent Cloud Schema Registry and Spring Boot
Note: This exercise is part of a larger course. You are expected to have completed the previous exercises.
The following continues with the program that you have worked on in previous exercises and begins with Confluent Cloud. Even though it continues from previous exercises, it has its own repo, which may be found on GitHub. (Refer there for a list of imports as well as an initial build.gradle file if you need them).
Set Up Schema Registry on Confluent Cloud
- On Confluent Cloud, select your environment, then Schema Registry. Select Set up on my own, then choose a cloud provider and region. Click Continue.
Add an Avro Gradle Plugin
-
Next, you’re going to use an Avro Gradle plugin from GitHub, which will allow you to create Java POJOs out of Avro schemas. In build.gradle, put the following in your “Plugins” section:
id "com.github.davidmc24.gradle.plugin.avro" version "1.2.0" -
If you are using IntelliJ (recommended for this exercise), also add the following:
id "idea"(in which case you will be able to see a new task).
-
Still in build.gradle, under “Dependencies,” add the following:
implementation 'org.apache.avro:avro:1.10.2' -
Then add this under “Repositories”:
mavenCentral() maven { url "https://packages.confluent.io/maven" } -
Finally, in settings.gradle,add the following at the top of the file:
pluginManagement {
    repositories {
            gradlePluginPortal()
            mavenCentral()
    }
}
Create an Avro Schema and Generate Your POJOs
-
You will use a JSON-formatted Avro schema to generate your POJOs. Create a new folder in /src/main called “Avro.” In that folder, create a file called hobbit.avsc:
-
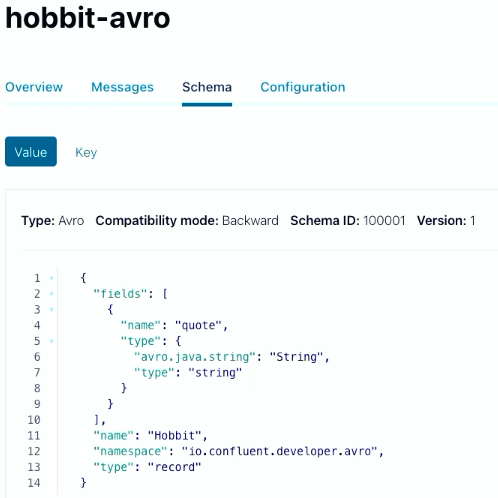
In the file, put a schema that represents the Hobbit object:
{
"fields": [
    {
        "name": "quote",
        "type": {
            "avro.java.string": "String",
            "type": "string"
        }
    }
],
"name": "Hobbit",
"namespace": "io.confluent.developer.avro",
"type": "record"
}
You’ll store a string with a quote from the Java Faker library, then wrap it into a Hobbit object.
-
Execute the Gradle task generateAvroJava, and in your Build directory, you should see a new folder called generated-main-avro-java that includes a Hobbit object. If you have enabled IntelliJ/Gradle generation, generated sources will be included in your classpath.
-
Note that you’re going to use a KafkaAvroSerializer that you need to add to build.gradle:
implementation "io.confluent:kafka-avro-serializer:6.1.0" -
In application.properties, you also need to specify the serializer (replacing the existing one):
spring.kafka.producer.value-serializer=io.confluent.kafka.serializers.KafkaAvroSerializer
Prepare Your Application
-
Now change the name of the topic in your producer:
Flux.zip(interval, quotes) .map(it -> template.send("hobbit-avro", faker.random().nextInt(42), it.getT2())).blockLast(); -
Then in your consumer, change the name of the topic as well as the types for ConsumerRecord:
@KafkaListener(topics = {"hobbit-avro"}, groupId = "spring-boot-kafka") public void consume(ConsumerRecord<Integer, Hobbit> record) { System.out.println("received = " + record.value() + " with key " + record.key()); } -
You won’t need a processor or REST API so comment out @Component from your Processor class and @RESTController, @RequiredArgsConstructor, and @GetMapping from your RestService class.
-
Now create a new topic in your application class:
@Bean
NewTopic hobbit-avro() { return TopicBuilder.name("hobbit-avro").partitions(15).replicas(3).build();
}
Fetch Creds from Confluent Cloud
-
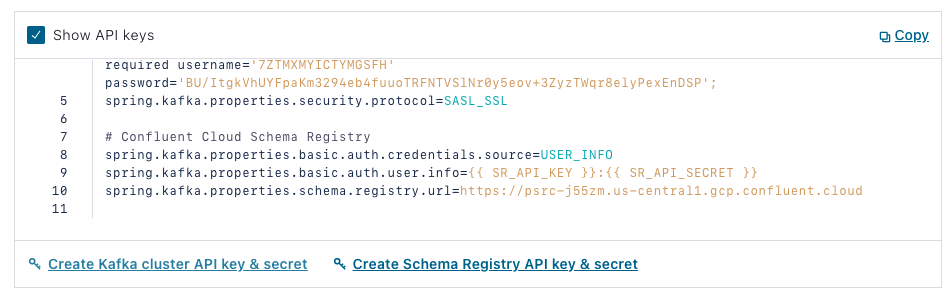
In Confluent Cloud, go to Cluster> Clients > Spring Boot > Create Schema Registry API key & secret:
-
Check the box, add a description, then select Continue, and your credentials will be entered into the config. Copy the section under “Confluent Cloud Schema Registry,” and return to your Java application and insert it into application.properties.
-
Note the Schema Registry URL, which is your endpoint, as well as the authentication properties.

Change Additional Application Parameters and Run
-
Now change the deserializers in application.properties for your consumer:
spring.kafka.consumer.key-deserializer=org.apache.kafka.common.serialization.IntegerDeserializer spring.kafka.consumer.value-deserializer=io.confluent.kafka.serializers.KafkaAvroDeserializer -
Disable the @EnableKafkaStreams annotation.
-
Run the program, and you should see system.out.println writing data in Avro format. You will also see it in your topic in Confluent Cloud if you go to Topics > hobbit-avro > Messages. Values are stored in Avro format so the UI can’t display them.
-
You can also now see schema under your “Schema” tab on Confluent Cloud.

Delete Cluster
- This is the final exercise in the course, so make sure to delete your cluster. To do this, go to Cluster settings on the left-hand side menu, then click Delete cluster. Enter your cluster name, then select Continue.
Use the promo code SPRING101 & CONFLUENTDEV1 to get $25 of free Confluent Cloud usage and skip credit card entry.
Hands On: Confluent Cloud Schema Registry and Spring Boot
Hi, this is Viktor Gamov with Confluent. And in this exercise, I'm gonna show you how we can use Cloud Schema Registry together in your Spring Boot application. Let's get to it. And we're back to our application that we developed on the previous lesson. And in order to use Schema Registry, we need to make sure that the Schema Registry is activated in our Confluent Cloud. So I'm going Confluent Cloud in my environment and I find the Schema Registry. I should be able to see something like this, like end point that I will be able to connect to, and some of the keys that I will be able to connect my client application. We'll get back to those in a few seconds. Next thing is that we also need to use a plugin that allows us to generate Java POJOs out of Avro schema. So in this case, we are gonna be using this Avro Gradle plugin. We're gonna copy this piece in our build script. So we go into the build.gradel, find the section about plugins. In order for this to be activated and used correctly with my IDE, I also need to enable intelligent idea plugin. So I will refresh the configuration. And how I would know if this actually works, I should be able to see a new task here very soon. Like after a few seconds when the Gradle will be updated called SOR generation. All right, in order to generate our Java POJOs we need to create Avro schema, which will be... We will be using the Json format for the schema. Going here in src/main. And we can create new folder called avro. And inside this avro folder I will create a file called hobbit.avsc so in this case, we're going to be using this schema that represents this Hobbit object that will be holding one property called quote. So we're going to store our string that was generated using the faker library. And after that, we'll wrap this into Hobbit object. So in order to get this working, I need to go and execute task Gradle tasks called generate Avro Java. And what I will see here in my build directory I will see this generated main Avro folder with my object hobbit. And because I enable intelliJ idea Gradle integration it was able to modify intelliJ idea project and also include generated sources in the class path. Now let's modify our application code as well to in order to, in order to support this. Also, couple dependencies that we're missing here. So, first of all, we see that it was new some code but some of the things are missing. So this is why we don't have our avro dependencies. We'll fix that in a second. Now we're going to be using confluent provided a serializer for our application that we'll be using this Avro object, then serialize it and the store information, the schema registry. So in this case they're going to be using Kafka Avro serializer in the version of confluent platform, also aligned with the version of the Kafka that spring brings. So in a, in application.properties what we need to change now and we need to specify this special serializer called Kafka serializers and our Kafka Avro serializer. And at this point we'd done with our producer let's fix our consumer. So in our consumer code. So first of all, we're going to be using different topics. So let's call it topic Avro, Hobbit Avro and we're going to be listening topic called Hobbits Avro. In this case, our string becomes integer because our key is integer type and our value is a Hobbit here as well. So that's our consumer. We don't need to use a processor. So that's why I just commented out this, this annotations. So those methods will not wouldn't be created and the rest controller as well. So just in case, because we don't need this for now. Now our producer now supposed to be creating messages in Avro format and write these messages into Kafka topics. So let's create this new, new Kafka topic. We don't need this guy actually here let's call it Hobbit Avro and we will provide a name Hobbit Avro here as well. Before I run this application I need to copy one important thing from our Confluent Cloud config. So let's get back to Confluent Cloud and switch into these clusters. My cluster, we go on into clients and Spring boot and now what we can see here we can generate our scheme registry key and the password let's call it a spring Kafka lesson. We're gonna save this continue. So in this case my place holder was replaced with actual values, that's something that I will copy in my in my code, in my configuration. So I'm going to application.properties and somewhere here around these lines I should put this configuration for scheme registry couple things that we put this extra. It's a scheme registry URL. This is the location of our endpoint that is connected to our Confluent Cloud cluster and the some of the authentication properties, basic auth user and the type of credential source. After I modify the code for my Kafka consumer here I also need to change a configuration for my consumer. So in this particular case, my consumer was using the long in string serializer deserializer. So in this case it's going to be using integer deserializer and it will going to be using io.com Confluent.Kafka.seriailizers and the Kafka Avro deserializers. So in this case, my producer will produce data in our format and my consumer will consume data in Avro format. So what I will do here don't forget to disable Kafka streams here because we don't need this for now. We don't, modify this code. And once again, our producer writes data into topic in a Hobbit format, and our consumer also does the same. Alright, so let's run this. And what we start seeing here is our system out printlns, start writing data in Avro format. So let's see if we can see the same data in our topic. I'm going here, topics, Hobbit Avro messages. And voila, now we are able to see something like this. So value would be stored in Avro format. Again, UI is not fully show this. However, we now can see inside our topic in the schema tab we finally can see our schema. We can see the version of the schema. We can defy the schema and so forth and so on. And now you have it in this lesson. You learn how we can use Avro format and how you can connect the cloud schema registry in order to produce and consume some of the binary data and use this for more complex objects that you might have in your applications.
Be the first to get updates and new content
We will only share developer content and updates, including notifications when new content is added. We will never send you sales emails. 🙂 By subscribing, you understand we will process your personal information in accordance with our Privacy Statement.