Enhance your career, get your certificate as a Data Streaming Engineer | Get your Certificate
Hands On: Interacting with ksqlDB


Allison Walther
Integration Architect (Presenter)
Hands On: Interacting with ksqlDB
In this exercise, you will try out the different user interfaces to ksqlDB. The first step is to provision a ksqlDB application on Confluent Cloud.
If you don’t already have a Confluent Cloud account, you can create one by signing up using the promo code 101KSQLDB for $25 of free Confluent Cloud usage (details) (this will cover the time to actively finish the exercises in the course using a Basic Cluster, but make sure to delete your cluster if you are finished with it or aren't using it for a day or so). You can also use the promo code CONFLUENTDEV1 to delay entering a credit card for 30 days.
Provisioning ksqlDB on Confluent Cloud
-
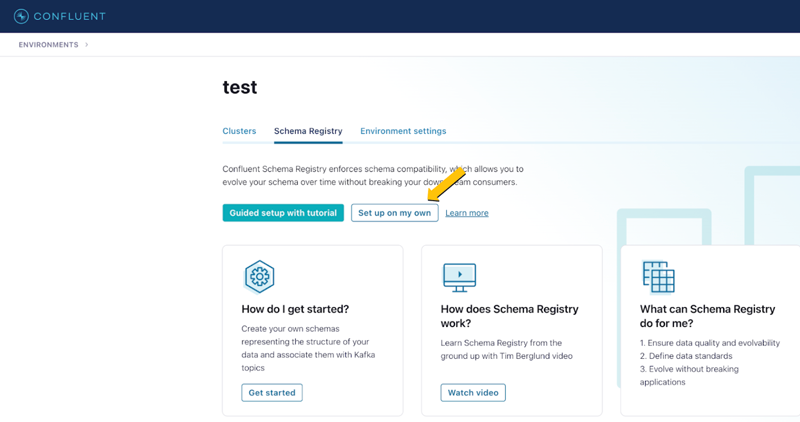
Sign in to Confluent Cloud. We’ll be using Confluent Schema Registry to format our data as Avro—you’ll hear more on this in a later module. For now, we need to enable Schema Registry. From the lower left hand corner, select Schema Registry. On the Schema Registry page, select Set up on my own. Select your preferred cloud region and create the instance.
-
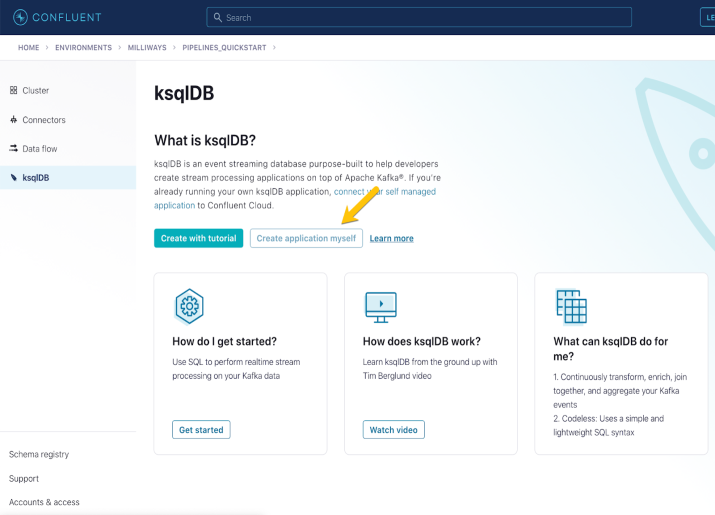
From your cluster’s home page, go to ksqlDB and add a new application. If prompted, select Create application myself.
-
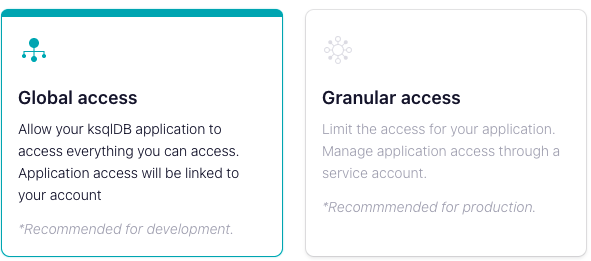
For production use you would always want to use granular access for your ksqlDB applications, but in a development or experimental environment, global access is adequate and easier to set up. So, select Global Access, then click Continue.
-
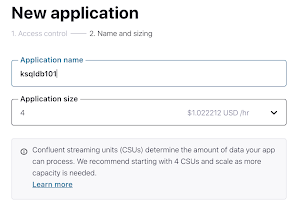
Configure your application’s name as ksqldb101, leave the application size as 4, and select Launch application!
Wait 5 minutes for provisioning to complete.
-
Once the application has finished provisioning, you’re ready to start building some queries!
-
Note that you should make sure to delete your ksqlDB application if you are finished with it or won't be using it for a period of time. To delete, click ksqlDB on the left-hand side menu, then select Delete under Actions. Enter your application's name, then click Continue.


Using ksqlDB on Confluent Cloud
-
In the ksqlDB editor on Confluent Cloud, run the following statement to create a stream called MOVEMENTS:
CREATE STREAM MOVEMENTS (PERSON VARCHAR KEY, LOCATION VARCHAR)
  WITH (VALUE_FORMAT='JSON', PARTITIONS=1, KAFKA_TOPIC='movements');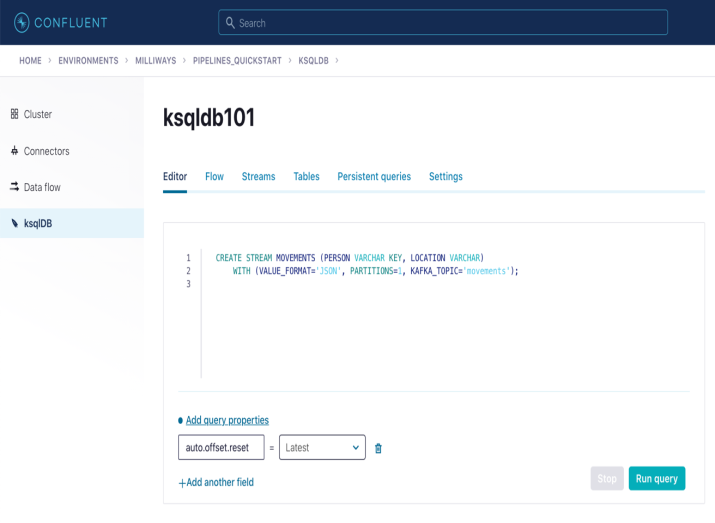
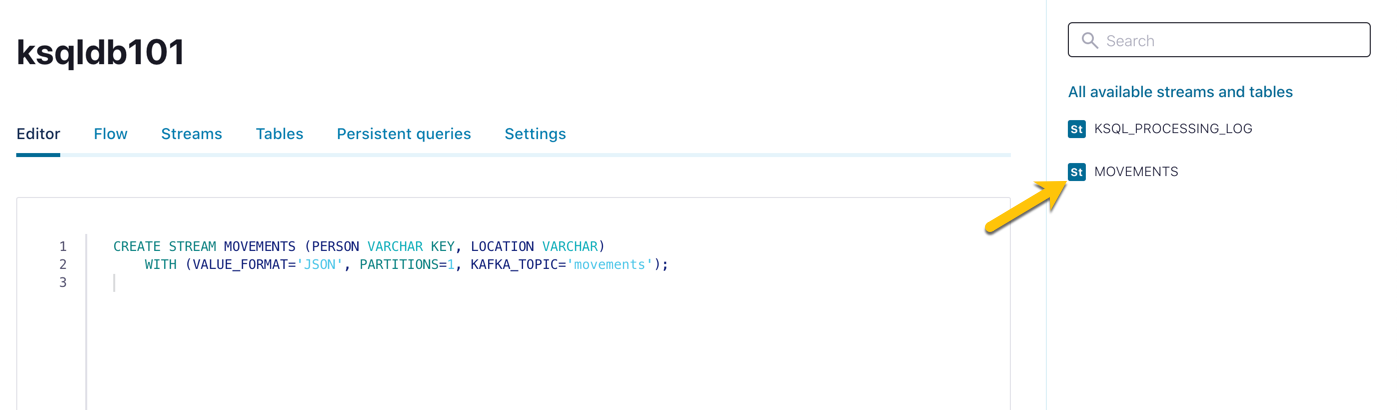
Shortly after you run this statement, a new stream will show up on the right-hand sidebar.
-
Add data to your stream by running these INSERT statements:
INSERT INTO MOVEMENTS VALUES ('Allison', 'Denver'); INSERT INTO MOVEMENTS VALUES ('Robin', 'Leeds'); INSERT INTO MOVEMENTS VALUES ('Robin', 'Ilkley'); INSERT INTO MOVEMENTS VALUES ('Allison', 'Boulder'); -
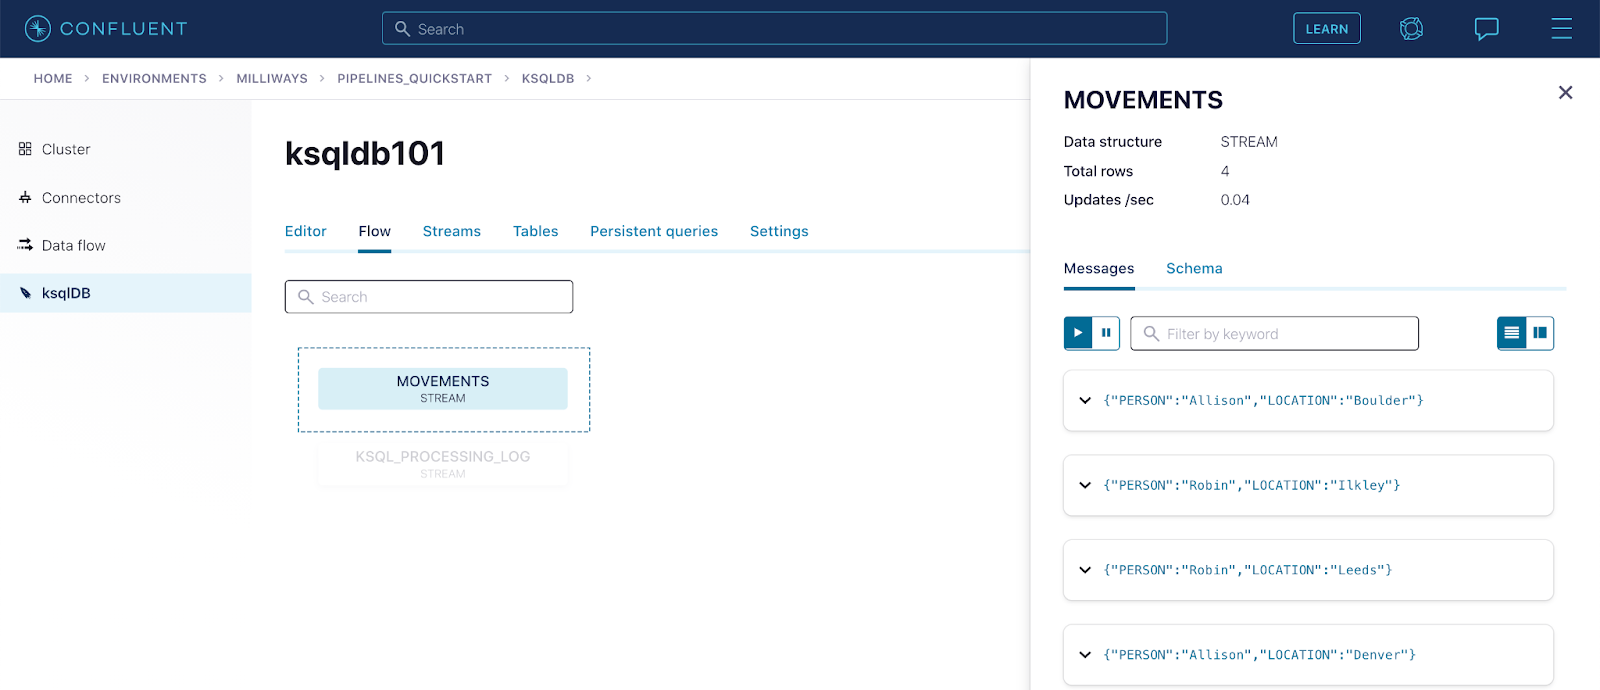
To look at the data in the stream that we’ve populated, click the Flow tab, and then click the Movements stream. The stream will open to the right, and you’ll see the messages in it.


Using the ksqlDB Command Line Interface (CLI)
As well as the web interface seen above, you can use the ksqlDB CLI for interacting with ksqlDB servers (local or on Confluent Cloud). Here we’ll use Docker to simplify access to the CLI, but you can install the binary directly if you prefer. Before getting started with the CLI, you will need to get some details for the ksqlDB application so that we can connect to it.
Obtaining ksqlDB API and Endpoint Details from Confluent Cloud
To obtain the application information, you need the confluent command line tool. Once you’ve installed it, run:
confluent loginIf you have more than one environment, use confluent environment list to list the environments and switch to the relevant environment first. Then run the following command to list out the ksqlDB application(s) that you can access:
confluent ksql cluster listYou’ll see results similar to the following example. Make a note of both the Endpoint and the Id.
       Id      |     Name      | Topic Prefix |   Kafka   | Storage |                       Endpoint                        | Status
+--------------+---------------+--------------+-----------+---------+-------------------------------------------------------+--------+
  lksqlc-92d50 | ksqldb101     | pksqlc-oqy1o | lkc-rxrgk |     500 | https://pksqlc-oqy1o.us-west4.gcp.confluent.cloud:443 | UP
Using the Id value from above, run:
confluent api-key create --resource <<Id>>Make a note of the resulting API Key and Secret.
Connecting to Confluent Cloud ksqlDB from Local CLI
-
Run the ksqlDB CLI from your terminal via Docker Compose. You’ll need the API details and endpoint that you obtained in the previous section.
Copy this text and paste it into a docker-compose.yml file:
---
services:
  ksqldb-cli:
    image: confluentinc/ksqldb-cli:0.17.0
    container_name: ksqldb-cli
    entrypoint: /bin/sh
    tty: true
Now run the following command to load the CLI:
docker compose up -dTo connect the CLI to the ksqlDB application on Confluent Cloud issue this command:
docker exec -it ksqldb-cli ksql -u <<KSQLDB_API_KEY>> -p <<KSQLDB_API_SECRET>> <<KSQLDB_ENDPOINT>>You should see output similar to the following, with the endpoint details shown matching those you supplied:
=========================================== = _ _ ____ ____ = = | | _____ __ _| | _ \| __ ) = = | |/ / __|/ _` | | | | | _ \ = = | <\__ \ (_| | | |_| | |_) | = = |_|\_\___/\__, |_|____/|____/ = = |_| = = The Database purpose-built = = for stream processing apps = =========================================== Copyright 2017-2021 Confluent Inc. CLI v0.18.0, Server v0.18.0-rc14 located at https://pksqlc-oqy1o.us-west4.gcp.confluent.cloud:443 Server Status: RUNNING Having trouble? Type 'help' (case-insensitive) for a rundown of how things work! -
In the ksqlDB CLI, list the streams present in the ksqlDB application:
show streams;You should see the MOVEMENTS stream, since you’re connected to the same ksqlDB application as you were interacting with via the web UI above.
Inserting and Querying Data from the CLI
-
Insert some more data into the stream:
INSERT INTO MOVEMENTS VALUES ('Allison', 'Denver'); INSERT INTO MOVEMENTS VALUES('Robin', 'Leeds'); INSERT INTO MOVEMENTS VALUES ('Robin', 'Ilkley'); -
Let’s now query this data, along with the data that we inserted earlier. Because we want to see all of the data that’s already in the stream, and not just new messages as they arrive, we need to run:
SET 'auto.offset.reset' = 'earliest';Now run the following SELECT to show all of the events in MOVEMENTS:
SELECT * FROM MOVEMENTS EMIT CHANGES;This will continuously provide results until you kill the query by pressing Ctrl-C.
Create a Table
-
Next, create a table:
CREATE TABLE PERSON_STATS WITH (VALUE_FORMAT='AVRO') AS
  SELECT PERSON,
    LATEST_BY_OFFSET(LOCATION) AS LATEST_LOCATION,
    COUNT(*) AS LOCATION_CHANGES,
    COUNT_DISTINCT(LOCATION) AS UNIQUE_LOCATIONS
  FROM MOVEMENTS
GROUP BY PERSON
EMIT CHANGES;
Then run:
show tables;This will verify that the table has been created.
Use the ksqlDB REST API with Postman
Now switch to Postman to try out the ksqlDB REST API, a great way to interact with your ksqlDB applications, whether they are running in Confluent Cloud or are self managed.
Get your endpoint from Settings in Confluent Cloud, then set the verb to POST, paste in your endpoint and add /ksql to the end of the URL.
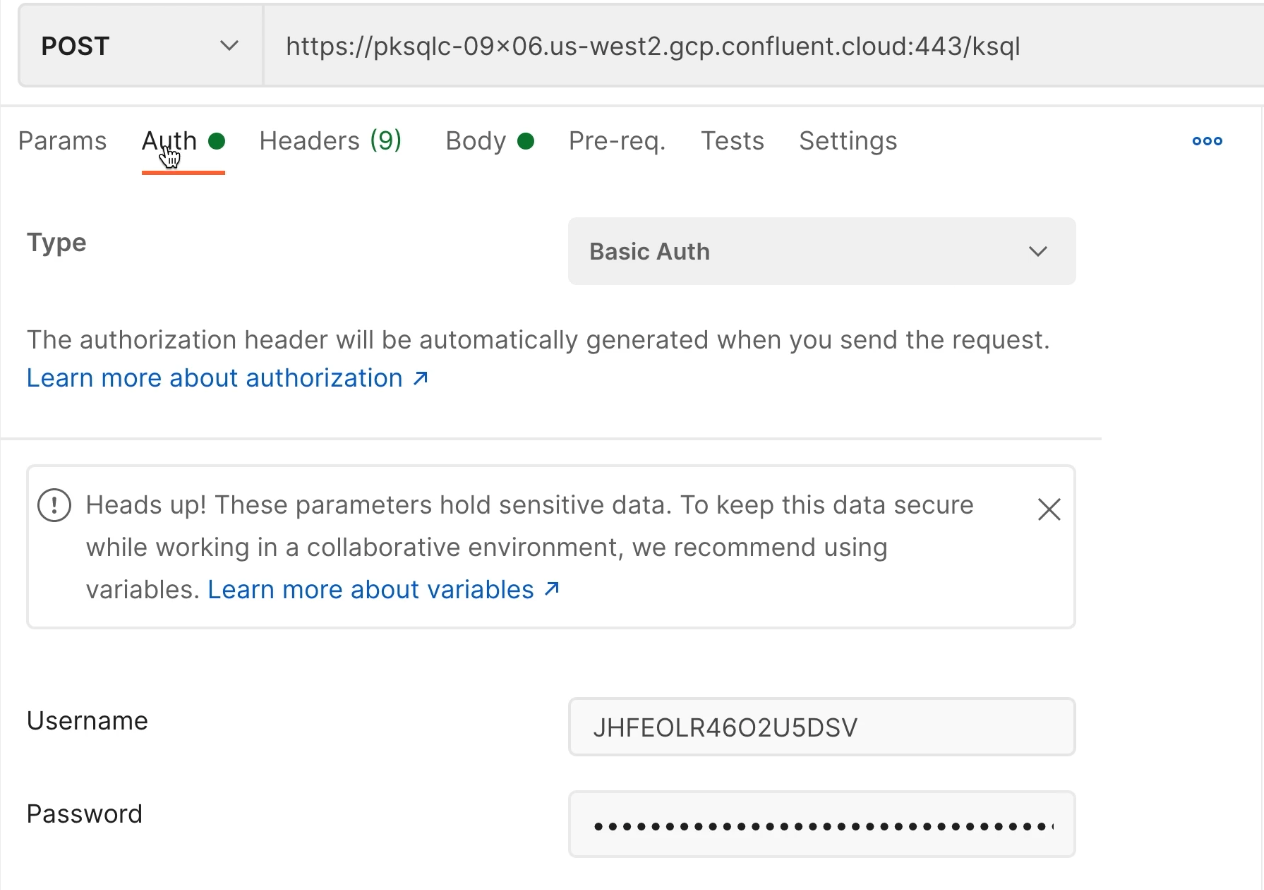
Set Up Auth
-
Under Auth, select Basic Auth and enter your ksqlDB credentials for Confluent Cloud.
-
Under the Body (raw) tab, enter a SHOW STREAMS statement:
{
  "ksql": "show streams;",
  "streamProperties":{}
}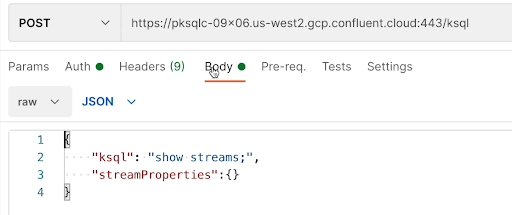
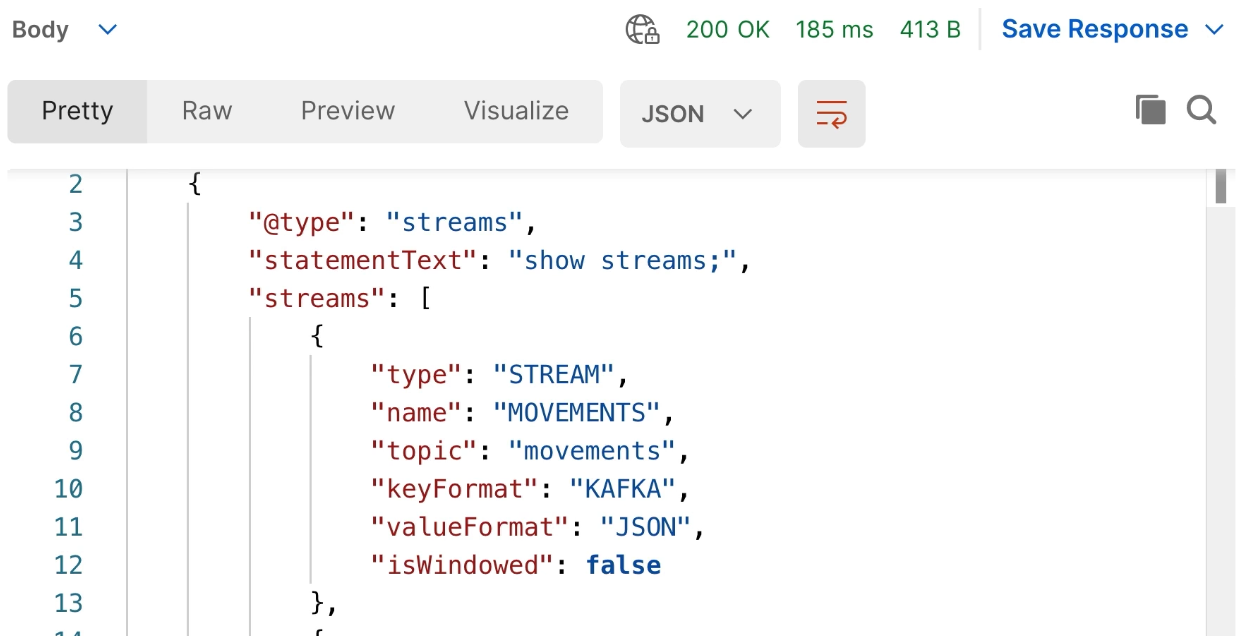
Send the request and then inspect the MOVEMENTS stream in the results.
-
Now SHOW your tables, with a slight change to the payload in the Body tab:
{
  "ksql": "show tables;",
  "streamProperties":{}
}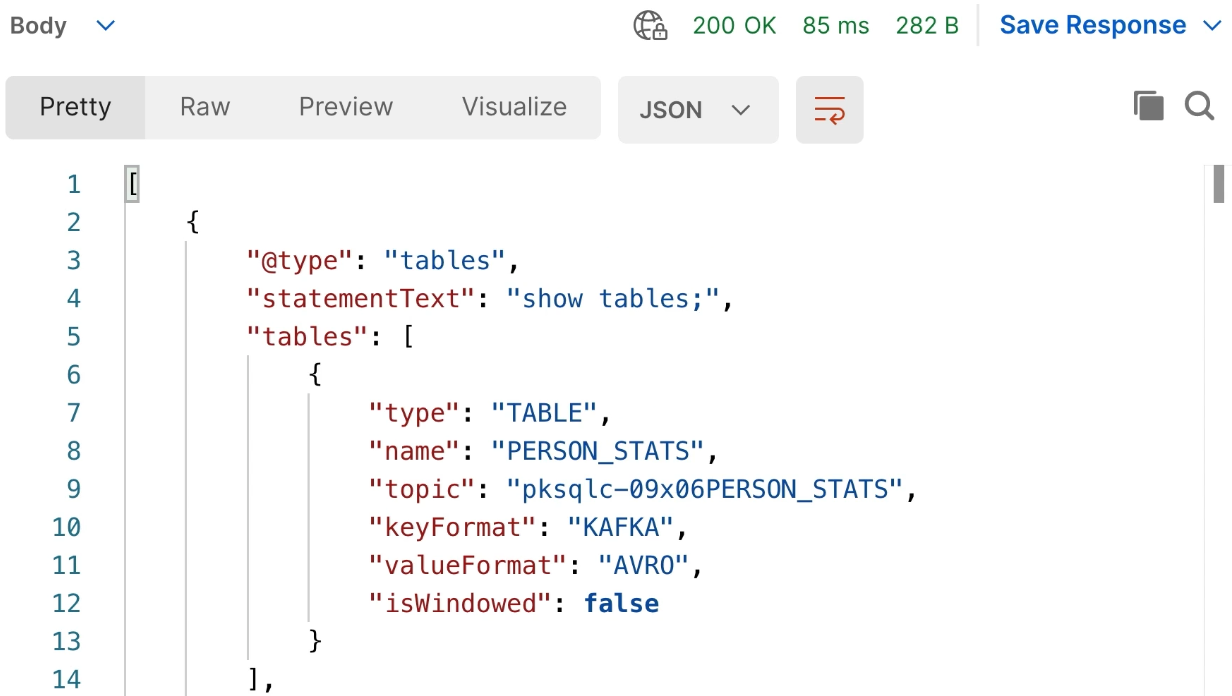


Insert Data
-
Switch tabs to insert some more data into MOVEMENTS:
{
  "ksql": "INSERT INTO MOVEMENTS VALUES('Allison', 'Loveland');",
  "streamProperties":{}
}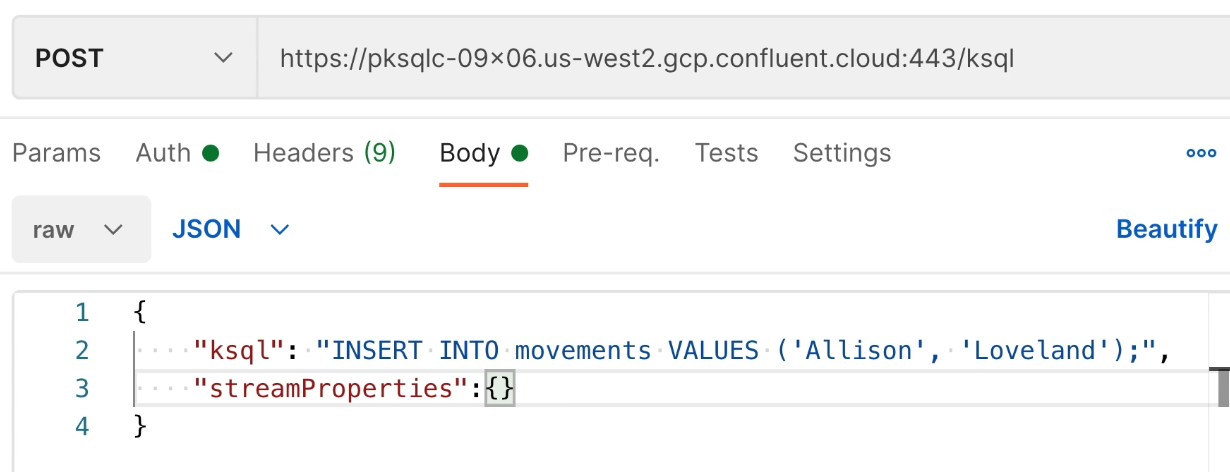

Display the Inserted Data
-
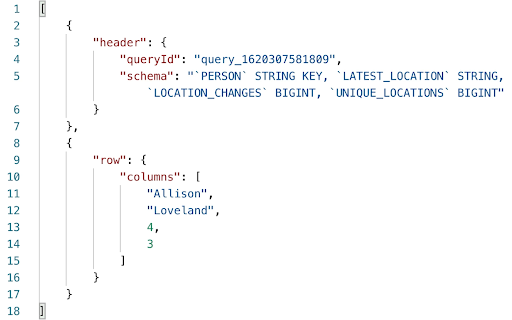
Now run a SELECT statement to see the results of your insert:
{
  "ksql": "SELECT * FROM PERSON_STATS WHERE person ='Allison';",
  "streamProperties":{}
}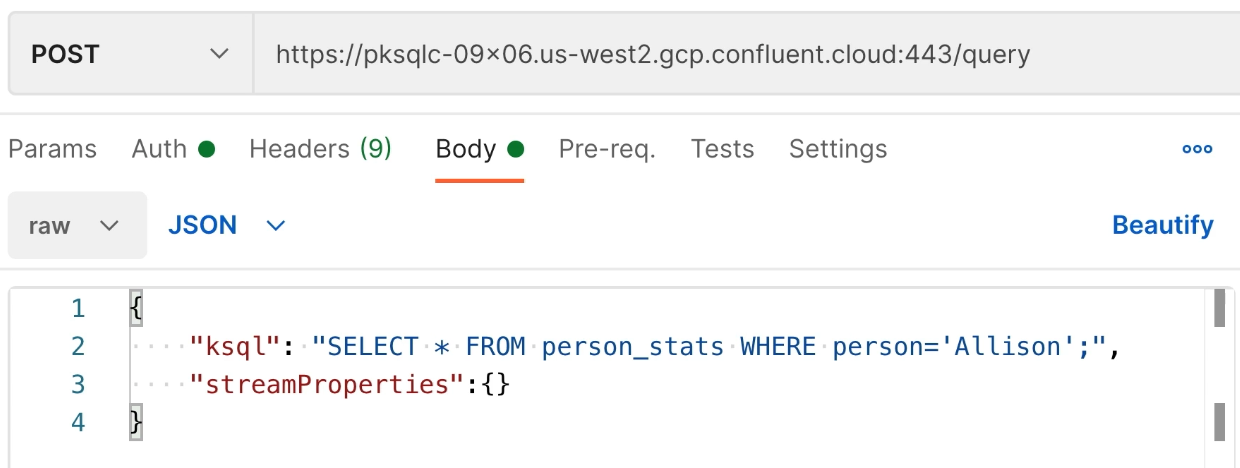
Note that the endpoint for a SELECT statement is query, rather than ksql. Since PERSON_STATS is based on MOVEMENTS, you should see the recently-inserted data in the results.


Use the promo code KSQLDB101 & CONFLUENTDEV1 to get $25 of free Confluent Cloud usage and skip credit card entry.
Hands On: Interacting with ksqlDB
Let's jump into using ksqlDB on Confluent Cloud. First, click the Create On My Own button. You'll land on a new application page where you'll be prompted about global access or granular access. You'll want to click global access for this exercise. And click Continue. You'll land on a new application page and be asked to configure your application name and set the number of streaming units you want for your application. Let's set the name to ksqlDB_demo. Beneath that you should see a streaming units option. But let's just leave it at the default, which is four. Click Launch application. Provisioning can take several minutes. So we'll fast forward to a point where it is provisioned. Our app is provisioned and up and running. So let's go open it. You'll find yourself at an editor tab. This is where we can enter in queries, and run them. Let's start off with creating a stream called Movements. Go ahead and run that query. A new stream should show up on your right-hand side bar. Using the exercise instructions, paste in the insert statements and run the query. What we're doing here is adding data to our stream. Let's move over to the flow tab. The flow tab helps you see what streams, tables, and persistent queries are running in your ksqlDB application. Let's go ahead and click on the Movement stream. You'll see more data shop on the right hand sidebar. Let's go back to our editor tab. Running ksqlDB in Confluent Cloud does help remove some operational complexities. But sometimes, you will want to use a CLI to work with ksqlDB. Let's head over to a terminal window to see what that's like. Using the ksqlDB CLI Here, we'll be running the ksqlDB CLI in Docker, and connecting to Confluent Cloud, specifically our ksqlDB application. Let's look at what our Docker compose file contains. Let's go ahead and cat that out. Next, we'll run Docker-compose-up. Let's switch over to a new tab. Let's enter in this Docker exec command to run the CLI. We're gonna run some CLI commands to start. The CLI should give you some welcome text and then it's ready to go. We'll enter in this query here to show the streams that we have inside of our Confluent Cloud ksqlDB applications. Look, you can see our movement stream. Let's insert some more data into our stream. Go ahead and run this query. Before we select any data from our stream, we need to set the auto offset reset policy to earliest. This means we'll start reading at the very beginning of the stream. With that set, we can now select star from movements and emit changes. This will continuously provide results until we kill the query. Now, let's go ahead and run a create table statement. We can use a similar command as to show streams to show tables. The ksqlDB-CLI is a useful tool, especially for automation. Now we're gonna go ahead and switch over to Postman to use the ksqlDB rest API. Using the ksqlDB REST API Starting in Postman, we'll use the ksqlDB rest API to access our ksqlDB app in Confluent Cloud. Click on the Auth tab, and you'll see the ksqlDB API key and secret. Click on the body tab. You'll see it's loaded with the show stream statement. Now let's go ahead and send this post request and see the movement stream in the results. Now let's switch gears a little bit, and show some tables and send some results to that table. Let's switch tabs and enter an insert statement to insert some more data into our movement stream. We can send the request for this insert statement, which is thus putting data inside of our movement stream. Let's go ahead and switch tabs back over to our select statement. Go ahead and select from the person stats table to see the results of our insert. Since person stats is based on the movement stream that we inserted into, we should see some data come up. In closing, the ksqlDB REST API is a great way to interact with your ksqlDB applications, whether they're running in Confluent Cloud or self-managed.
Be the first to get updates and new content
We will only share developer content and updates, including notifications when new content is added. We will never send you sales emails. 🙂 By subscribing, you understand we will process your personal information in accordance with our Privacy Statement.