Enhance your career, get your certificate as a Data Streaming Engineer | Get your Certificate
Creating a Flink Data Source (Exercise)


Wade Waldron
Principal Software Practice Lead
Creating a Flink Data Source (Exercise)
Note: This exercise is part of a larger course. You are expected to have completed the previous exercises.
In this exercise, we'll start to create a new Flink data stream.
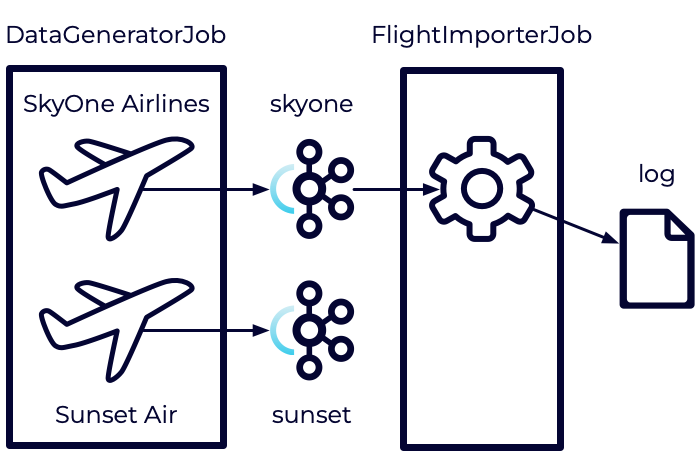
We will be building a new Flink Job known as the FlightImporterJob. This job will eventually be responsible for importing flight data from our skyone and sunset Kafka topics and converting it to a unified format.
However, for the moment, we'll keep it simple. We'll just be reading data from the skyone topic and printing it to a log file. We'll expand on this later.
If you get stuck on this exercise, you can watch me write the code in the following video:
Consume Apache Kafka Messages using Apache Flink and Java
Stage the Exercise
Stage the exercise by executing:
./exercise.sh stage 08Create a Consumer Config
The first step is to create a consumer configuration to read from Kafka. The simplest way to do this is to copy from the producer.properties.
- Create a new file: src/main/resources/consumer.properties.
- Copy the configuration from src/main/resources/producer.properties.
Create the Flight Importer Job
Next, let's create the job that will consume our skyone topic.
-
Create a new java package in src/main/java named flightimporter.
-
Add a new class to the flightimporter package named FlightImporterJob.
-
Define a main method in the class to create an entry point for the job.
-
Import the following:
import org.apache.flink.api.common.eventtime.WatermarkStrategy;
import org.apache.flink.api.common.serialization.SimpleStringSchema;
import org.apache.flink.connector.kafka.source.KafkaSource;
import org.apache.flink.connector.kafka.source.enumerator.initializer.OffsetsInitializer;
import org.apache.flink.streaming.api.datastream.DataStream;
import org.apache.flink.streaming.api.environment.StreamExecutionEnvironment;

import java.io.InputStream;
import java.util.Properties;
- Hint: Have a look at the DataGeneratorJob.
Create the Stream Execution Environment
Our data stream is going to require an execution environment as well as access to our consumer configuration.
- In the main method we defined above, create a StreamExecutionEnvironment
- Load the consumer.properties.
- Hint: Have a look at the DataGeneratorJob.
Create a Kafka Source
We will be reading our data from the skyone Kafka topic. This requires us to create a KafkaSource.
- Use a KafkaSource.builder to create a new KafkaSource<String>.
- Call setProperties and pass it the consumer configuration.
- Call setTopics and pass it the name of the topic it will consume.
- Call setStartingOffsets and pass it OffsetsInitializer.latest() so that it starts consuming from the end of the topic.
- Note: We're ignoring older records for simplicity. However, in a production application, you might want to start consuming from the beginning of the topic using earliest.
- Call setValueOnlyDeserializer and give it a new SimpleStringSchema.
- Call build to create the KafkaSource.
Use the Kafka Source to create a Data Stream
We'll be using our KafkaSource to create a new DataStream.
-
Use fromSource on the StreamExecutionEnvironment to create a new DataStream<String> with the following parameters:
- Your KafkaSource from above.
- WatermarkStrategy.noWatermarks().
- A name for the source (eg. "skyone_source").
Print and Execute the Stream
For now, we are just going to print the data from our stream to a log file.
- Call the print method on the DataStream.
- Call execute on the StreamExecutionEnvironment and pass it a name for the job (eg. "FlightImporter").
Execute the Job
If you look inside the pom.xml file for the project, you will find a line like the following:
<mainClass>datagen.DataGeneratorJob</mainClass>This indicates that the DataGeneratorJob is the main entry point for the application. However, we have now created a second possible entry point (The FlightImporterJob).
This means that if we want to run our DataGeneratorJob we'll need to be more specific. We can use the -c flag on the flink run command to specify our entry point.
-
If it's not already running, make sure to start your Flink cluster.
-
Build and package the jar file:
mvn clean package -
Execute the DataGeneratorJob:
<flink_installation_path>/bin/flink run target/travel-itinerary-0.1.jaror
../flink*/bin/flink run target/travel-itinerary-0.1.jar -
Execute the FlightImporterJob:
<flink_installation_path>/bin/flink run -c flightimporter.FlightImporterJob target/travel-itinerary-0.1.jaror
../flink*/bin/flink run -c flightimporter.FlightImporterJob target/travel-itinerary-0.1.jar
Note: During this process you may encounter errors such as:
WARNING: An illegal reflective access operation has occurredThese are common when working with Flink and Java 21 and you can feel free to ignore them.
Note: We have provided the start-datagen.sh and start-flightimporter.sh shell scripts to make this a little easier.
Inspect the Logs
Once the jobs are both running, check the logs to make sure the data is being printed as expected. Finding the right log file can be a little tricky.
-
Navigate to localhost:8081 in a browser.
-
Select Job Manager from the left.
-
Select Log List from the top.
-
Sort the Log List by Last Modified Time in Descending order (newest first).
-
Click on the first .out file.
Note: It make take a moment for the file to show up. Try reloading the page if you don't see it.
This represents the most recently modified output file from our jobs. Assuming that we are printing logs on every message, the most recently modified output file should contain the logs we are looking for. You should see a series of JSON entries similar to:
{"emailAddress":"NBPEY@email.com","flightDepartureTime":"2023-05-04T18:38:00.000Z","iataDepartureCode":"FLL","flightArrivalTime":"2023-05-05T02:47:00.000Z","iataArrivalCode":"SLC","flightNumber":"SKY1956","confirmation":"SKY1KTBLZF","ticketPrice":973.0,"aircraft":"AircraftXVR","bookingAgencyEmail":"GASNI@email.com"}Remember to cancel your jobs so they don't use your Confluent Cloud credits.
Finish
This brings us to the end of this exercise.
Use the promo codes FLINKJAVA101 & CONFLUENTDEV1 to get $25 of free Confluent Cloud usage and skip credit card entry.
Be the first to get updates and new content
We will only share developer content and updates, including notifications when new content is added. We will never send you sales emails. 🙂 By subscribing, you understand we will process your personal information in accordance with our Privacy Statement.