Enhance your career, get your certificate as a Data Streaming Engineer | Get your Certificate
Running a Flink Job (Exercise)


Wade Waldron
Principal Software Practice Lead
Running a Flink Job (Exercise)
Note: This exercise is part of a larger course. You are expected to have completed the previous exercises.
In this exercise, we'll run our first Flink job.
We are working in a domain that handles airline flight data. Imagine it as a travel itinerary that imports flight data from various sources and creates new views of that data. In particular, we'll be working with the fictional airlines "Sunset Air" and "Sky One Airlines".
This is a rough outline of the system we are building:
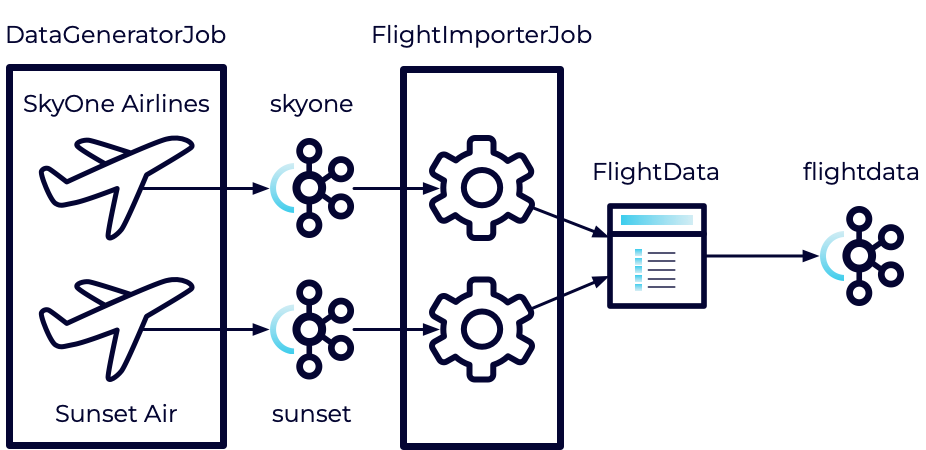
The DataGeneratorJob has already been created. It will be used to generate fake flight data for each of these airlines. It will then push the data to Kafka topics. This is where we will focus this exercise.

In later exercises, we'll implement the other parts of the pipeline where we consume and transform the feeds.
Stage the Exercise
The code repository you set up in the first exercise includes the following folders:
- exercises - This is where you will do the majority of your work.
- solutions - Contains the solution files for each exercise. Use these for reference if you get stuck.
- staging - Contains source files needed for each exercise (you can ignore this folder).
The exercises folder contains a utility script:
- exercise.sh - Used to move between exercises on Mac/Linux.
To start with, we want to stage the current exercise. This will load any code required for the exercise. Run the following command:
cd exercises
./exercise.sh stage 05
If at any point, you wish to automatically solve the exercise, you can execute:
./exercise.sh solve <exercise-id>You can also copy individual solution files by executing:
./exercise.sh solve <exercise-id> <filename>Note: Exercises are numbered with their absolute position in the course (including lecture videos). That's why this exercise is numbered 05.
Create the Kafka Topics
Each of our airlines will be pushing data to a separate topic. Let's create those topics.
- In Confluent Cloud, navigate to the building-flink-applications-in-java environment and select your Kafka cluster.
- In the menu on the left, click Topics.
- Click Create Topic.
- Create a new topic named skyone with the default settings.
- When you are asked if you want to define a data contract you can choose Skip.
- Now repeat this for another topic named sunset.
Command Line Reference
You can create these topics from the command line using the following:
confluent kafka topic create skyone --cluster <ClusterID>  --environment <EnvironmentID>
confluent kafka topic create sunset --cluster <ClusterID>  --environment <EnvironmentID>
Configure the Producer
Our data generator is going to need access to our Kafka cluster so we will need to add some configuration.
-
In Confluent Cloud, navigate to your Kafka cluster and then select Connectors on the left.
-
Using the search box, look for Java, then click Connect with Java.
-
You will be presented with a set of Java configuration values. Copy the configuration.
-
In exercises/src/main/resources create a new file named producer.properties.
-
Paste the Java configuration into the file.
-
Replace the values of {{ CLUSTER_API_KEY }} and {{ CLUSTER_API_SECRET }} with the API key and secret that you created in the previous exercise.
- NOTE: The API key and secret will need to be enclosed in 'single quotes'
-
Delete the following configuration entries (we won't be using them):
- schema.registry.url
- basic.auth.credentials.source
- basic.auth.user.info
-
Save the file.
Run the Job
With the configuration in place, we are ready to run the job.
Note: Before running the job, make sure you have a Flink instance running as outlined in the previous exercise.
-
From inside the exercises folder, build and package the job:
mvn clean package -
Run the job:
<flink_installation_path>/bin/flink run target/travel-itinerary-0.1.jaror
../flink*/bin/flink run target/travel-itinerary-0.1.jar -
Locate the skyone and sunset topics in Confluent Cloud. Click on the Messages tab for each topic. If everything is working, you should see each of the messages being produced.
Note: for convenience, we have provided a small shell script named start-datagen.sh. The script will package the job and run it. Feel free to use the script in future exercises.
Inspect the Job
Next, we'll take a look at the running job in the Flink UI.
- In a browser, navigate to http://localhost:8081/#/overview.
- In the Overview you should see a running job named InputStreams. Click on it.
- This will take you to a visualization of the job where you can see the two data streams that are running.
- You will also see metrics for each of the sources and sinks in your stream.
- You may not see values in the Bytes Sent or Bytes Received. These fields represent bytes being sent internally between stream components. However, our streams are built into a single component and no data passes between them.
- This does not mean that data isn't being sent to Kafka.
Cancel the Job
Now let's see how to cancel the job.
Note: When you run the job from your terminal, it should run in the foreground. However,
-
Through the Flink UI this is easy. Simply select the job and click the Cancel Job link in the top right corner.
-
Through the command line you will need the JobID. This is provided when you run the job. Alternatively, you can see all running jobs by executing:
<flink_installation_path>/bin/flink listor
../flink*/bin/flink list -
Once you have the JobID, you can cancel it with:
<flink_installation_path>/bin/flink cancel <JobID>or
../flink*/bin/flink cancel <JobID> -
Go ahead and cancel the job using whichever option you prefer.
Note: When you cancel the job you may see a JobCancellationException. This is normal and can be ignored.
-
Verify the job is canceled either through the UI or at the command line (flink list).
Note: Although this Flink job is fairly lightweight, you will want to make sure it is not running if you are not using it, otherwise, it can consume your Confluent Cloud credits.
Finish
This brings us to the end of this exercise.
Use the promo codes FLINKJAVA101 & CONFLUENTDEV1 to get $25 of free Confluent Cloud usage and skip credit card entry.
Be the first to get updates and new content
We will only share developer content and updates, including notifications when new content is added. We will never send you sales emails. 🙂 By subscribing, you understand we will process your personal information in accordance with our Privacy Statement.