Enhance your career, get your certificate as a Data Streaming Engineer | Get your Certificate
Managing State in Flink (Exercise)


Wade Waldron
Principal Software Practice Lead
Managing State in Flink (Exercise)
Note: This exercise is part of a larger course. You are expected to have completed the previous exercises.
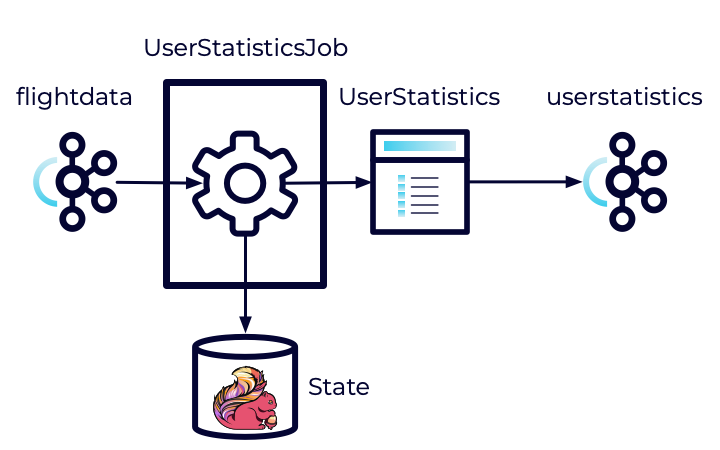
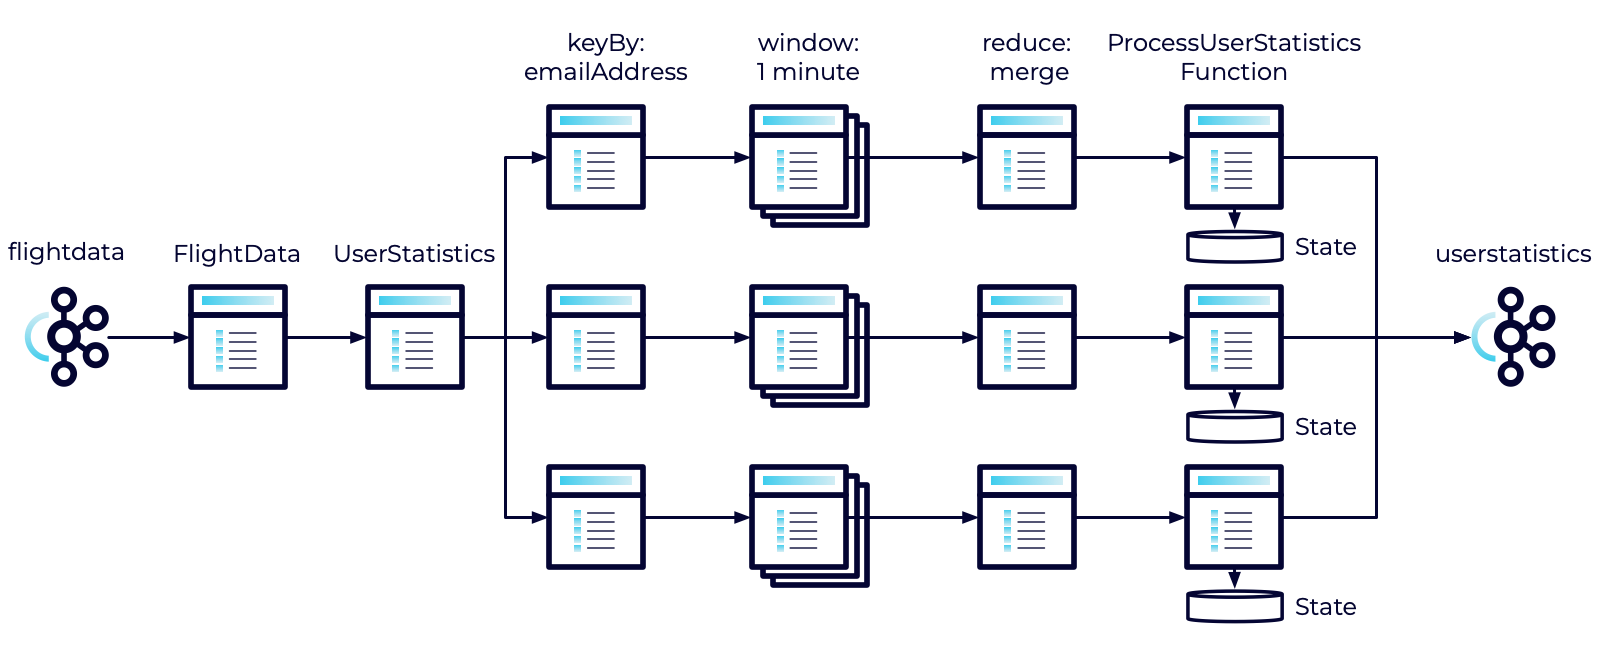
In the previous exercise, we set up a Flink Job to accumulate statistics in a one-minute window. However, each window was independent. The totals did not carry over. What if we wanted a cumulative total reported every minute? How would we achieve that?
In this exercise, we'll introduce stateful operations that will allow us to carry information from one window to the next.
Stage the Exercise
Stage the exercise by executing:
./exercise.sh stage 20Create a ProcessUserStatisticsFunction
Our first step is to define a function that will manage the state across windows. This function will load the previous state, combine it with the state of the current window, and then store the result. This allows us to create a cumulative result.
-
Create a new class in the userstatistics package named ProcessUserStatisticsFunction.
-
Import the following:
import org.apache.flink.api.common.state.ValueState; import org.apache.flink.api.common.state.ValueStateDescriptor; import org.apache.flink.configuration.Configuration; import org.apache.flink.streaming.api.functions.windowing.ProcessWindowFunction; import org.apache.flink.streaming.api.windowing.windows.TimeWindow; import org.apache.flink.util.Collector; import models.UserStatistics; -
Extend ProcessWindowFunction<UserStatistics, UserStatistics, String, TimeWindow>
-
Define a private field of type ValueStateDescriptor<UserStatistics> named stateDescriptor. This provides an identifier (descriptor) for our state storage mechanism.
Define the open method
Our ProcessUserStatisticsFunction will require two methods. The first is the open method. It can be used for any one-time setup we need. We'll use it to initialize the descriptor.
- Override the open method. It takes a single parameter of type Configuration and returns void.
- Implement the open method as follows:
- Initialize the stateDescriptor with a new ValueStateDescriptor. It takes two parameters:
- A name - Use User Statistics.
- A type - Use UserStatistics.class.
- Call open on the superclass.
- Initialize the stateDescriptor with a new ValueStateDescriptor. It takes two parameters:
Define the process method
The next method we need is the process method. It will load our previous state, combine it with the latest window, and save and emit the result.
-
Override the process method. It should take the following parameters and return void:
- A String - The key for the record. In our case, the email address.
- A ProcessWindowFunction<UserStatistics, UserStatistics, String, TimeWindow>.Context - We will use this to load our state.
- An Iterable<UserStatistics> - Contains a list of statistics accumulated in the window.
- A Collector<UserStatistics> - Used to collect (and emit) the results.
-
Implement the function as follows:
- Define a variable of type ValueState<UserStatistics>. Initialize it by calling context.globalState().getState and passing it the stateDescriptor.
- Define a variable of type UserStatistics and initialize it by calling value on the ValueState object you just obtained. This represents the previous state.
- Note: If there was no previous state, then this will be null. Make sure to handle the null case.
- Loop through each of the UserStatistics in the Iterable defined in the method signature.
- Merge the previous state with the new state from the list and store the result.
- Continue until you've merged all of the states.
- Call update on the ValueState object and pass it the newly computed state. This will ensure that your computed state can get carried through to the next window.
- Use the Collector to collect the newly computed state. This will emit the current value into the output stream.
Note: If you look at the logic for what we've just implemented, it's basically the same as the reduce that we implemented previously. I.E. it's taking the previous state, merging it with the new state, and emitting the result. The difference here is that the state we combine it with is being persisted across windows. We'll discuss this in a little more detail shortly.
Use the ProcessUserStatisticsFunction
Now that we've defined our function, let's put it to work.
-
Open the UserStatisticsJob.
-
Locate the call to reduce.
-
reduce takes two parameters.
- A function to reduce two elements in the stream.
- An optional ProcessWindowFunction. Create a new instance of the ProcessUserStatisticsFunction for this parameter.
At this point, you might ask why we don't just eliminate the reduce completely and call process with our ProcessUserStatisticsFunction. It is essentially doing the same thing. And in fact, if you did that, all of your tests would pass and you'd get the right behavior.
However, using process in this case isn't optimized. It accumulates all of the results for a window into a single Iterable. Depending on the size of the window, and the size of the data, that could take a lot of memory.
On the other hand, the reduce function can continuously process the messages in the window. Each time we receive a new message we can call reduce and only keep track of the result. This means that we only ever need to store at most two UserStatistics objects and by the time we call the ProcessUserStatistics function, we'll have already reduced the messages in the window to a single record. As such, when we call the function, even though it operates on an array, that array will only contain a single element. This is much more memory efficient.
However, always consider your use case. If the size of the data and the size of the window are small, the extra efficiency may not be worth the increase in code complexity.
Run All Tests
As always, you can run the tests to verify your application is behaving as expected.
mvn clean testExecute the Jobs
Execute each of the jobs.
- Build and package the jar file:
- Execute the DataGeneratorJob.
- Execute the FlightImporterJob.
- Execute the UserStatisticsJob.
Note: Feel free to use the start-datagen.sh, start-flightimporter.sh, and start-userstatistics.sh shell scripts here.
Inspect the Messages
Inspect the messages in Confluent Cloud.
- Navigate to the userstatistics topic.
- Select the Messages tab.
As before you should begin to see messages appear after about a 1 minute period. The difference is that the totals in these messages should grow over time. So the first minute, you might have low numbers, but as each successive window passes, you should start to see those numbers grow.
Note: You can enter a single email address into the filter box. This will allow you to watch that email address and see how it grows over time. Just pick any of the email addresses you can see. However, be aware that it may not display the results in order. You'll need to compare timestamps.
Finish
This brings us to the end of this exercise.
Use the promo codes FLINKJAVA101 & CONFLUENTDEV1 to get $25 of free Confluent Cloud usage and skip credit card entry.
Be the first to get updates and new content
We will only share developer content and updates, including notifications when new content is added. We will never send you sales emails. 🙂 By subscribing, you understand we will process your personal information in accordance with our Privacy Statement.