Enhance your career, get your certificate as a Data Streaming Engineer | Get your Certificate
Creating a Flink Data Sink (Exercise)


Wade Waldron
Principal Software Practice Lead
Creating a Flink Data Sink (Exercise)
Note: This exercise is part of a larger course. You are expected to have completed the previous exercises.
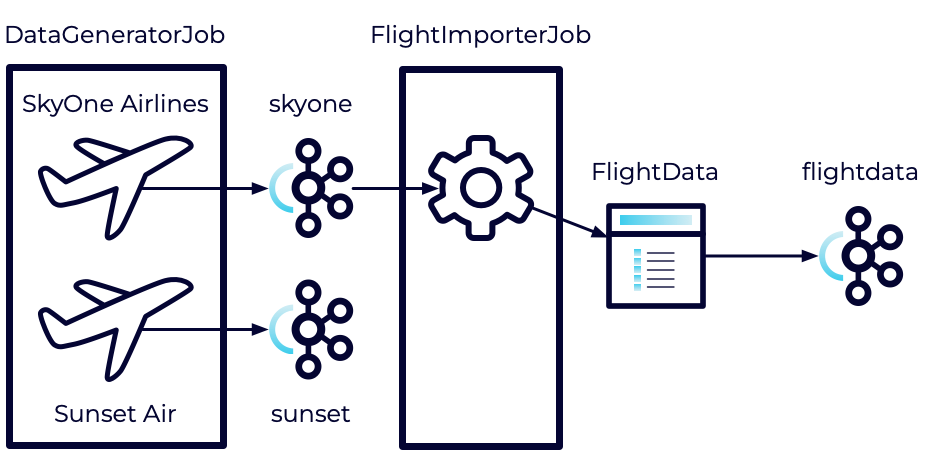
Now that we have our data transformed into the desired format, in this exercise we'll push that data to another Kafka topic through a Sink.
Our data has been transformed from the Sky One Airlines format into our own internal FlightData format. At the same time, we filtered out any stale records. However, those records are currently just being dumped into a log file where they aren't very useful.
To resolve this, we'll be creating a new flightdata topic in Kafka and pushing our records to it. This will require us to create a KafkaSink as well as a Serializer for the records.
Stage the Exercise
Stage the exercise by executing:
./exercise.sh stage 14Create the Topic
We'll be pushing our data to the flightdata topic, so let's go ahead and create that.
- In Confluent Cloud, create a new topic named flightdata.
- Use the default settings.
Import the Producer Configuration
Our KafkaSink will require access to a producer configuration. We already created one in a previous exercise so we can re-use it as is.
-
Open the FlightImporterJob class.
-
Add the following imports:
import org.apache.flink.connector.kafka.sink.KafkaRecordSerializationSchema; import org.apache.flink.connector.kafka.sink.KafkaSink; import org.apache.flink.formats.json.JsonSerializationSchema; import org.apache.flink.shaded.jackson2.com.fasterxml.jackson.databind.ObjectMapper; import org.apache.flink.shaded.jackson2.com.fasterxml.jackson.datatype.jsr310.JavaTimeModule; -
After loading the consumer.properties also load the producer.properties.
Hint: You can load the configuration the same way you did with the consumer.
Note: In a production application, we wouldn't share our configuration files between applications. Each application would have its own configuration. This would allow each application to have different values for settings such as group.id and client.id. If you want a more realistic experience, consider creating separate producer.properties and consumer.properties files for each job.
Create a Serializer
Next, we need a way to configure a serializer for our data.
- In the FlightImporter, before calling defineWorkflow use the KafkaRecordSerializationSchema.<T>builder() method to create a new builder of type <FlightData>.
- Call the setTopic method on the builder and provide the name of the topic you created above.
- Call the setValueSerializationSchema and pass a new JsonSerializationSchema<FlightData>.
- Provide a factory method that returns a new ObjectMapper.
() -> { return new ObjectMapper(); } - Inside the factory method, call registerModule on the ObjectMapper and provide it with a new JavaTimeModule().
- Note: The factory method is necessary because the JavaTimeModule is not serializable.
- Provide a factory method that returns a new ObjectMapper.
- Call the build method on the builder to create a KafkaRecordSerializationSchema<FlightData> and store the result in a variable.
Create a Kafka Sink
In addition to the serialization schema, we also need a KafkaSink. This is the endpoint we will use to push our data to Kafka.
- After we created our serializer, and before calling defineWorkflow, use the KafkaSink.<T>builder() to create a new builder of type FlightData.
- Call setKafkaProducerConfig on the builder and pass it the producer properties we loaded above.
- Call setRecordSerializer on the builder and pass the serializer we created above.
- Call the build method on the builder to create a `KafkaSink
and store the result in a variable.
Connect the Sink to the Stream
Finally, we need to connect our Sink to our Stream.
- Instead of calling .print on the result of defineWorkflow, call sinkTo and pass the KafkaSink created above.
- After calling sinkTo, call name to give this portion of the stream a name such as "flightdata_sink".
Run All Tests
No new tests were brought in for this exercise. However, it's a good practice to run the tests anyway just to verify we haven't broken anything.
mvn clean testExecute the Jobs
- Build and package the jar file:
- Execute the DataGeneratorJob.
- Execute the FlightImporterJob.
Note: Feel free to use the start-datagen.sh and start-flightimporter.sh shell scripts here.
Inspect the Messages
Inspect the messages in Confluent Cloud to verify that everything is working correctly.
- Navigate to the flightdata topic in Confluent Cloud.
- Select the Messages tab.
- Watch to see that you are receiving messages from your Flink application.
You should see messages that look something like this:
{
  "emailAddress": "PKPNF@email.com",
  "departureTime": "2023-11-02T03:04:00.000Z",
  "departureAirportCode": "BNA",
  "arrivalTime": "2023-11-02T11:26:00.000Z",
  "arrivalAirportCode": "ATL",
  "flightNumber": "SKY1467",
  "confirmationCode": "SKY1DOYDFB"
}
Finish
This brings us to the end of this exercise.
Use the promo codes FLINKJAVA101 & CONFLUENTDEV1 to get $25 of free Confluent Cloud usage and skip credit card entry.
Be the first to get updates and new content
We will only share developer content and updates, including notifications when new content is added. We will never send you sales emails. 🙂 By subscribing, you understand we will process your personal information in accordance with our Privacy Statement.